 35187
35187
Scale: 1:35
Media: Resin, photo-etch brass, braided copper wire, waterslide decals
Review kit supplied by Perfect Scale Modellbau.
Reviewed by Jason Bobrowich.
Photos credited where sources known
Highs
Mediums
Lows
Conclusion
Highly recommended. A high-quality resin kit that can depict of variety of Canadian Badger AEV deployment options.
The Bundeswehr Pionierpanzer 2 Dachs is a purpose designed Armoured Engineering Vehicle (AEV). Developed during the Cold War, the Dachs provided Combat Engineer support for deliberate breaches of defensive obstacles such as anti-tank ditches, preparing waterways for AFV crossings, vehicle recovery tasks (towing and winching), load lifting, and obstacle removal. The Bundeswehr Dachs were converted from both the Pionierpanzer 1s and Bergepanzer 2 already in Bundeswehr service. The Dachs is an ominous Leopard-based support vehicle equipped with a massive telescoping excavator arm with bucket, an integrated dozer blade, on board cutting and welding equipment, an internally mounted winch, and equipped for sustained deep fording and underwater operations.

Bundeswehr Dachs AEV (Dish Models)
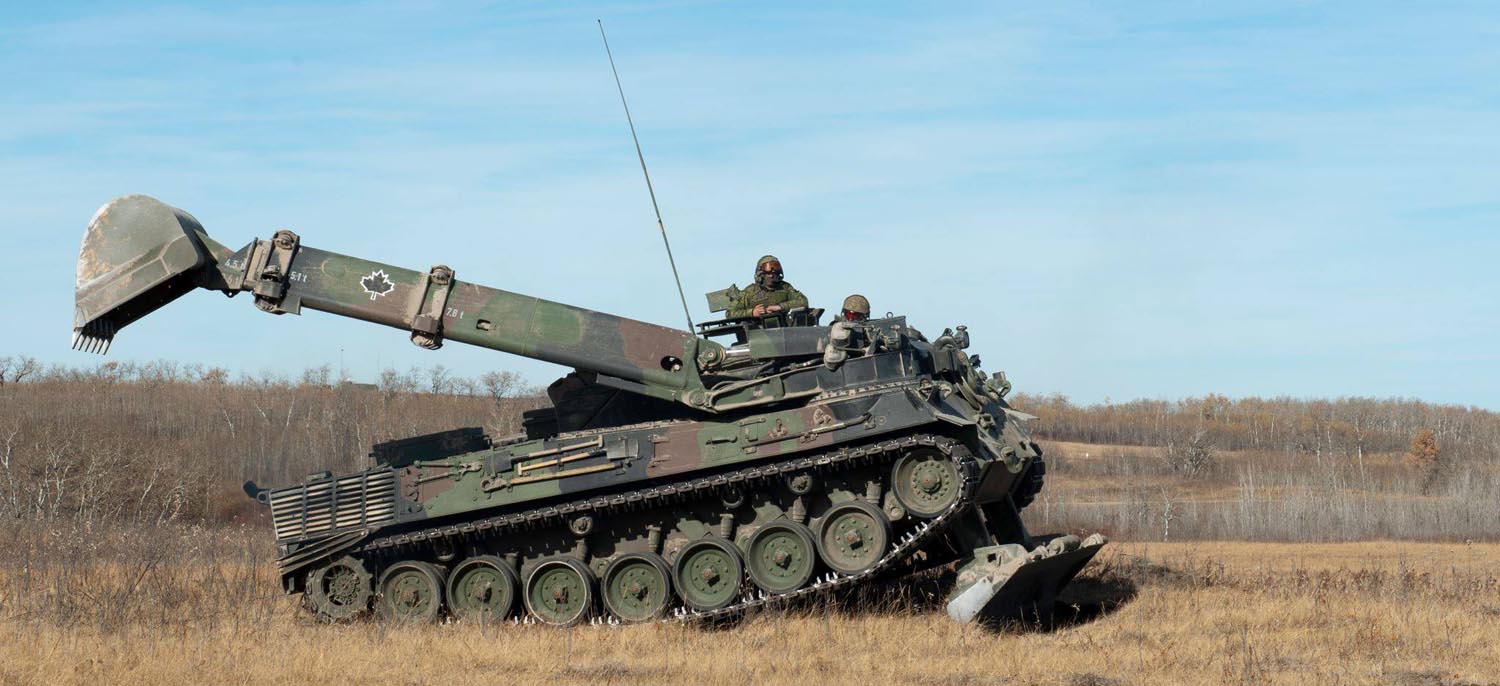
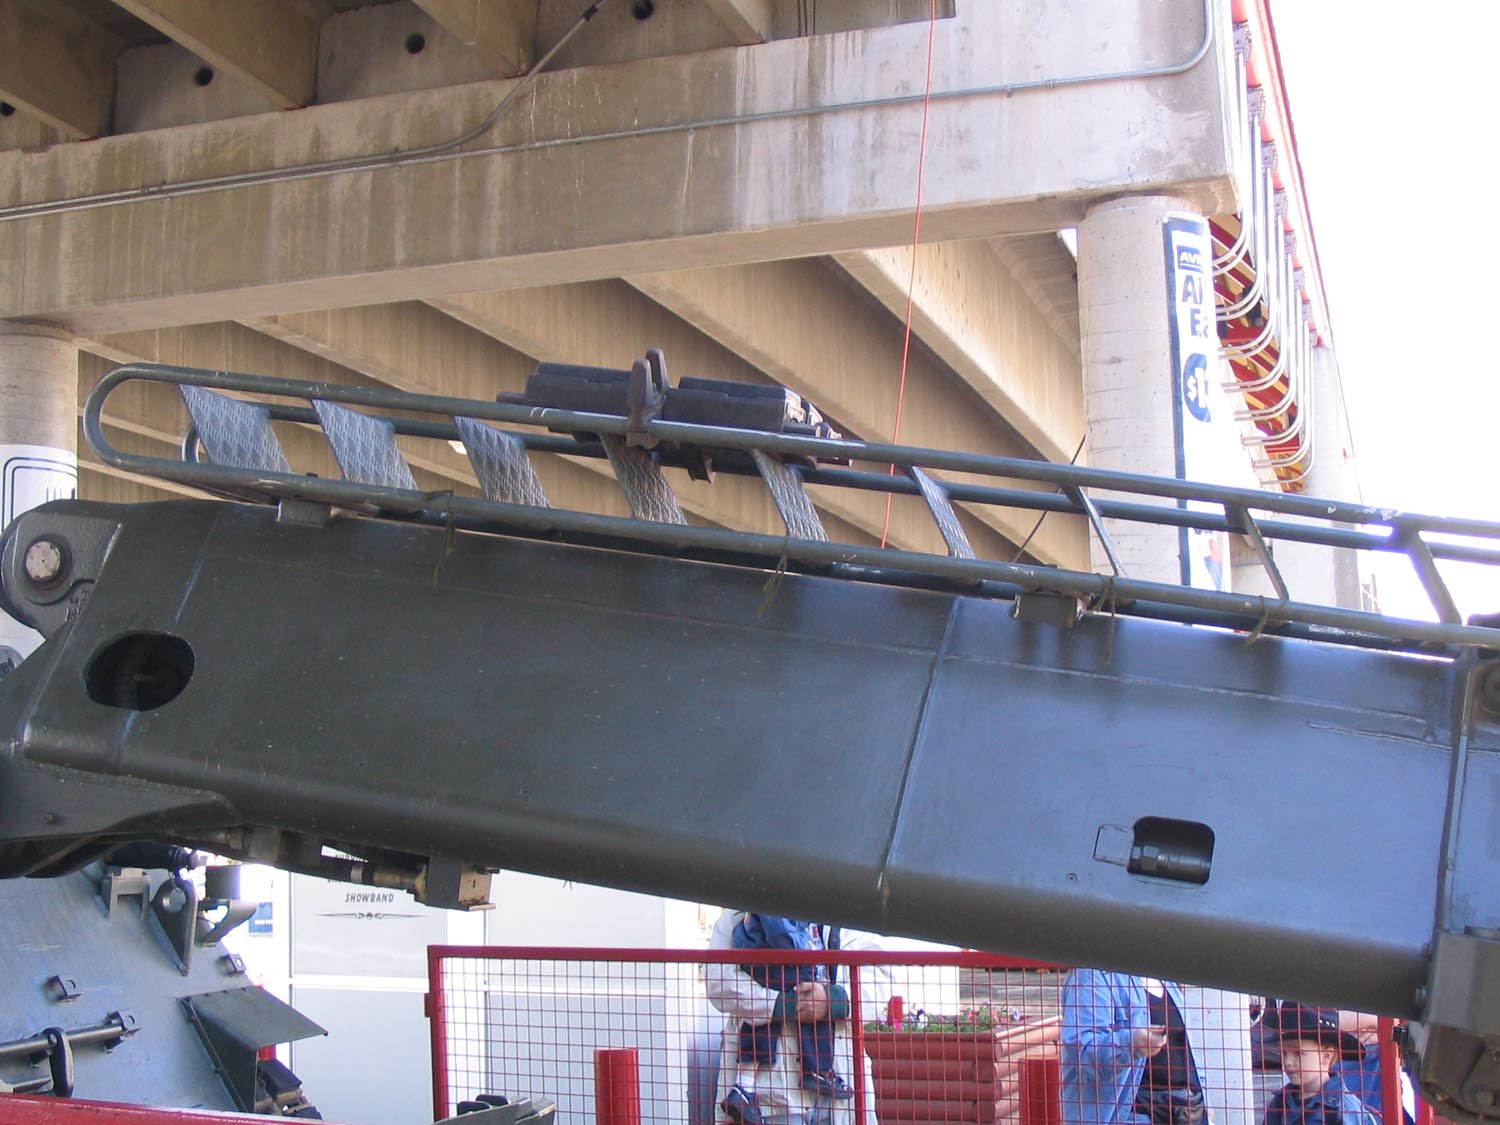
The Canadian Badger AEV is based on the German Pionierpanzer 2 Dachs. A total of nine Canadian Badgers were purchased in the early 1990s. The Canadian Badgers were all new builds and not converted from existing vehicles. The Canadian Badgers included modifications such as a robust ladder attached to the excavator arm, the reintegration of the ball mount machine gun, a C6 GPMG on the Commander's cupola, and a brush guard for the grenade dischargers. Some Badgers also mounted additional stowage boxes on the excavator arm. A tubular fascine rack could also be mounted on the back deck for carrying fascine rolls over extended distances. Over time the original volute suspension dampers were replaced partially or in whole by hydraulic versions. In the late 1990s, the Badgers were fitted with MEXAS attachment points in order to mount the MEXAS modules.
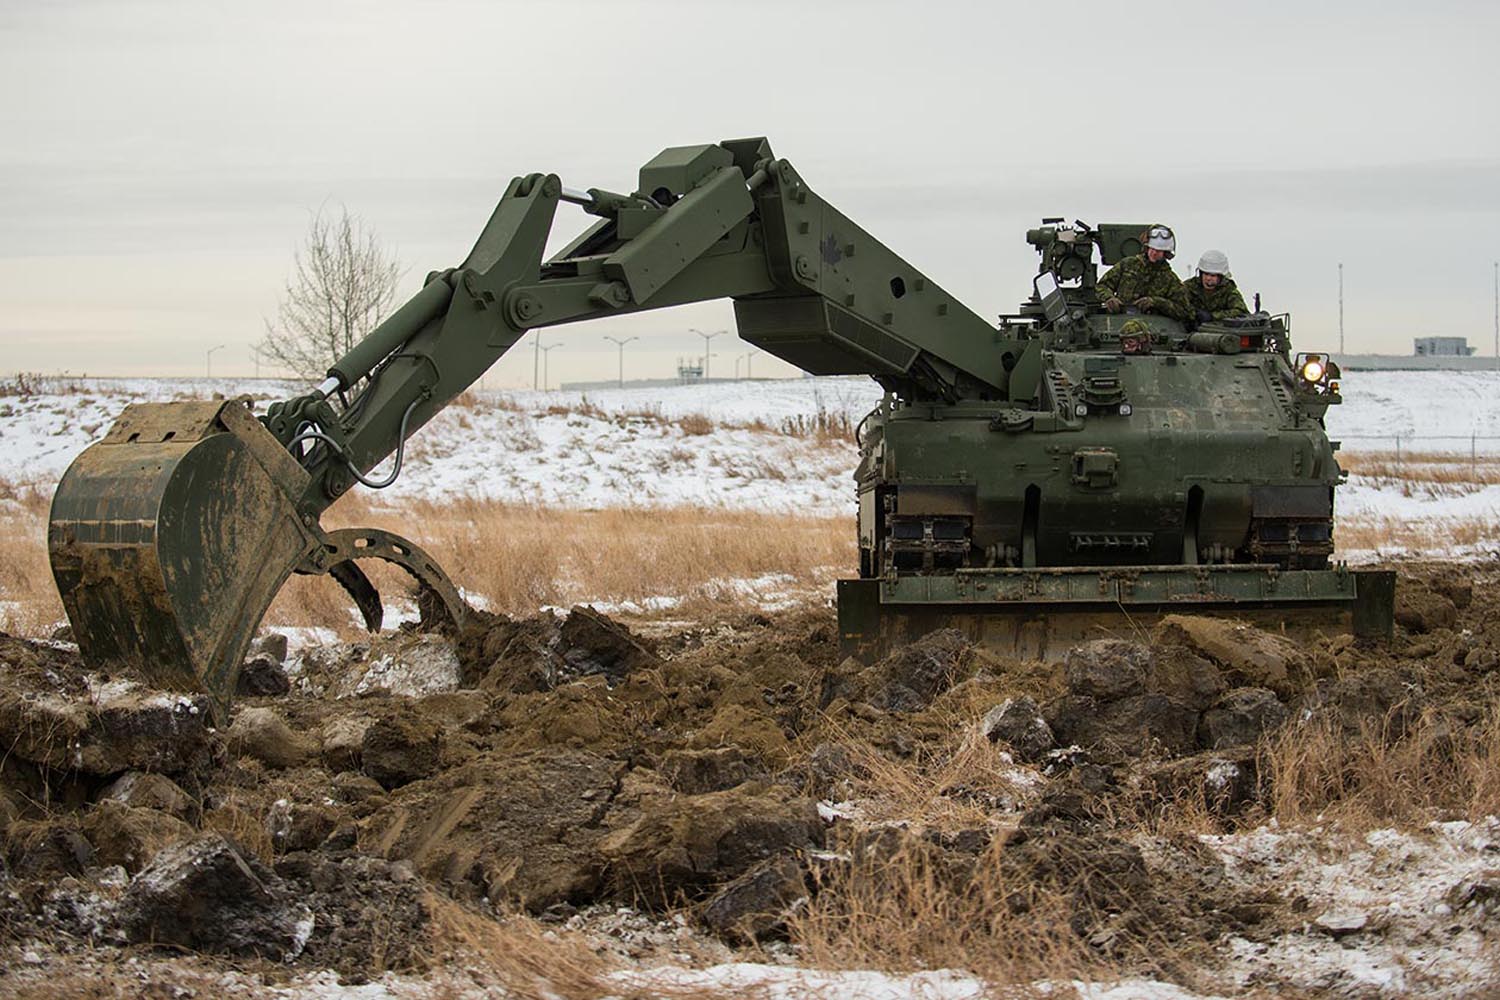
An interesting anomaly within the Canadian Badger story is that in late 2010, three stock Bundeswehr Dachs were purchased by Canada for training use on Canadian soil due to the long-term deployment of Badgers to Afghanistan. The three Dachs were only modified with Canadian antennae mounts and the recognizable black Maple Leaf on the excavator arm. All three Dachs were based with 1 Combat Engineer Regiment in Edmonton, Alberta, until retirement.
One of the three Bundeswehr Dachs obtained for training in 2010 (Canadian Forces Image)
Canadian Badgers were utilized on multiple deployments including being stationed in Canada and Germany with Combat Engineer Regiments, deploying to Croatia and Bosnia for a short period of time in the early 1990s with UNPROFOR, taking part in the NATO-led IFOR/SFOR missions in Bosnia, and KFOR in Kosovo during the late 1990s and early 2000s.

Badger in Germany, 1991 (Canadian Forces Image)

Badger with UNPROFOR, 1992 (Canadian Forces Image)

Badger with SFOR, 1998 (Image source unknown)
The culmination of the Badger's legacy in the Canadian Army was sustained combat deployments in Afghanistan. Fitted with MEXAS, the Badgers were used as a spearhead during Canadian armoured operations where the enormous dozer blade and fierce excavator arm was used to punch through concrete-like grape field walls while facing down enemy fire.
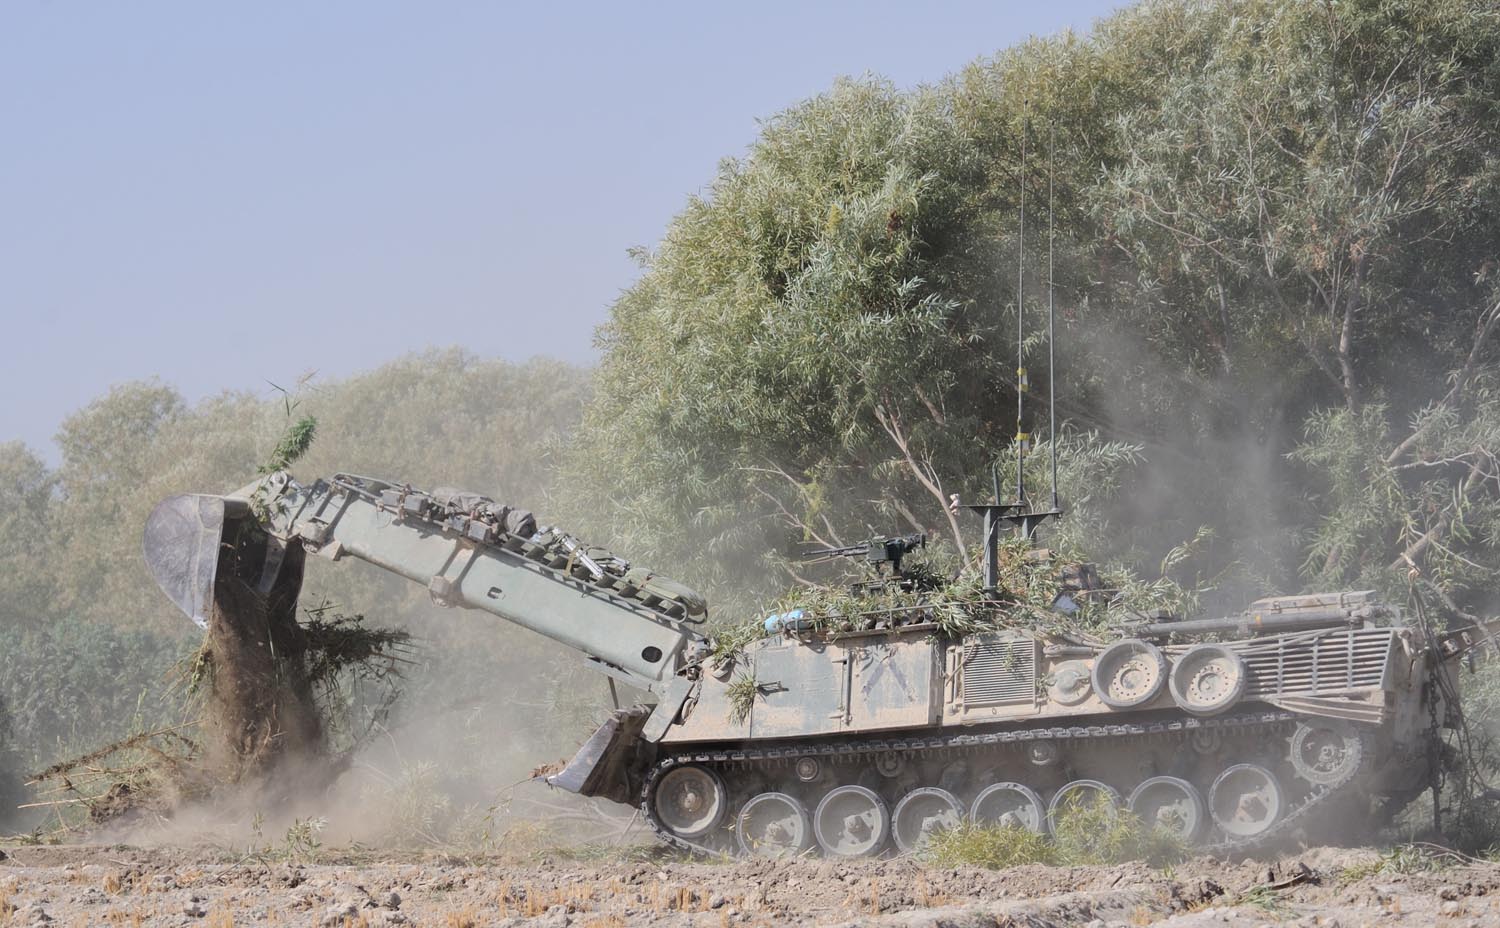
Badger in Afghanistan, 2010 (Canadian Forces Image)
After 26 years of hard-earned service, the Canadian Badger AEVs were retired in 2017 with the vehicles being scrapped or designated for museum displays. The Badger has now been replaced by the Leopard 2 Canadian ~Ram~ Armoured Engineer Vehicle based on the Wisent 2 AEV.
Canadian Ram AEV (Canadian Forces Image)
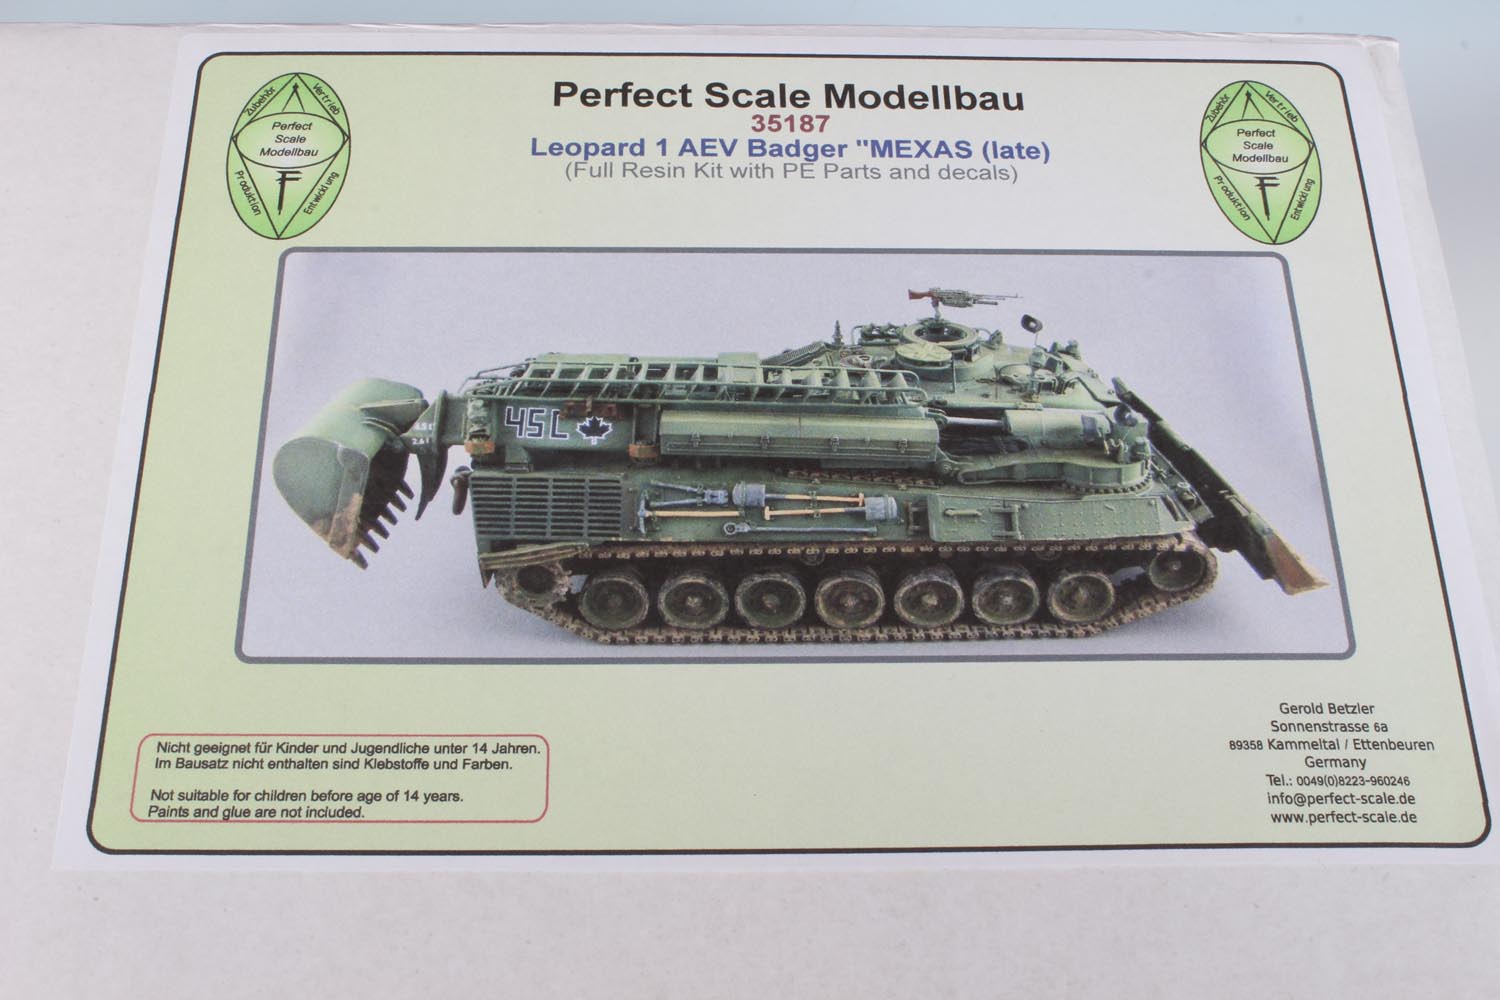
Until the production of the Perfect Scale Modellbau (PSM) Canadian Badger kits there was no 1/35 option to modellers other than converting the full resin Elite Modellbau Pionierpanzer 2 Dachs kit. PSM has led the charge and set the new bar with the release of their full resin Bundeswehr Dachs A1 (35171) and Dachs A2 AEV (35173) kits. PSM took it a step further with the Canadian versions when they produced the Leopard 1 Badger AEV (early) (35186) and the focus of this review Leopard 1 Badger AEV MEXAS (late) (35187).
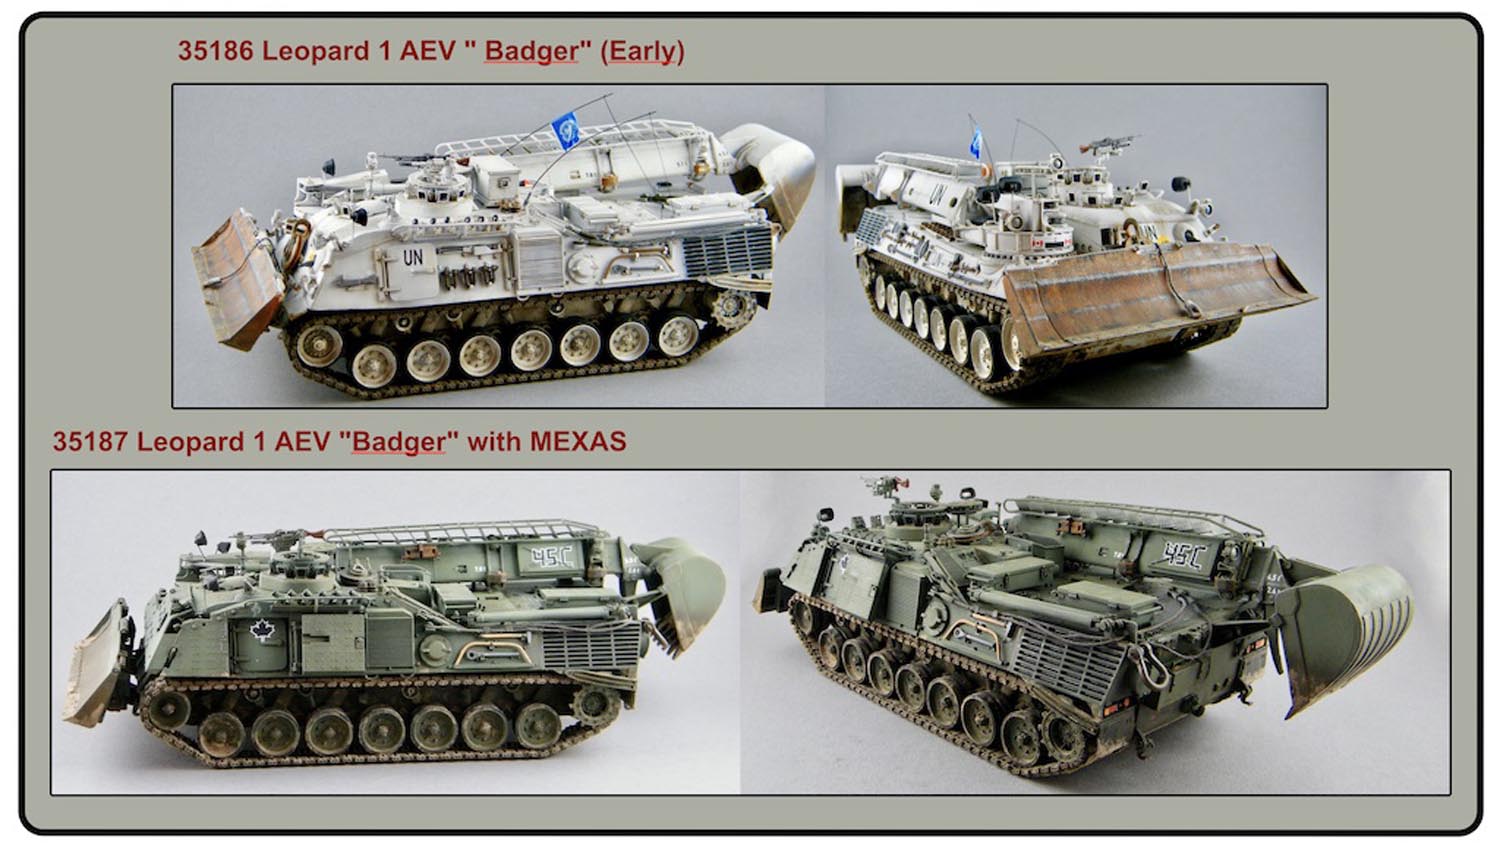
Leopard 1 Badger AEV (early) (35186) and Leopard 1 Badger AEV MEXAS (late) (35187) (Perfect Scale Modellbau Image)
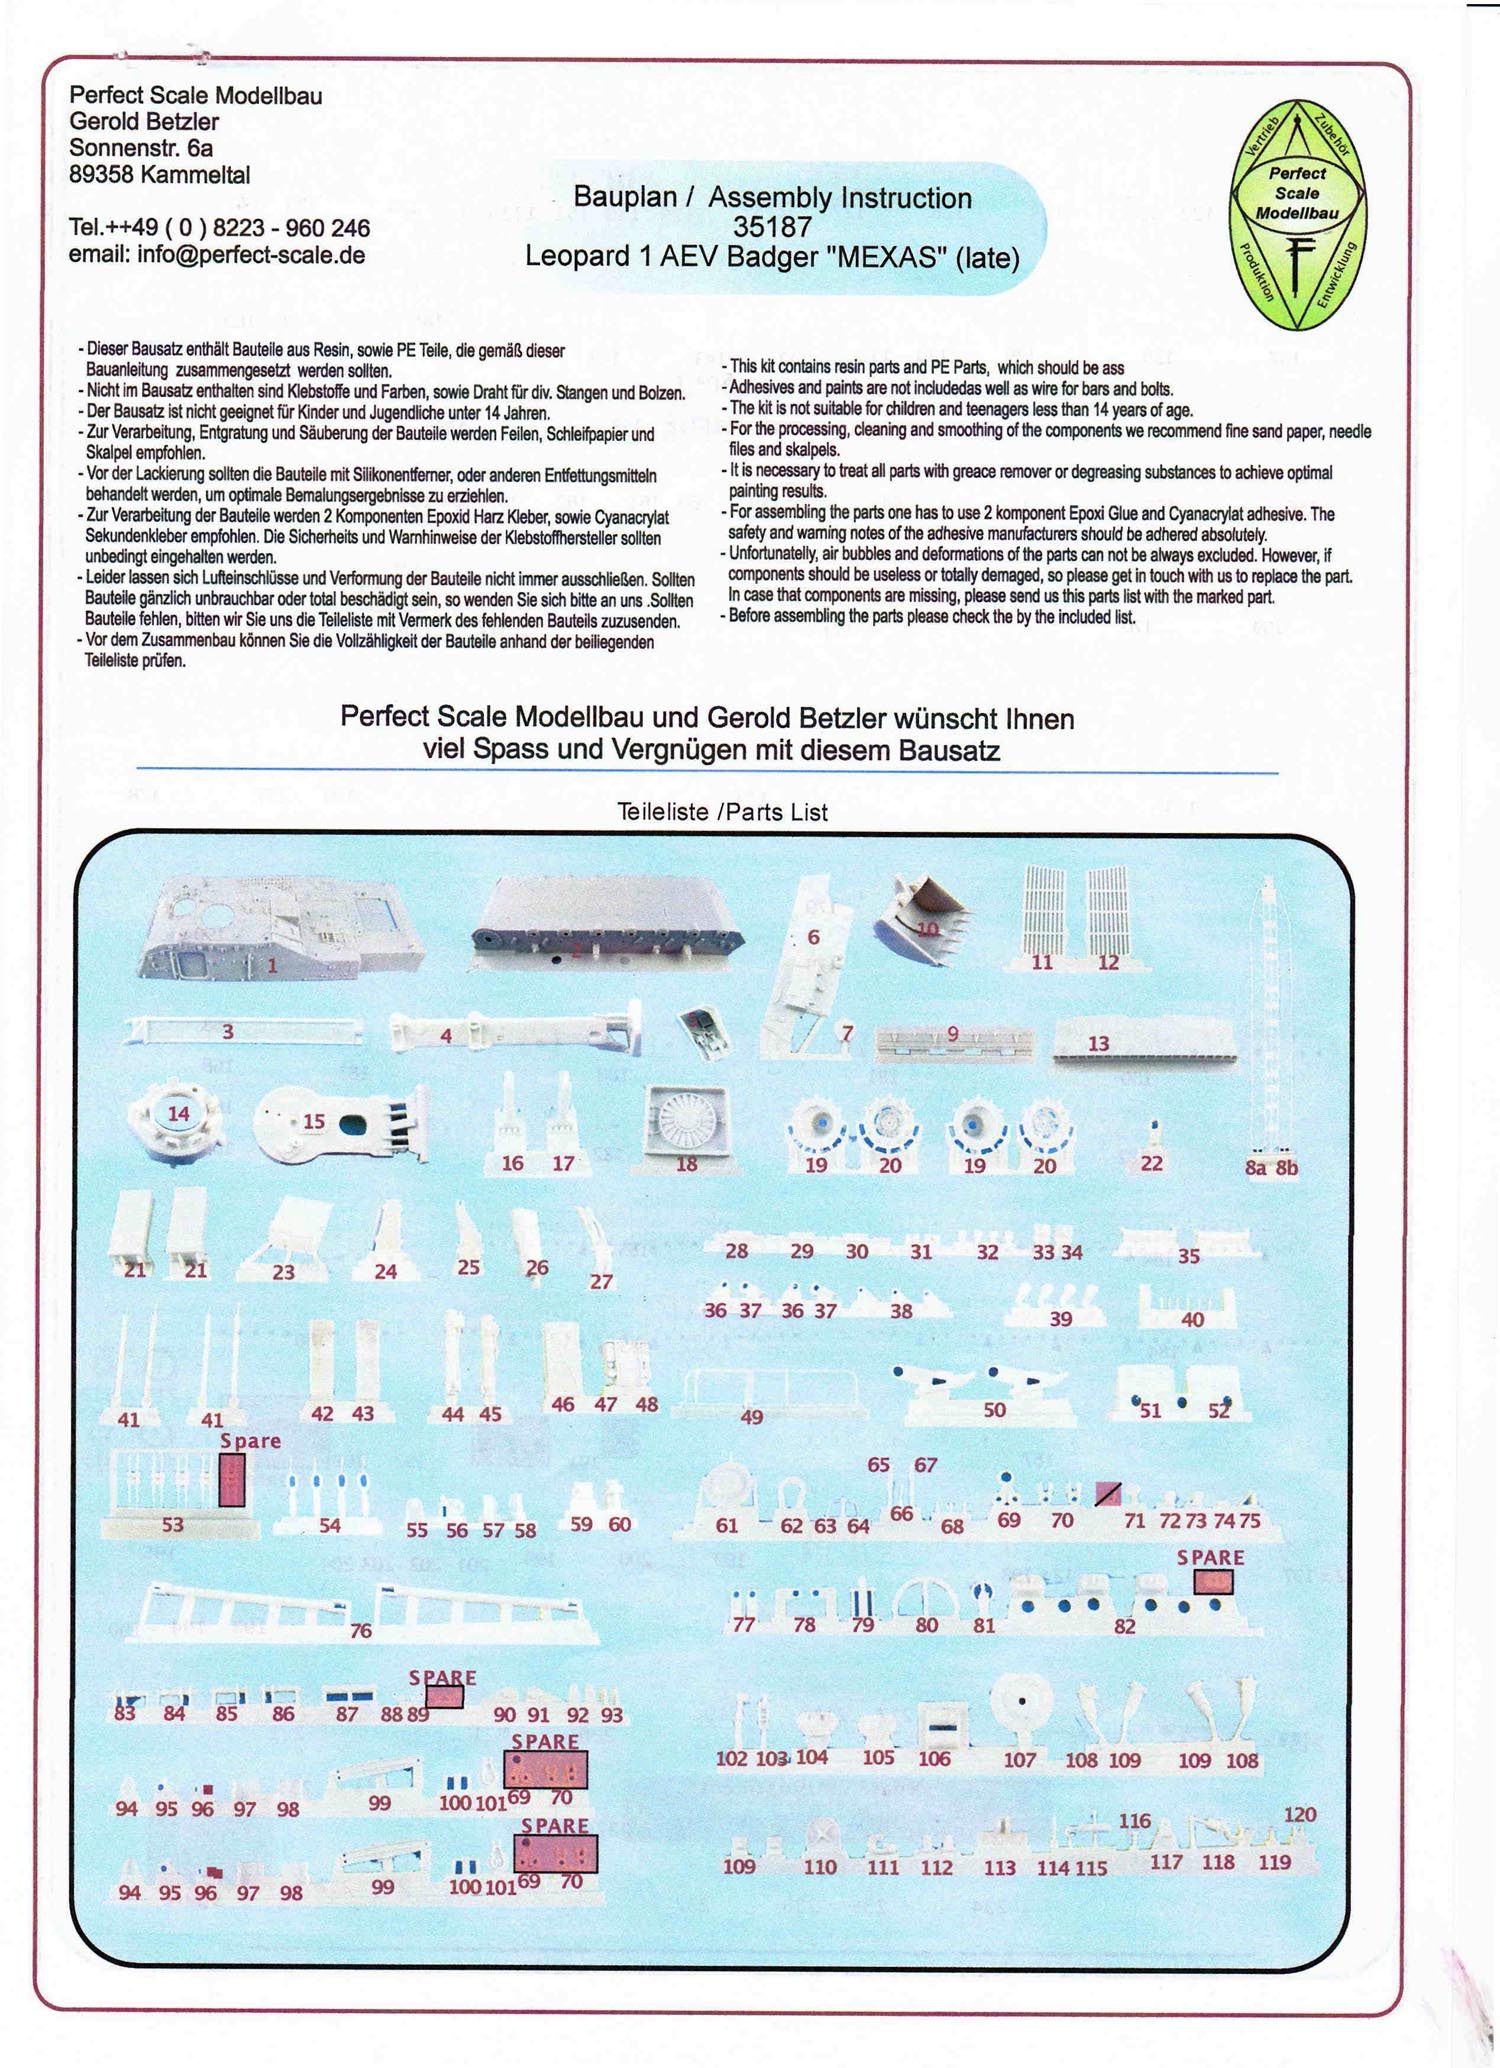
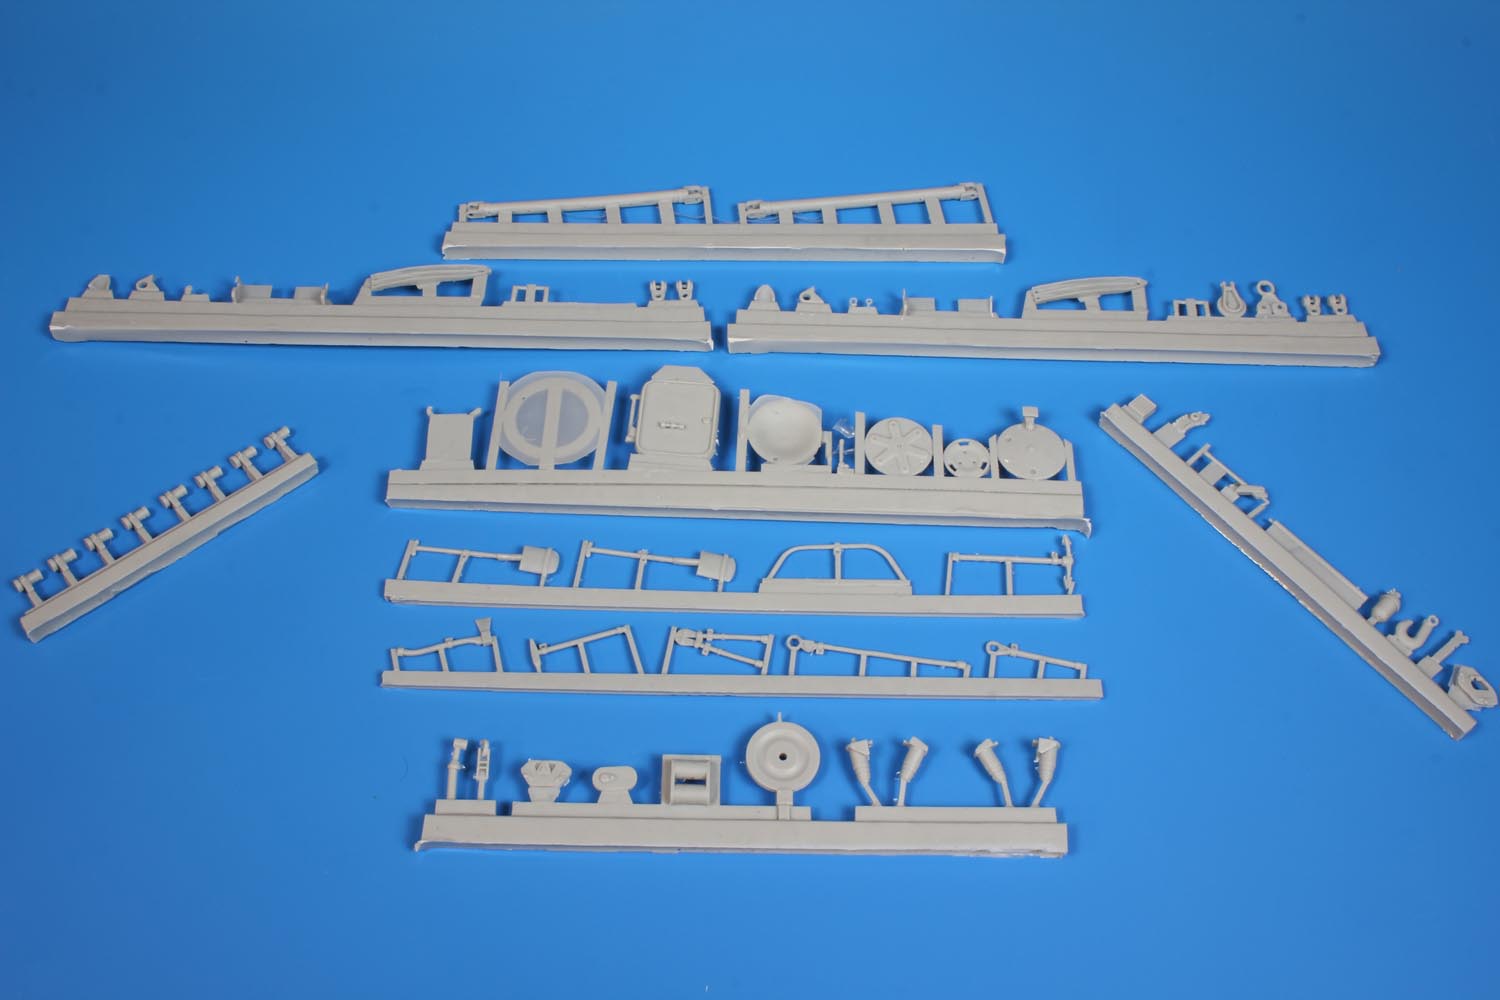
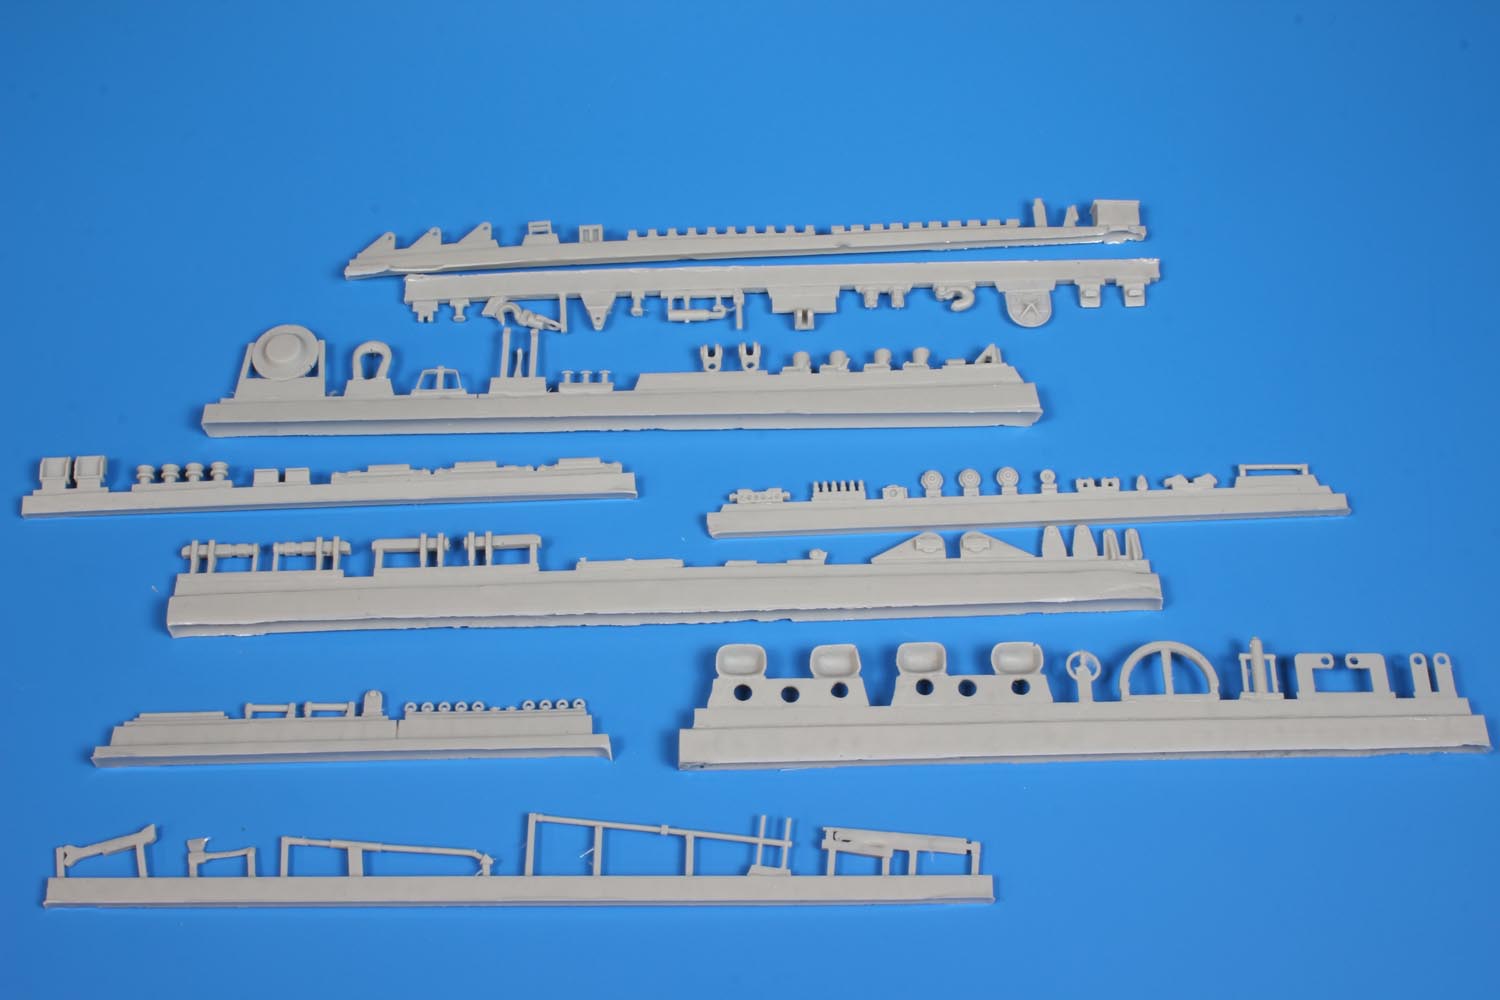
The kit consists of 237 numbered resin parts in the instructions. Given multiples of parts in the suspension and other components, I estimate there to be approximately 400 resin parts. Also included are two photo-etch frets containing 156 parts, two lengths of different diameter braided copper cable (30cm of 1mm and 10cm of 0.6mm), and two decal sheets with a total of 65 decals.
First impressions upon opening the box and pushing aside the Styrofoam chips and bubble wrap are "Wow, there is a lot of resin in there!" The myriad of resin parts are attached to casting blocks which will need cutting, sanding, trimming, and cleaning before use. The upper and lower hulls also require the removal and clean up of casting blocks.
The light grey resin parts in my review kit did have some damage. Multiple centre guides on the cast track sections were broken off, the upper rear hull resin was chipped, some of the small parts were chipped or had broken casting air bubble along the edges, and approximately a dozen parts had already broken free from the casting blocks. All fixable but likely also preventable with diligent packaging.
The level of detail on the resin parts is terrific and this will be highlighted further into the review.
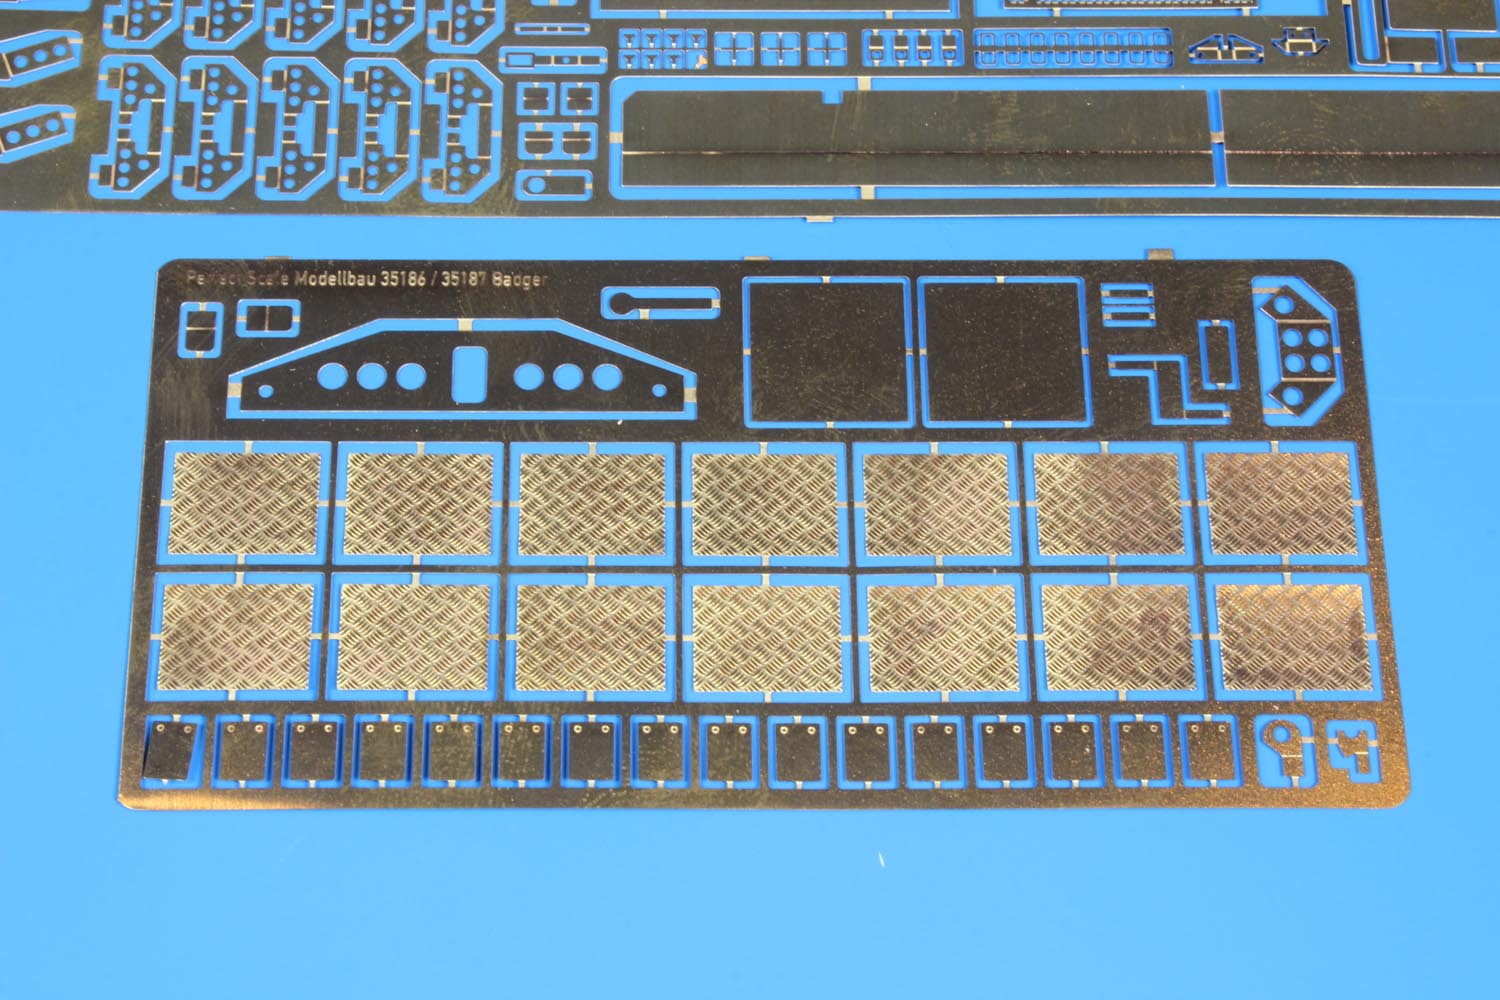
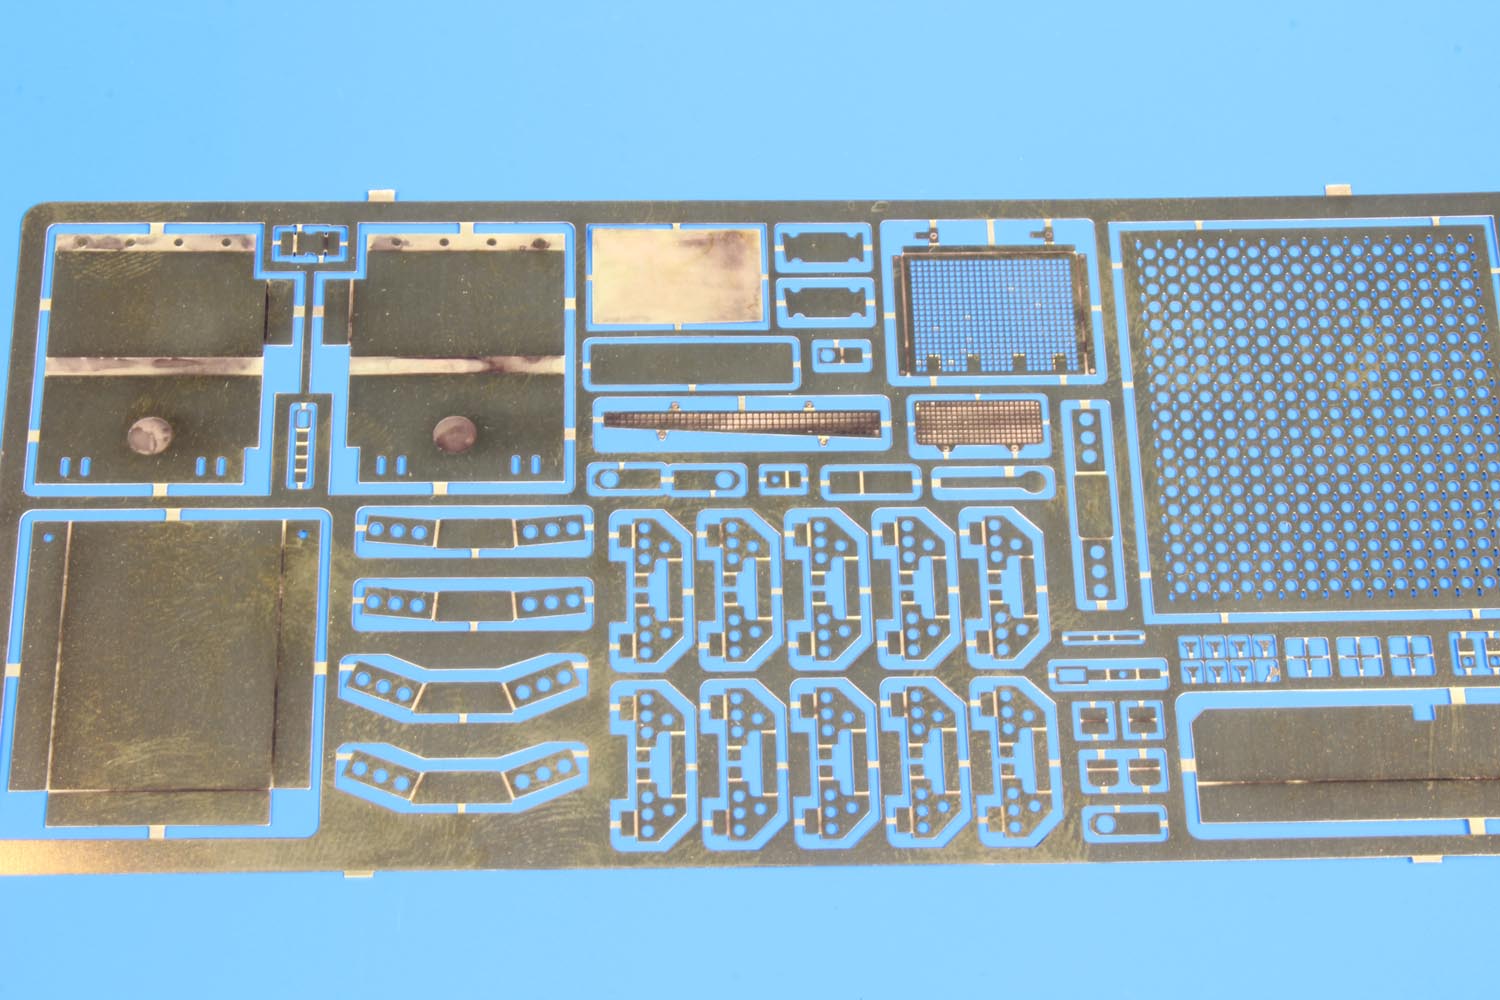
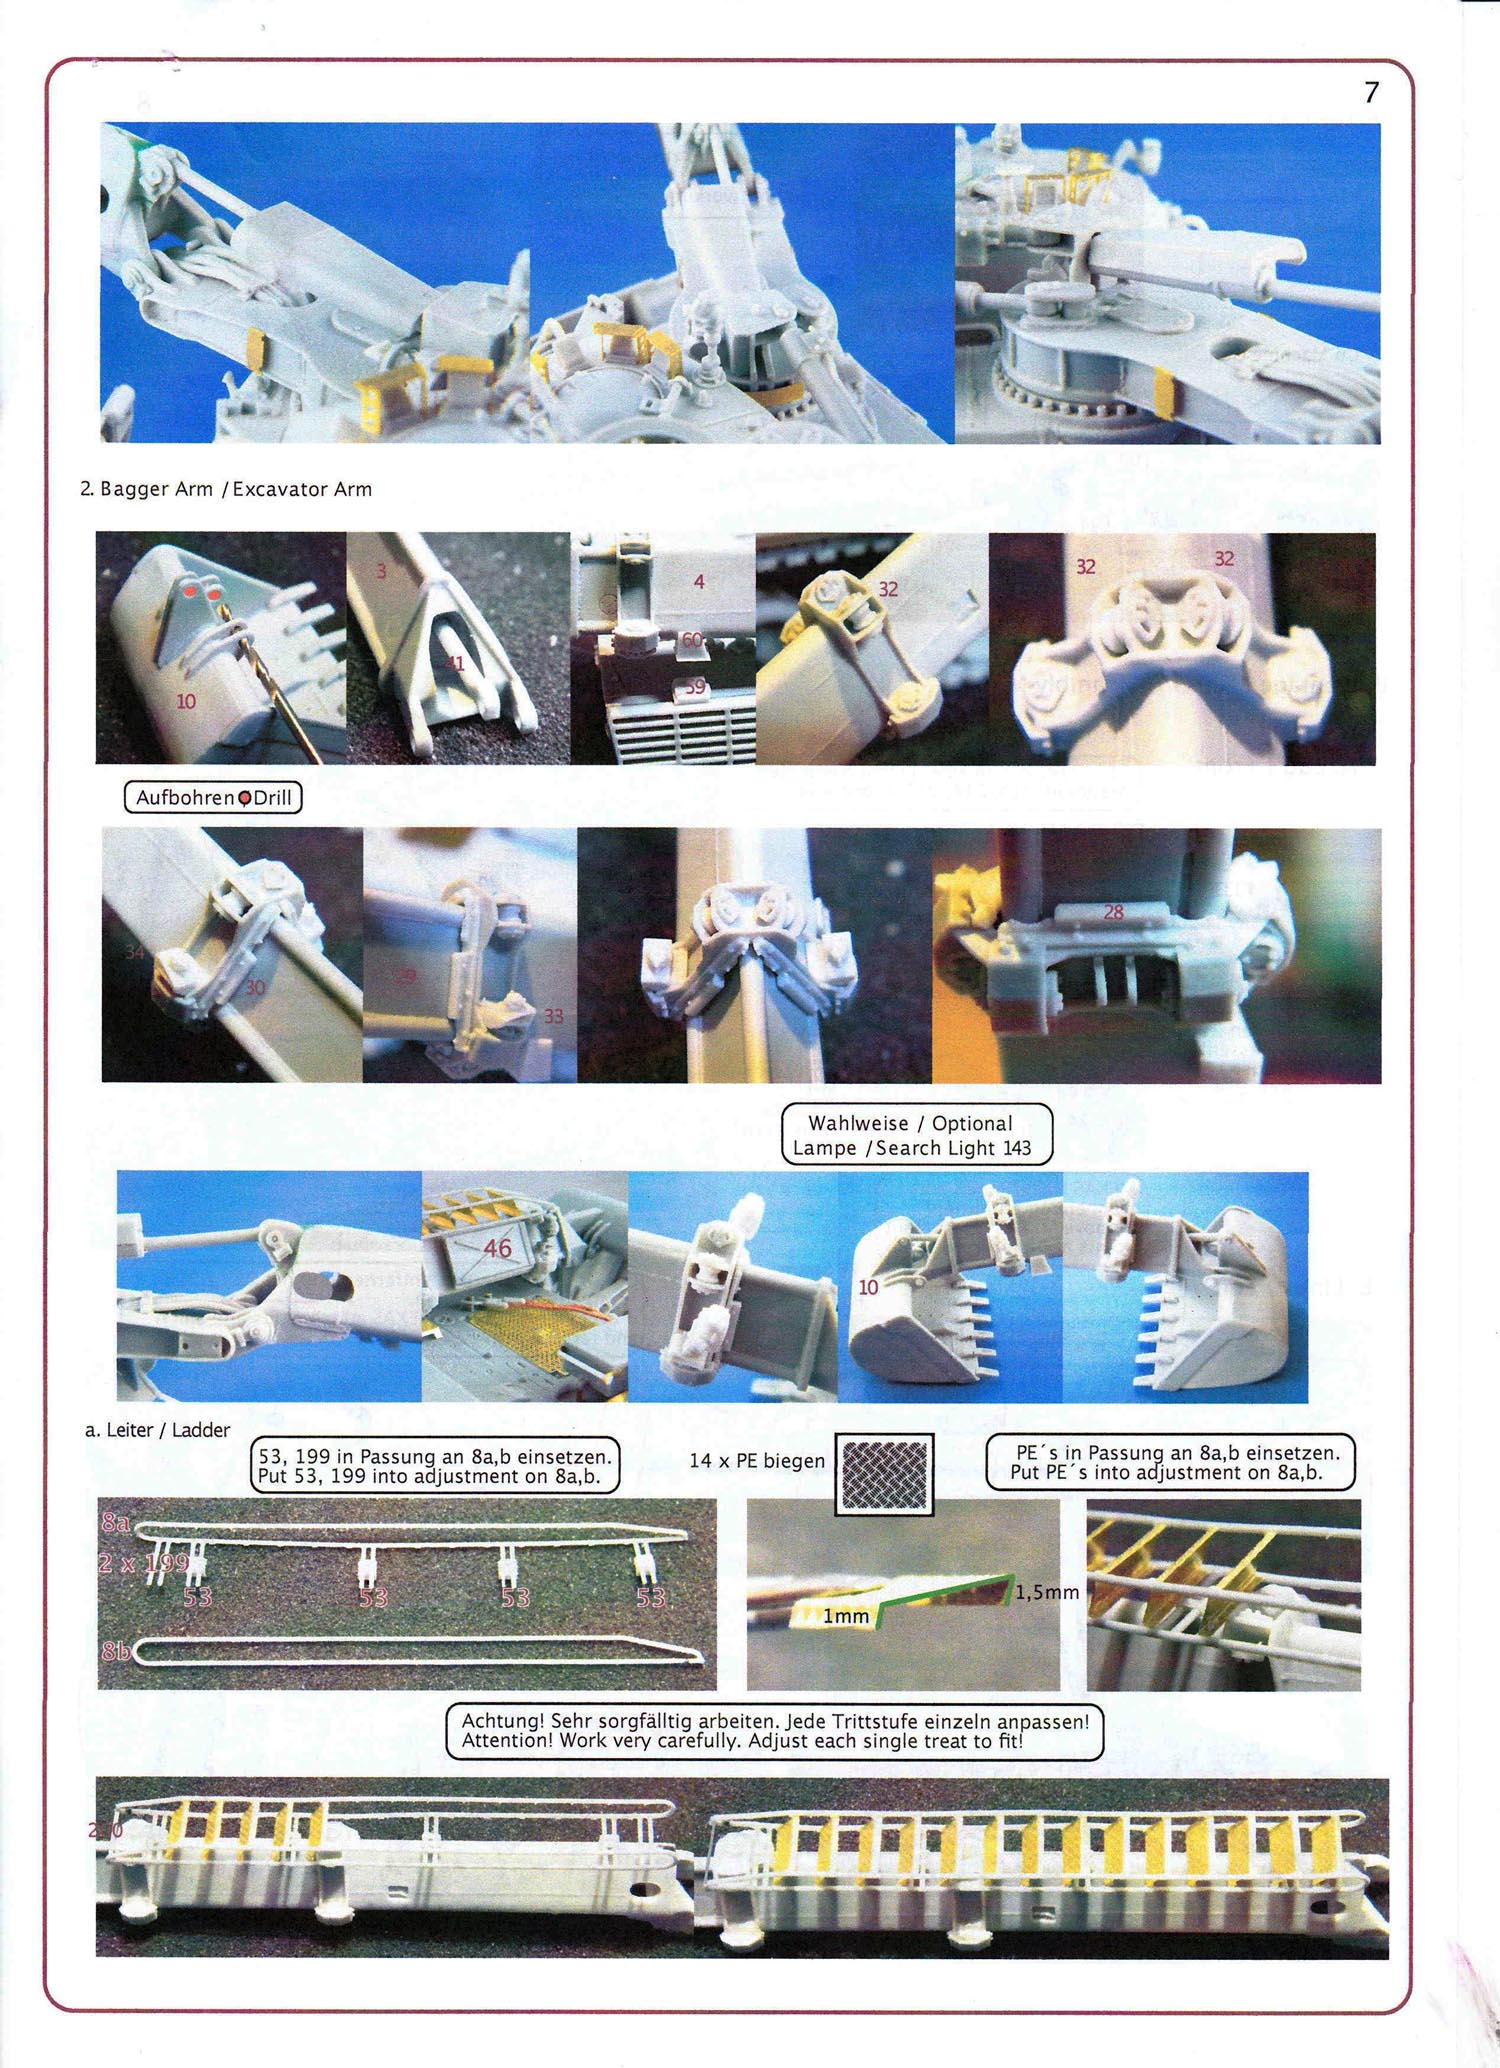
The photo-etch parts are not numbered on the frets so study and care is required in order to understand the parts. For parts that need to be bent into shape there are recessed lines which greatly aids in accurately formed parts. Parts such as the tread plates for the ladder and engine grille have great detail and will for sure standout during the build.
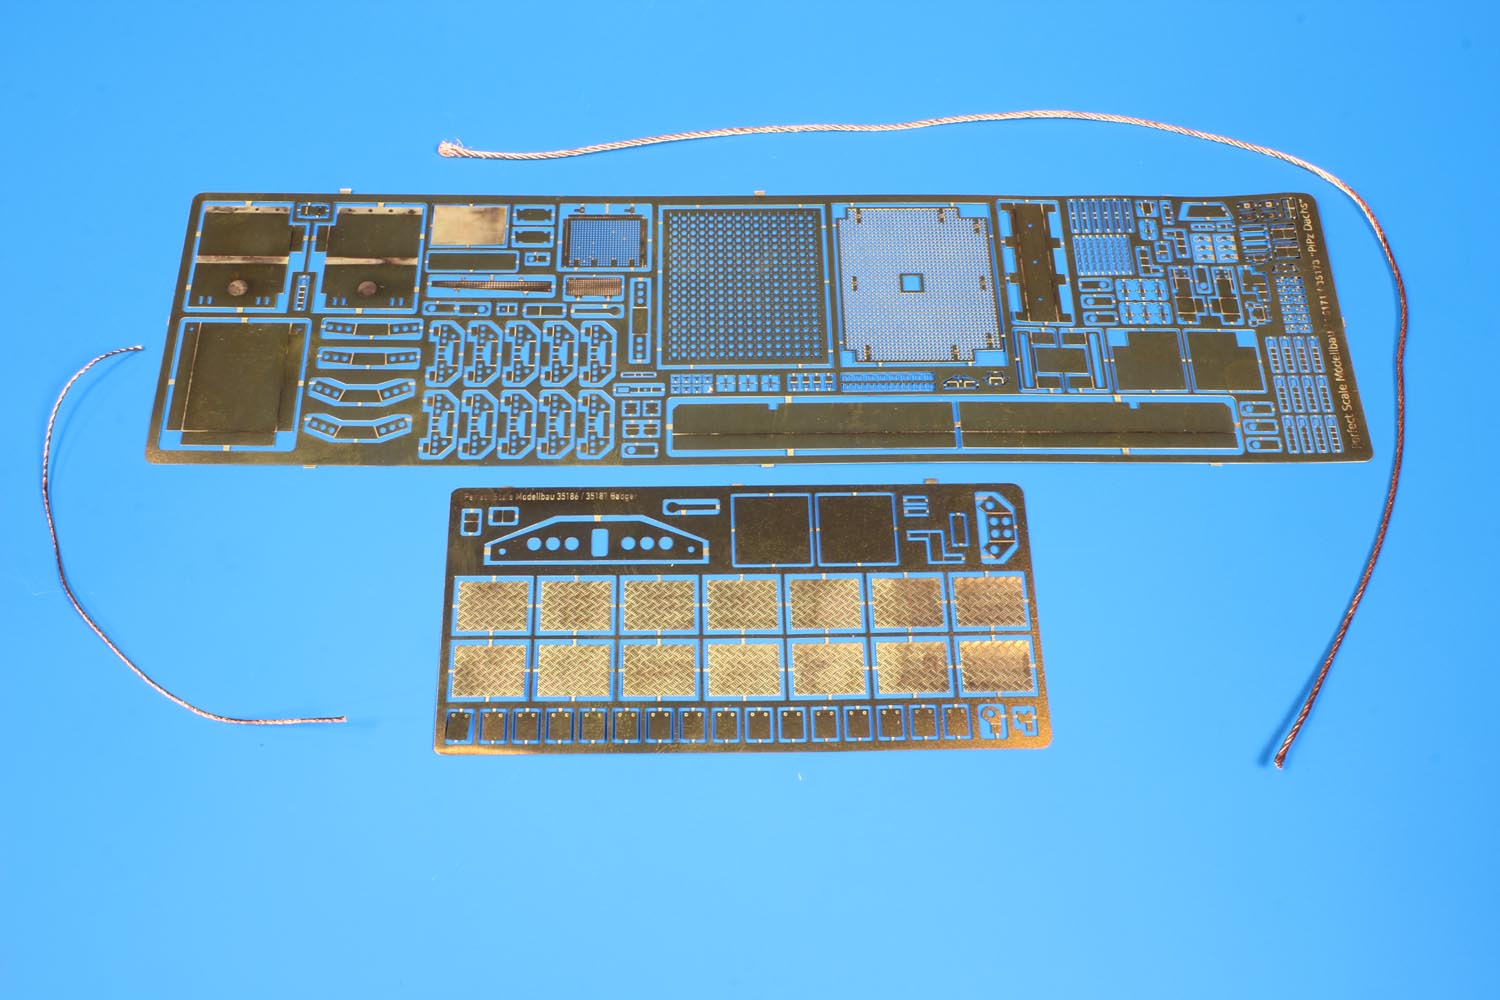

The inclusion of braided copper wire is a wise decision by PSM and much more realistic that string as other model producers have included.
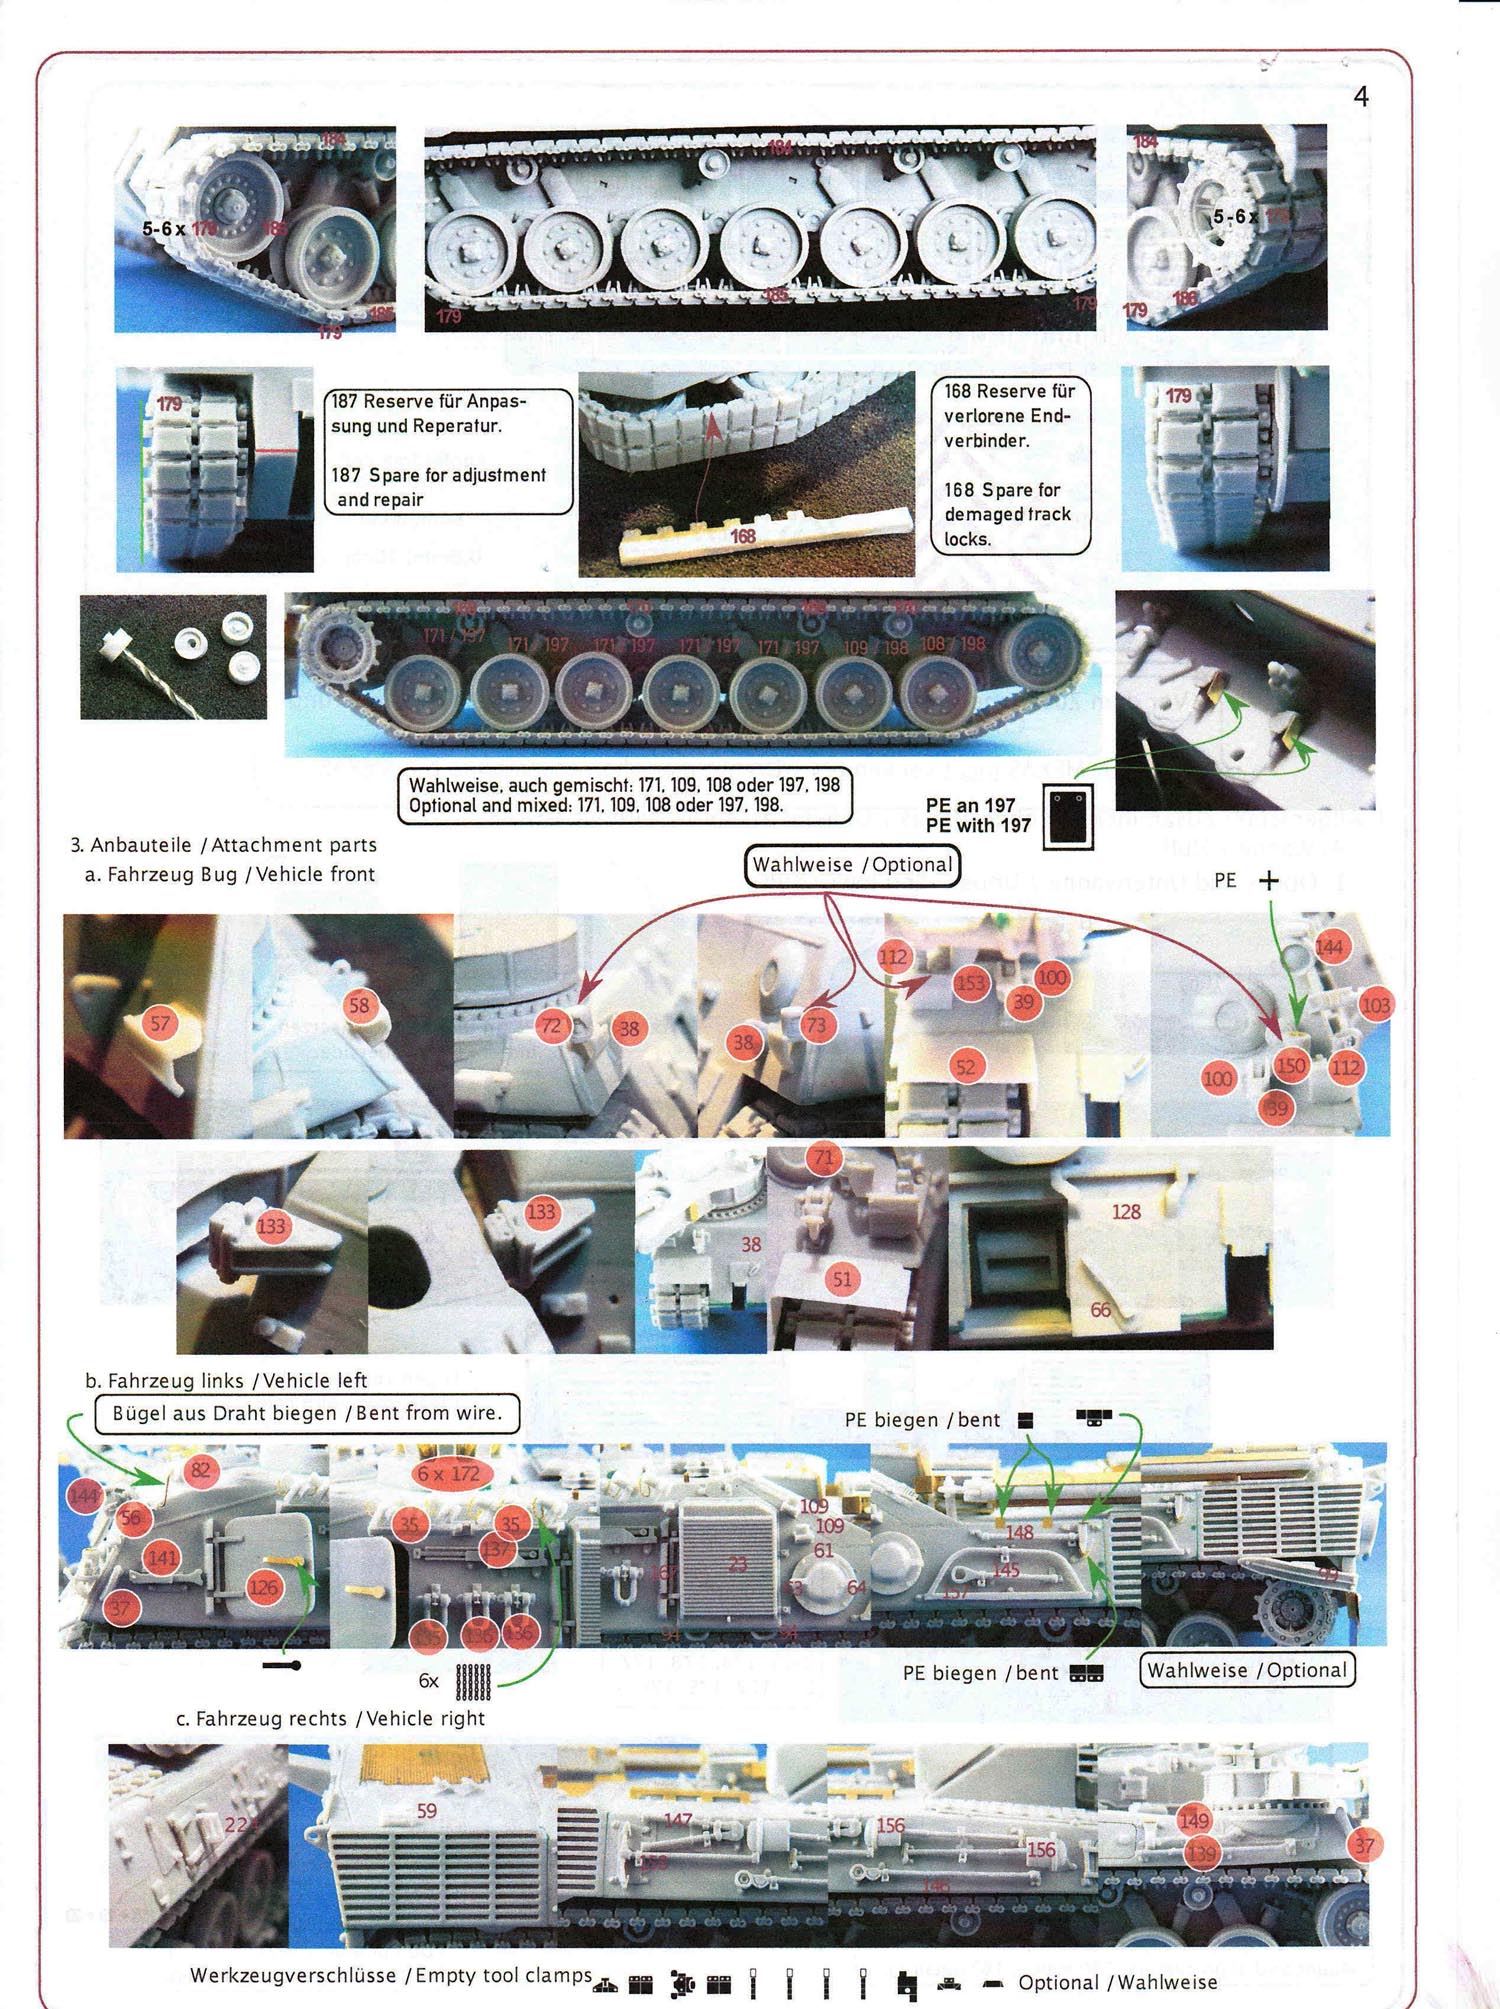
The instructions consist of nine colour photocopied pages standard letter sized paper. Typical of PSM instructions they provide actual images of the parts being assembled as well as text in German and English indicating specific assembly points.
It is critical to review and completely understand the parts breakdown, the instructional text, and the instructional images. This kit can be built with or without the MEXAS modules mounted and it is crucial that you understand what is to be left off the built, what to add to the build, or what to remove or include on the cast parts.


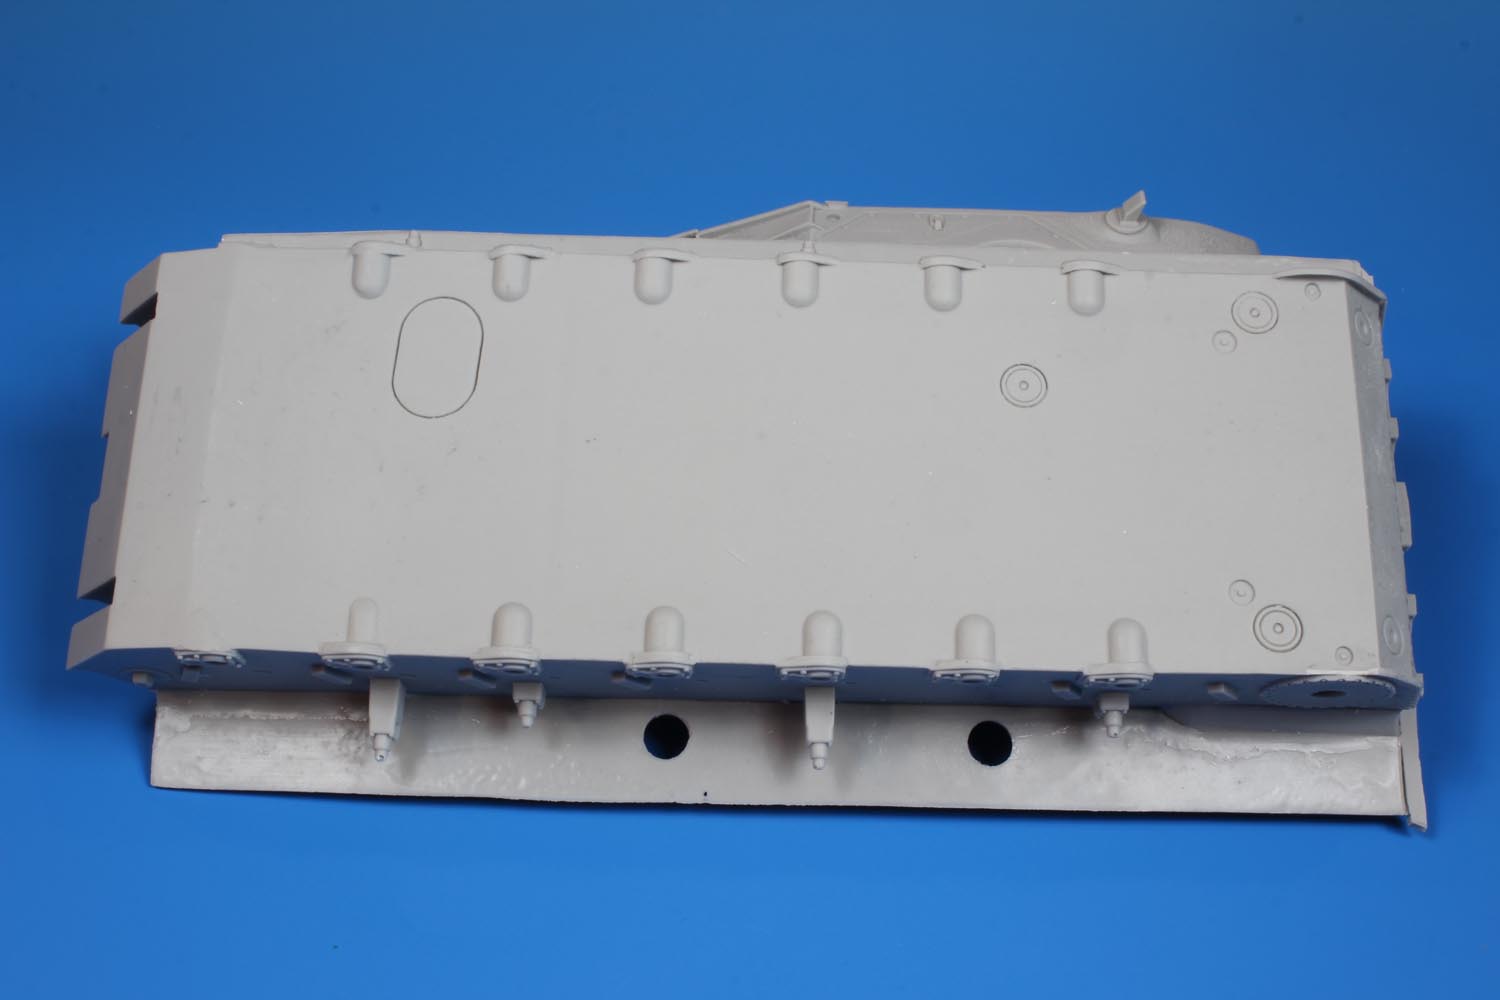
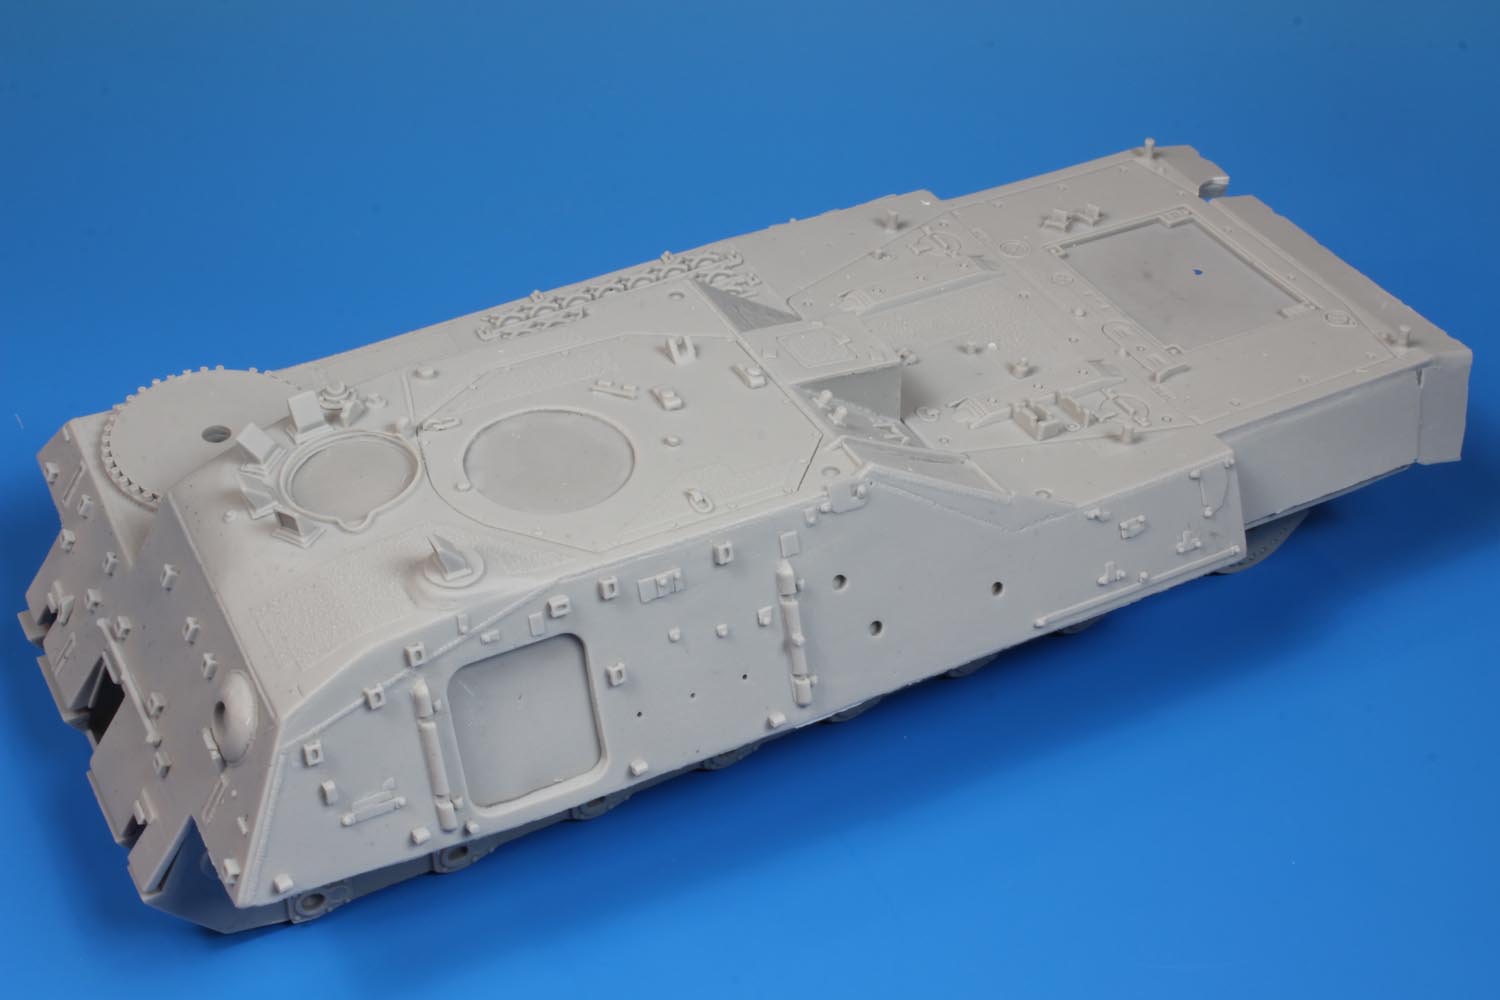
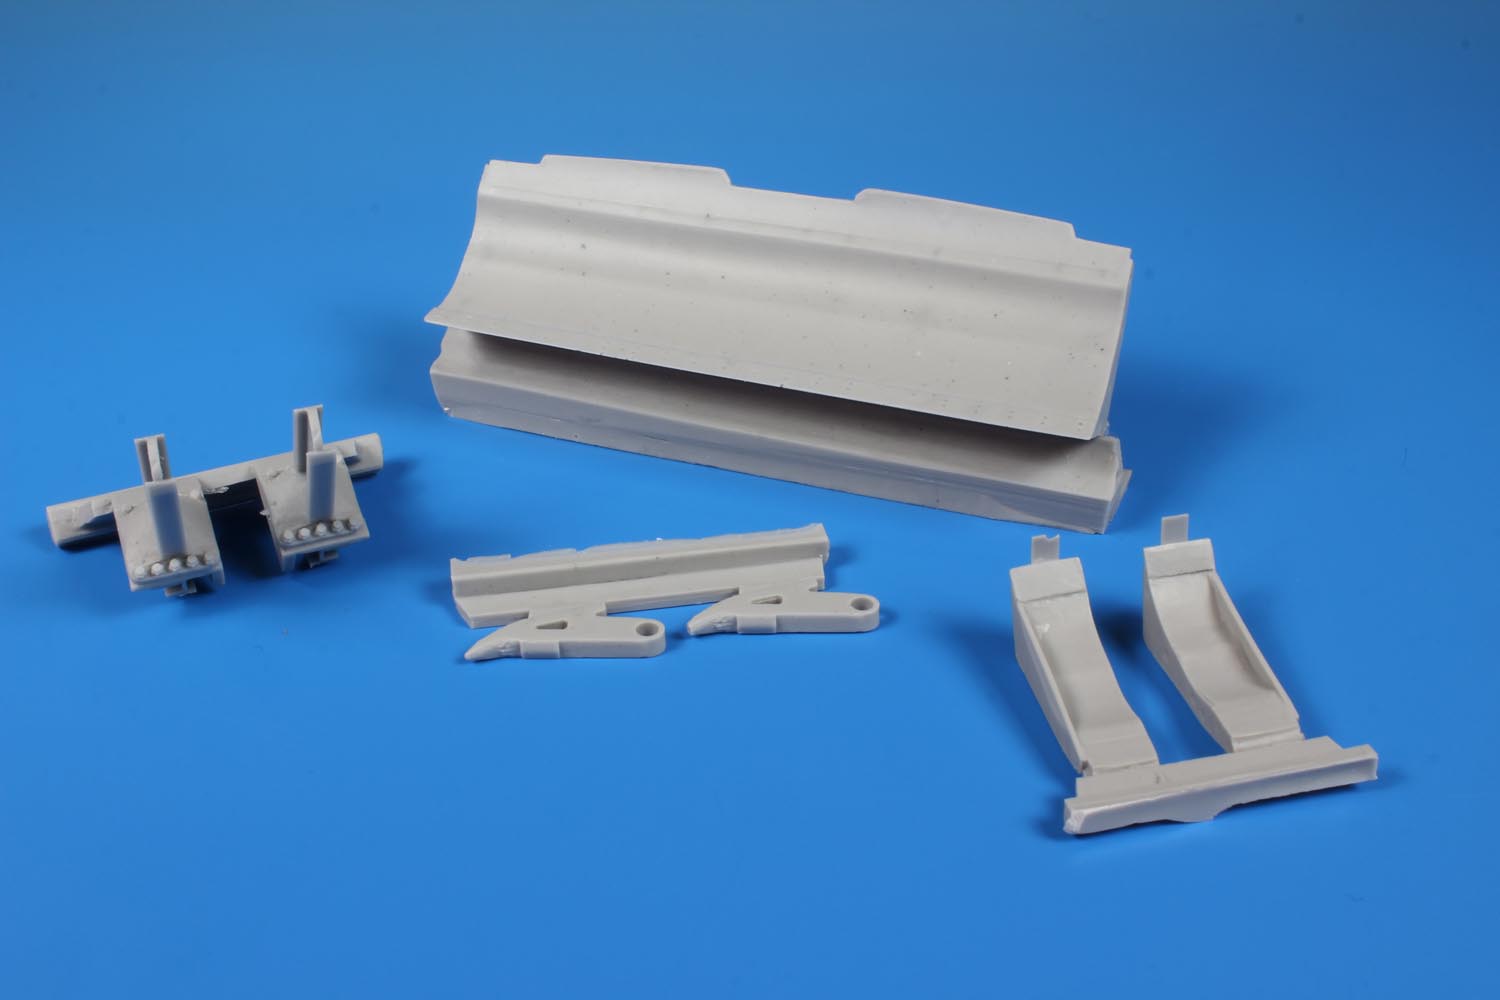
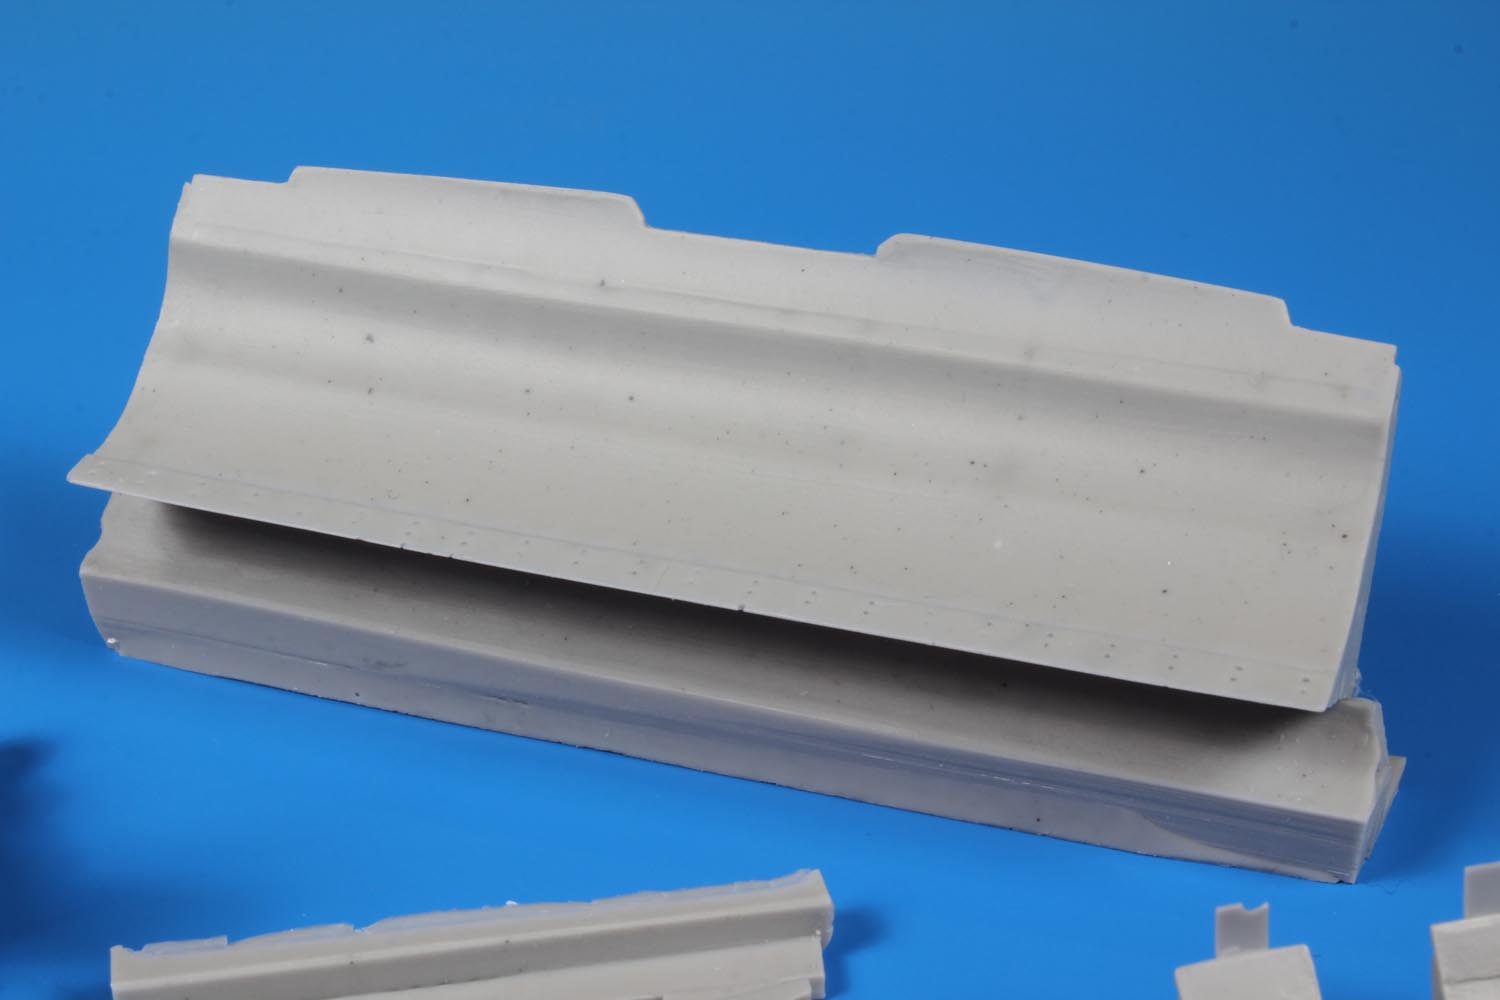
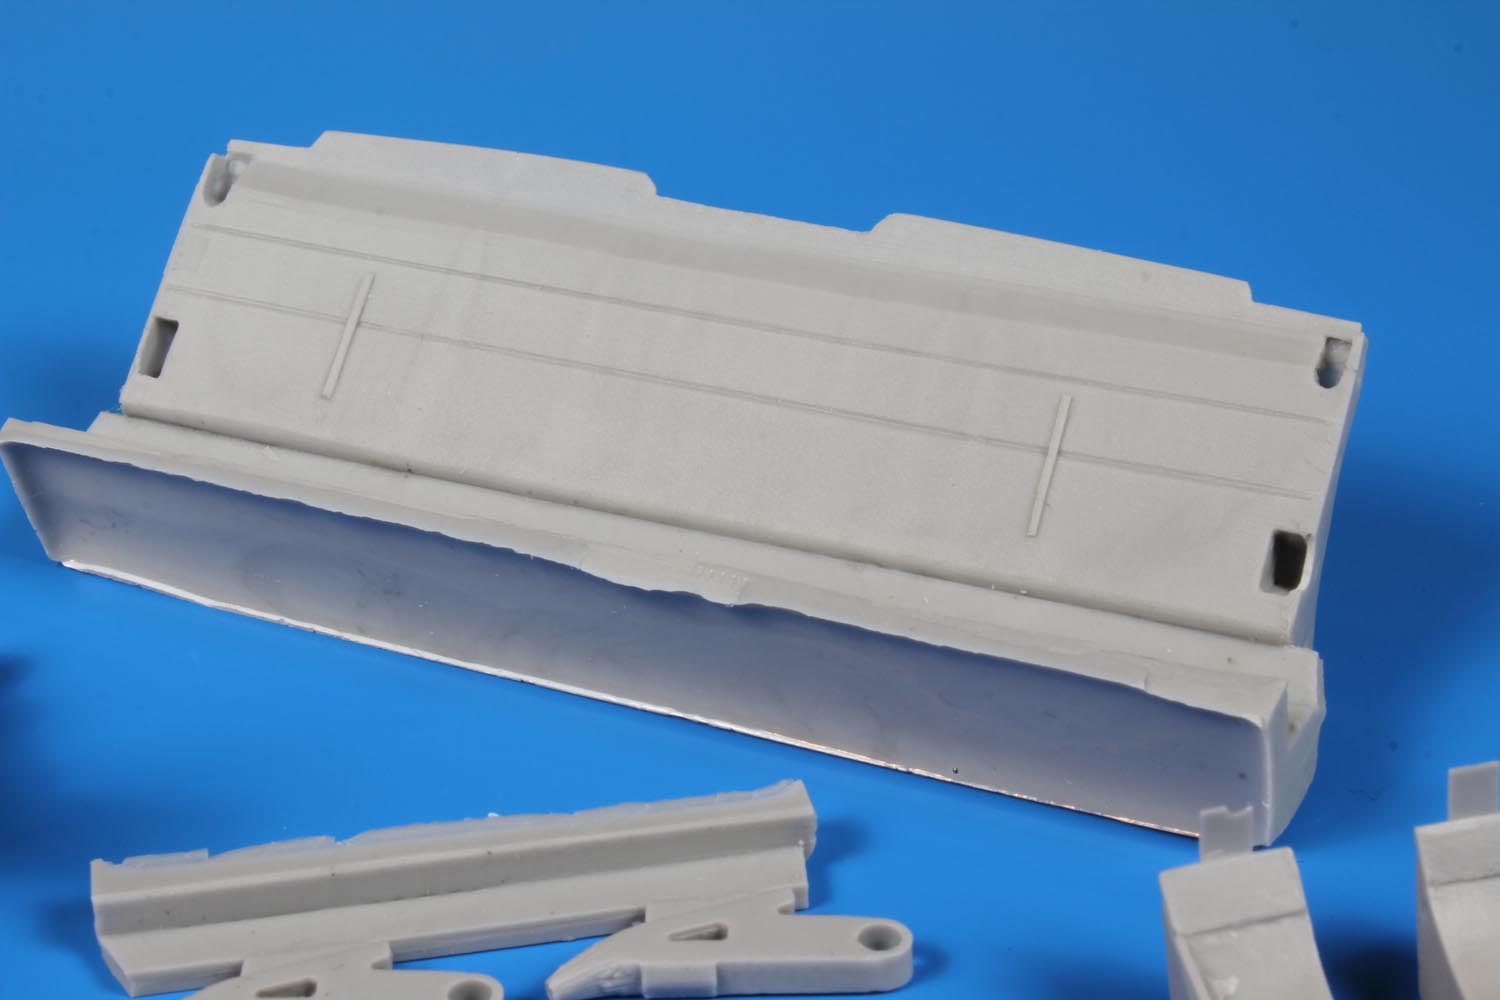
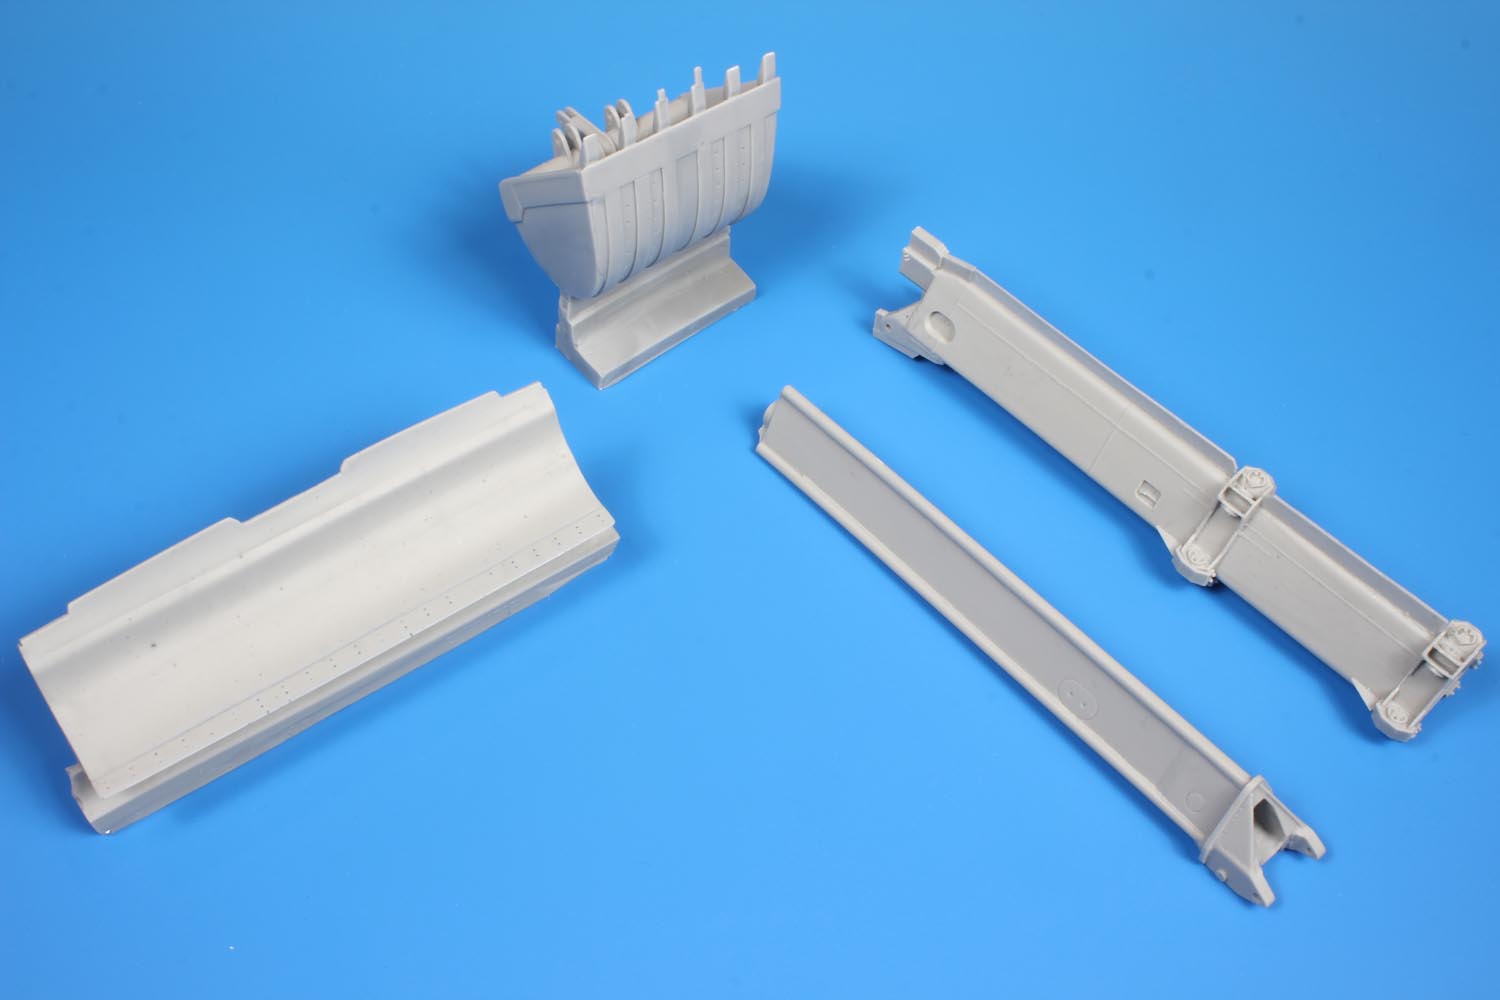
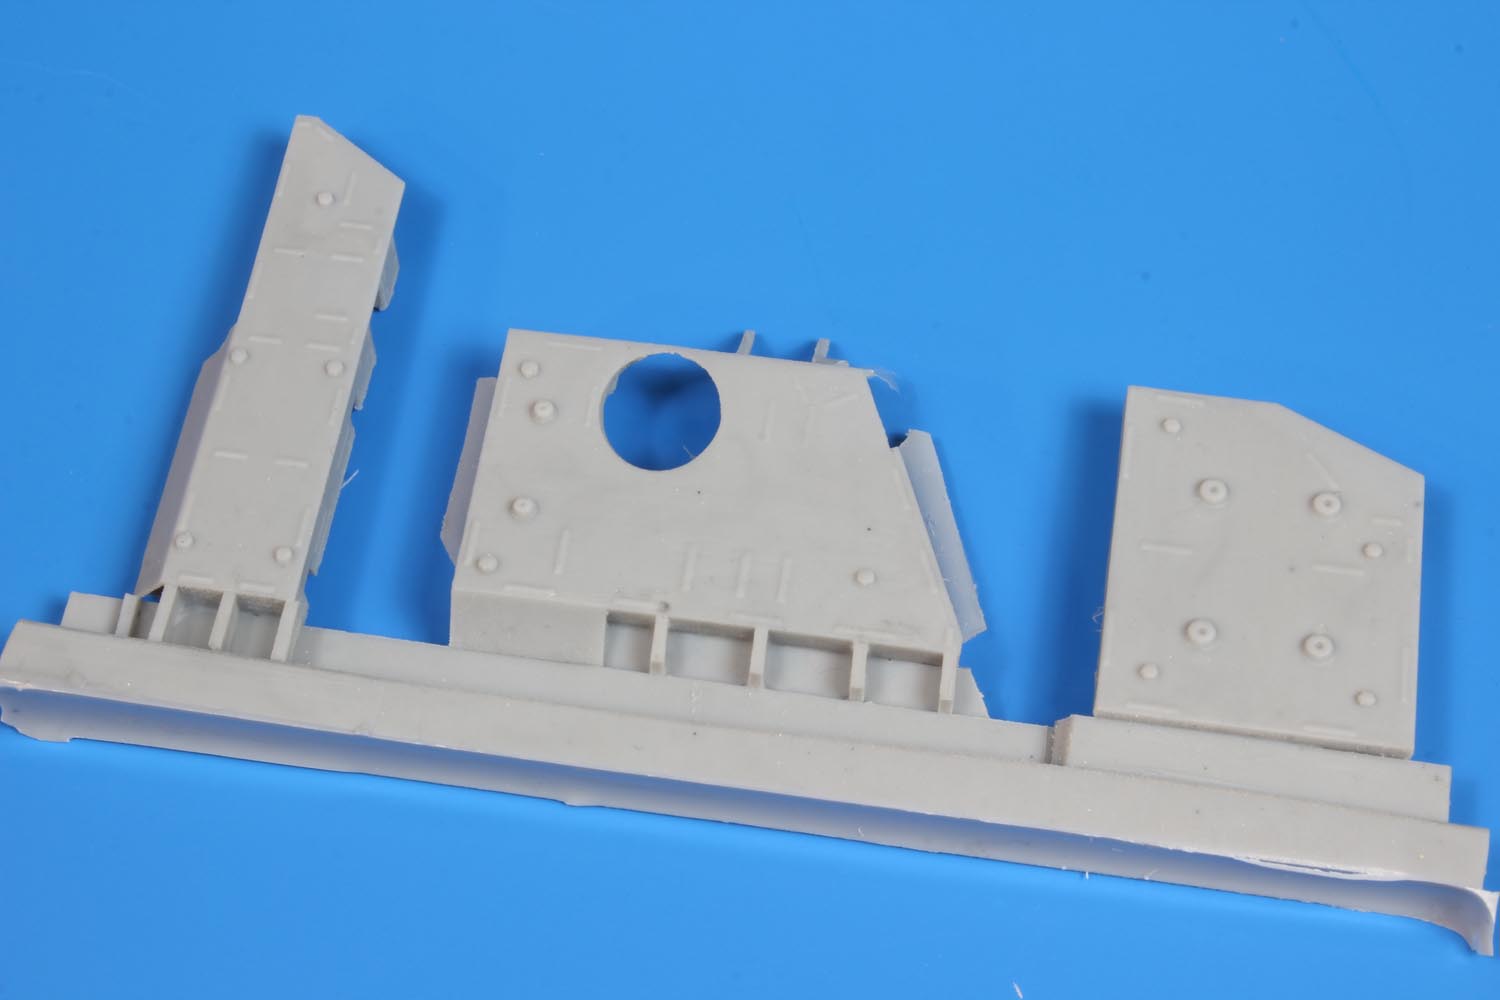
There are two primary components for the Badger hull. The upper hull and lower hull are cast in resin. There is a mandatory requirement to cut and trim the excess casting blocks in order to prepare the parts for assembly. The lower hull is not just a straight swap with a Leopard 1 lower hull and therefore the option for having this kit as a conversion is eliminated. The Badger lower hull incorporates a unique upswept angle towards the front of the lower hull, and this appears to be accurately depicted. The front of the lower hull is designed to mesh with the upper hull and includes cut outs for the onboard winch and the dozer blade hydraulic arms.
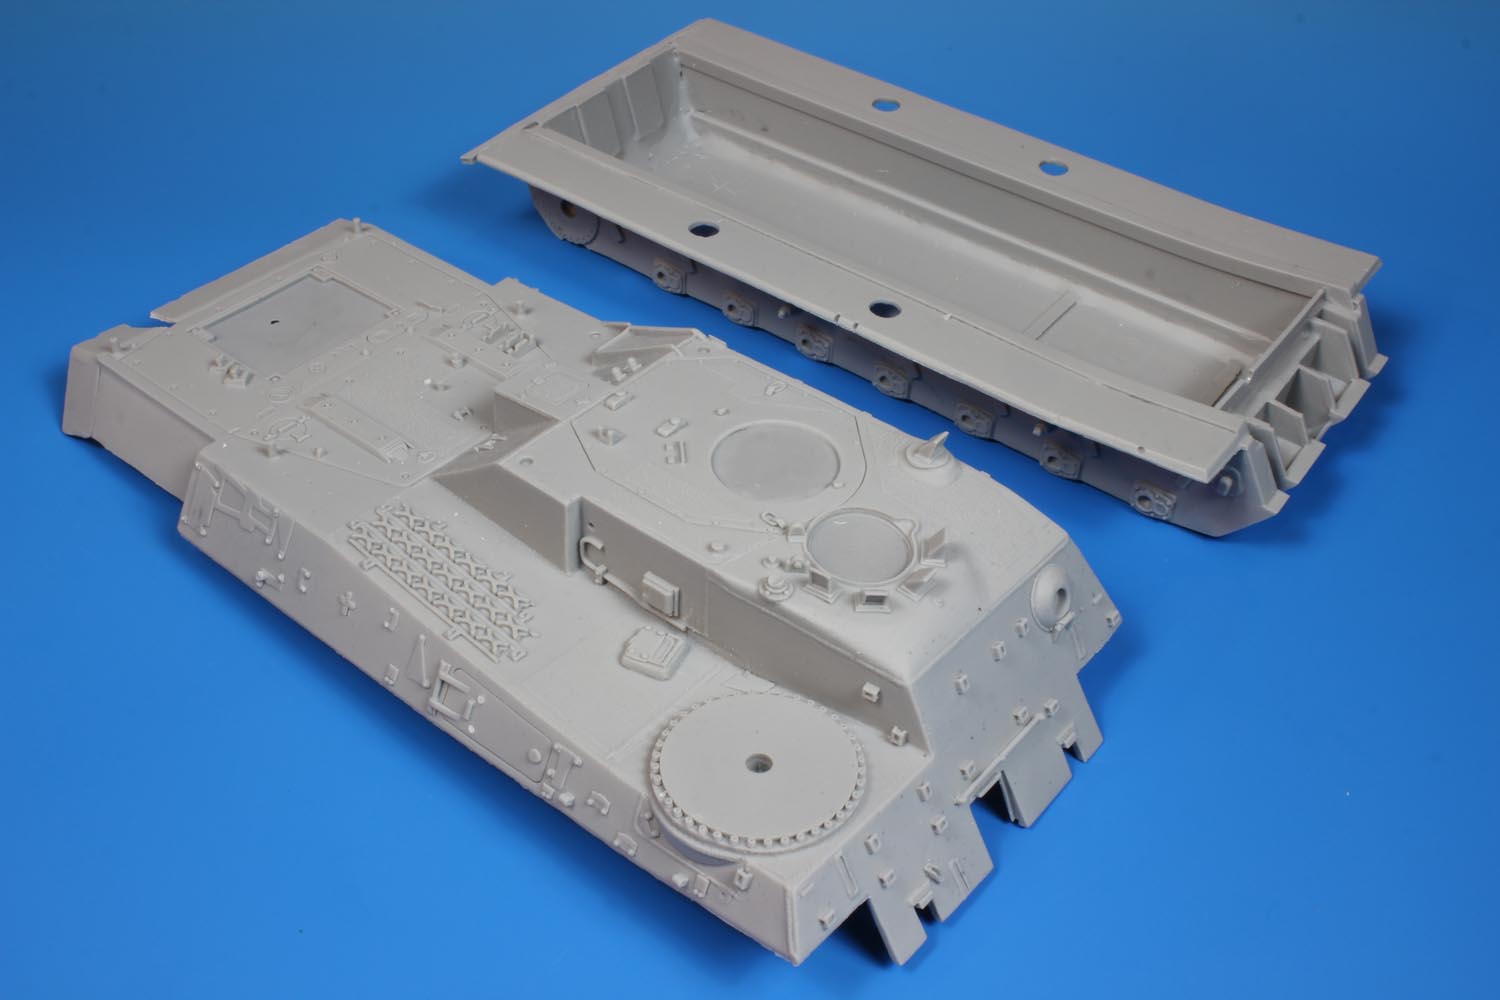
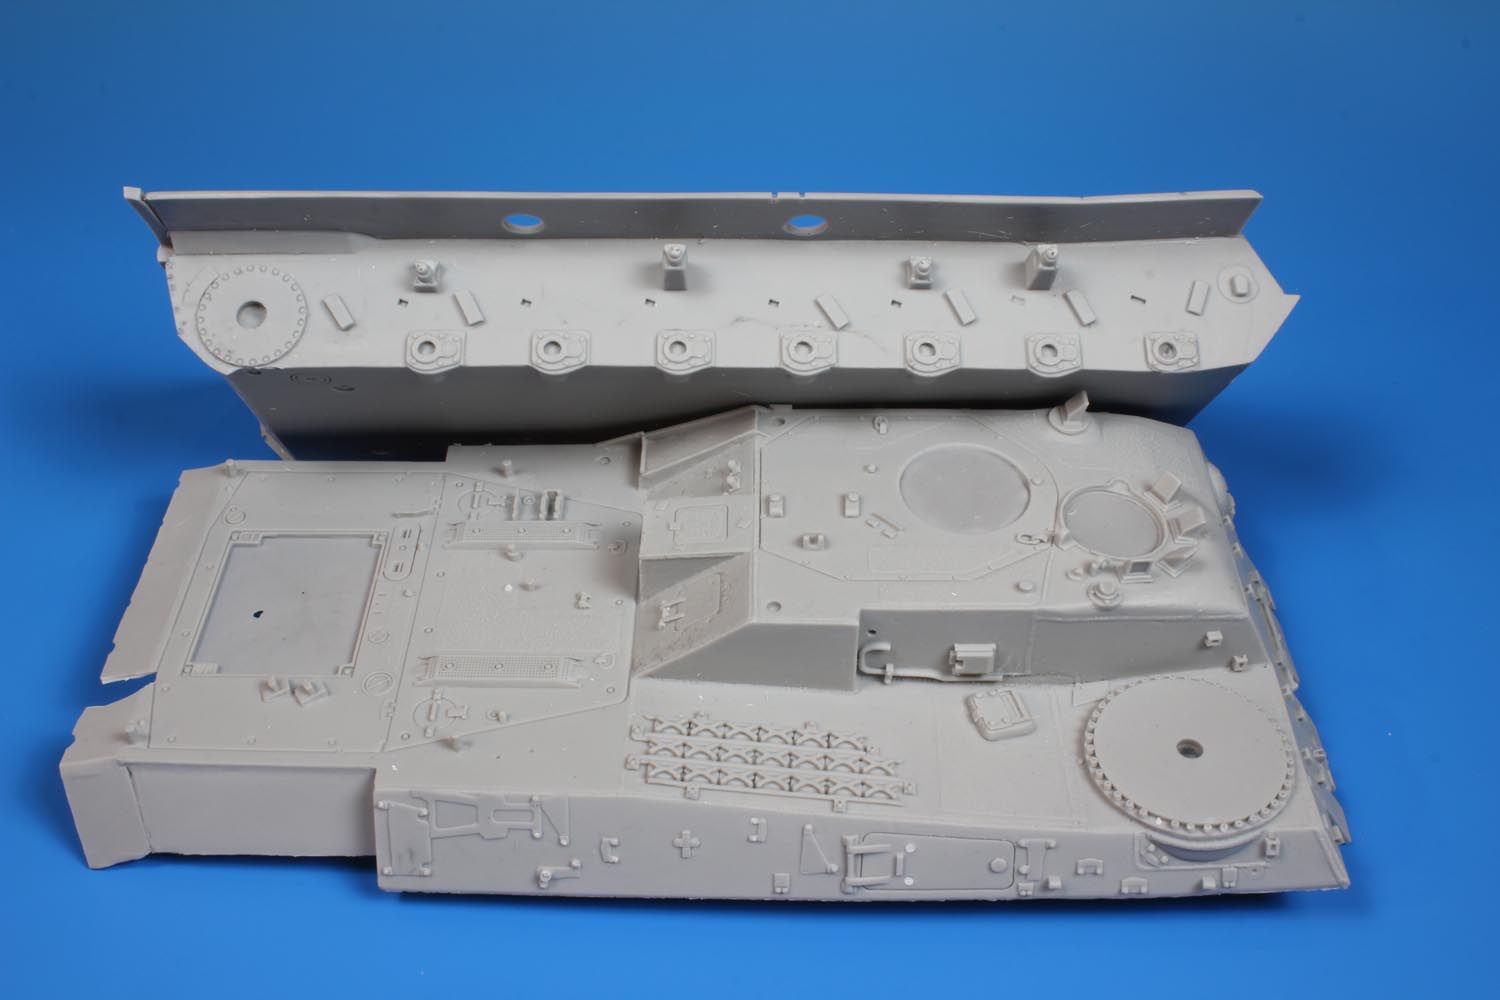
The MEXAS mounts are cast on the upper hull part. I see the logic in this as no additional work is required if the modeller chooses the option of building the Badger as a late version without the MEXAS modules. However, the cast on MEXAS mounts must all be sanded off if the MEXAS modules are to be added. An option for PSM to have considered was providing the MEXAS mounts as either separate resin parts or as photo etch parts. This would have essentially created a 3-in-1 kit - without MEXAS mounts, with MEXAS mounts, or with MEXAS mounted.
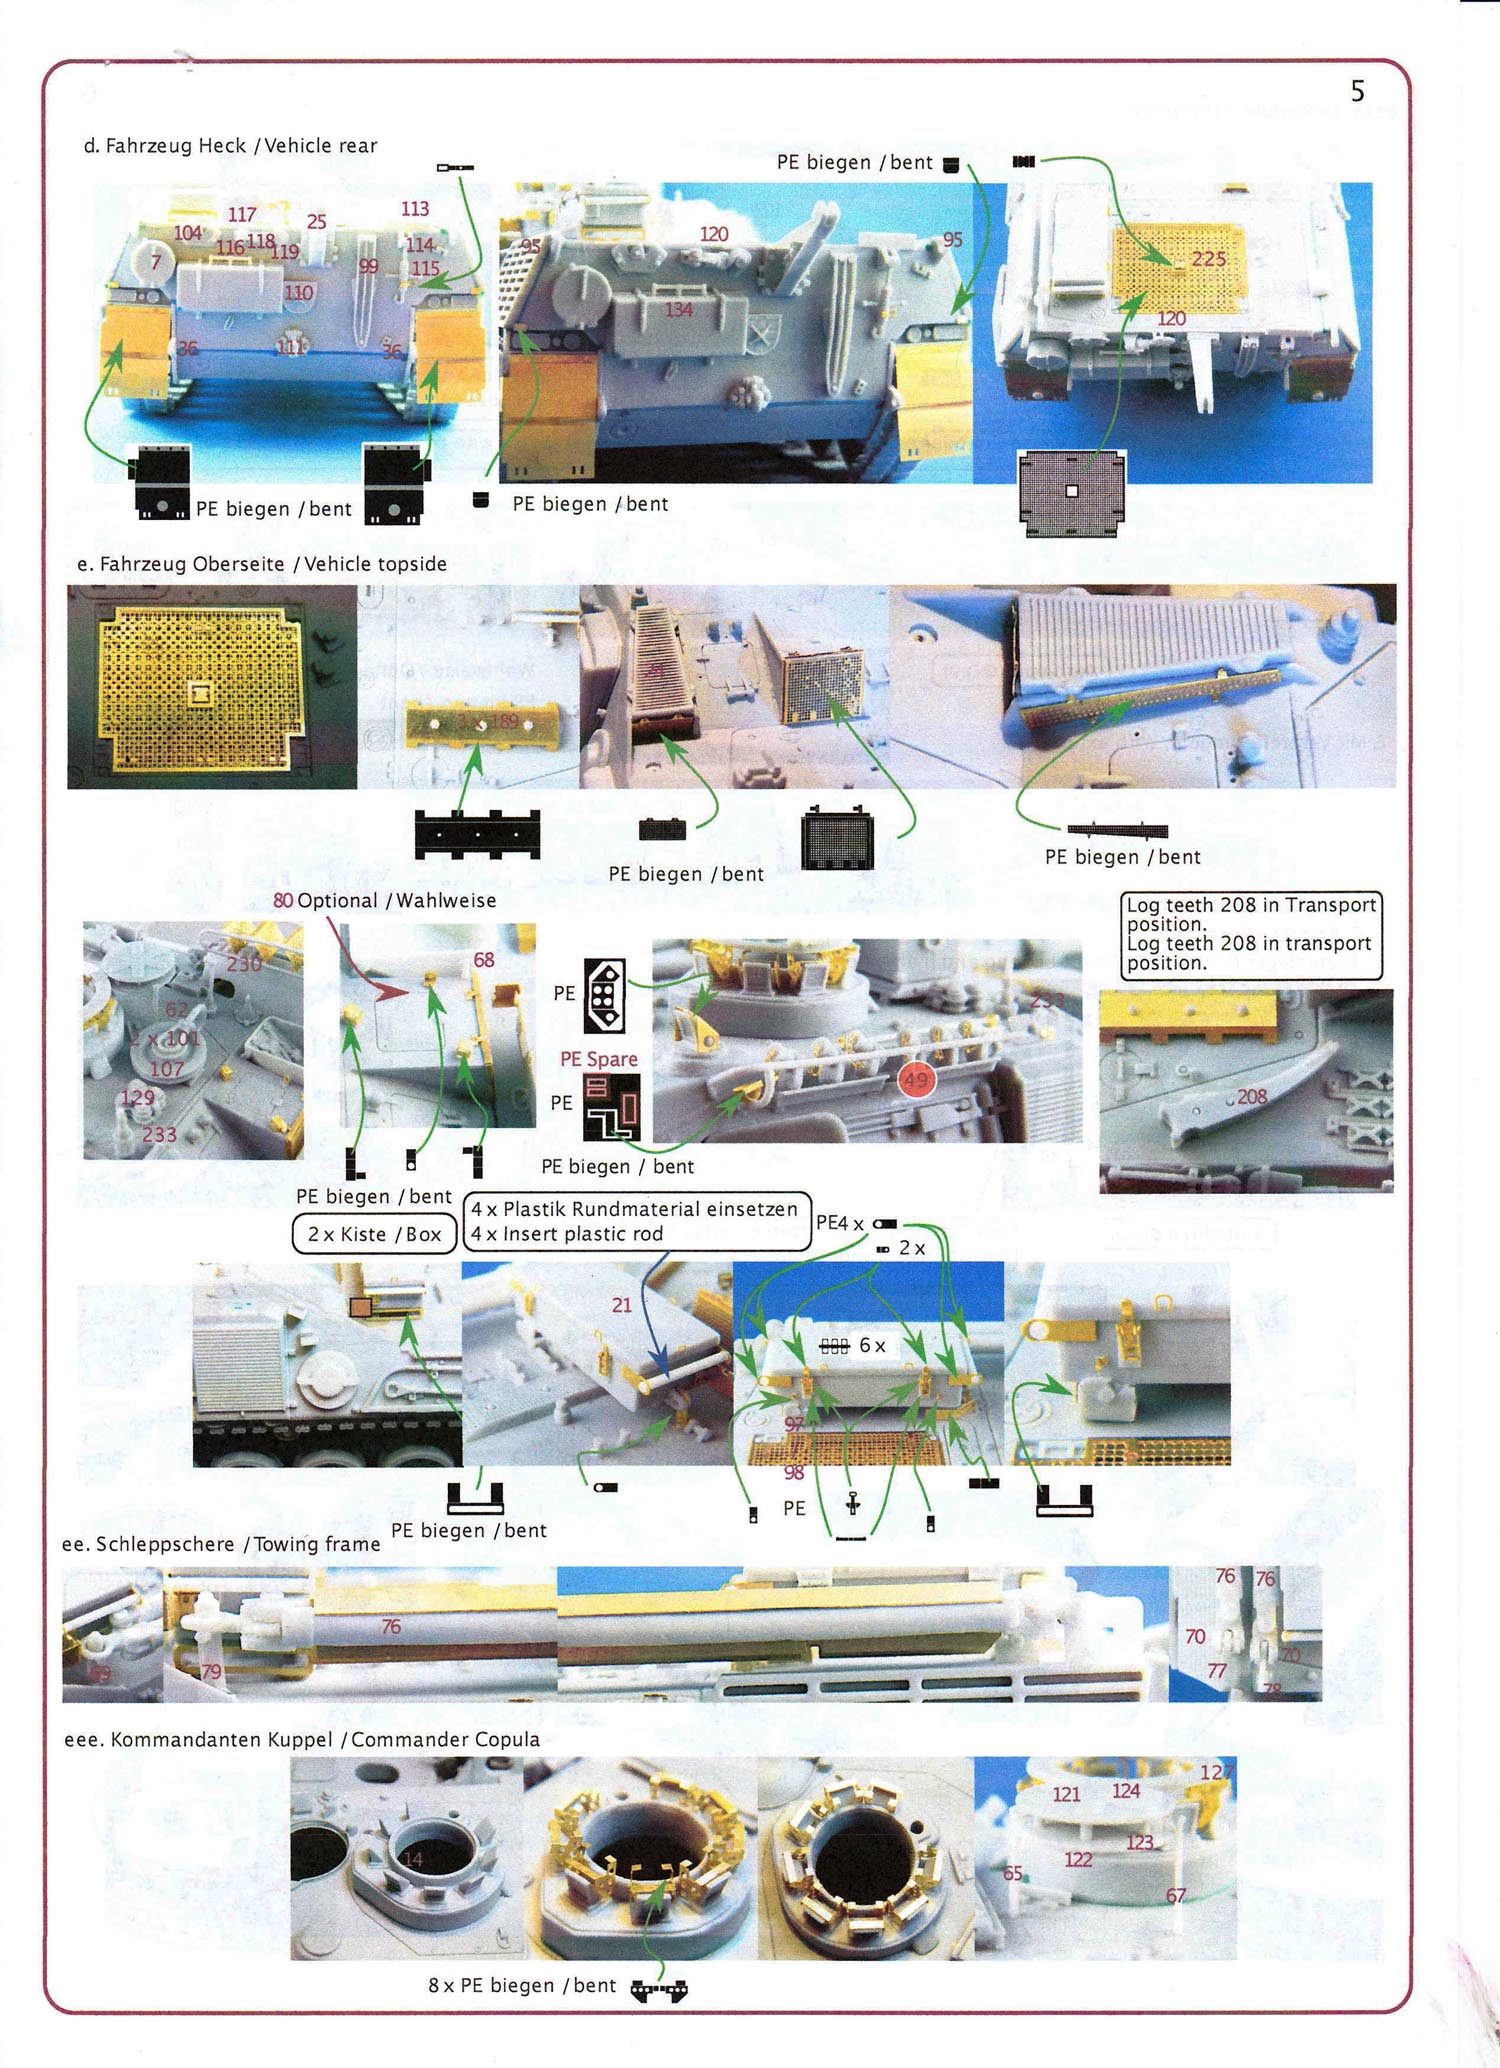
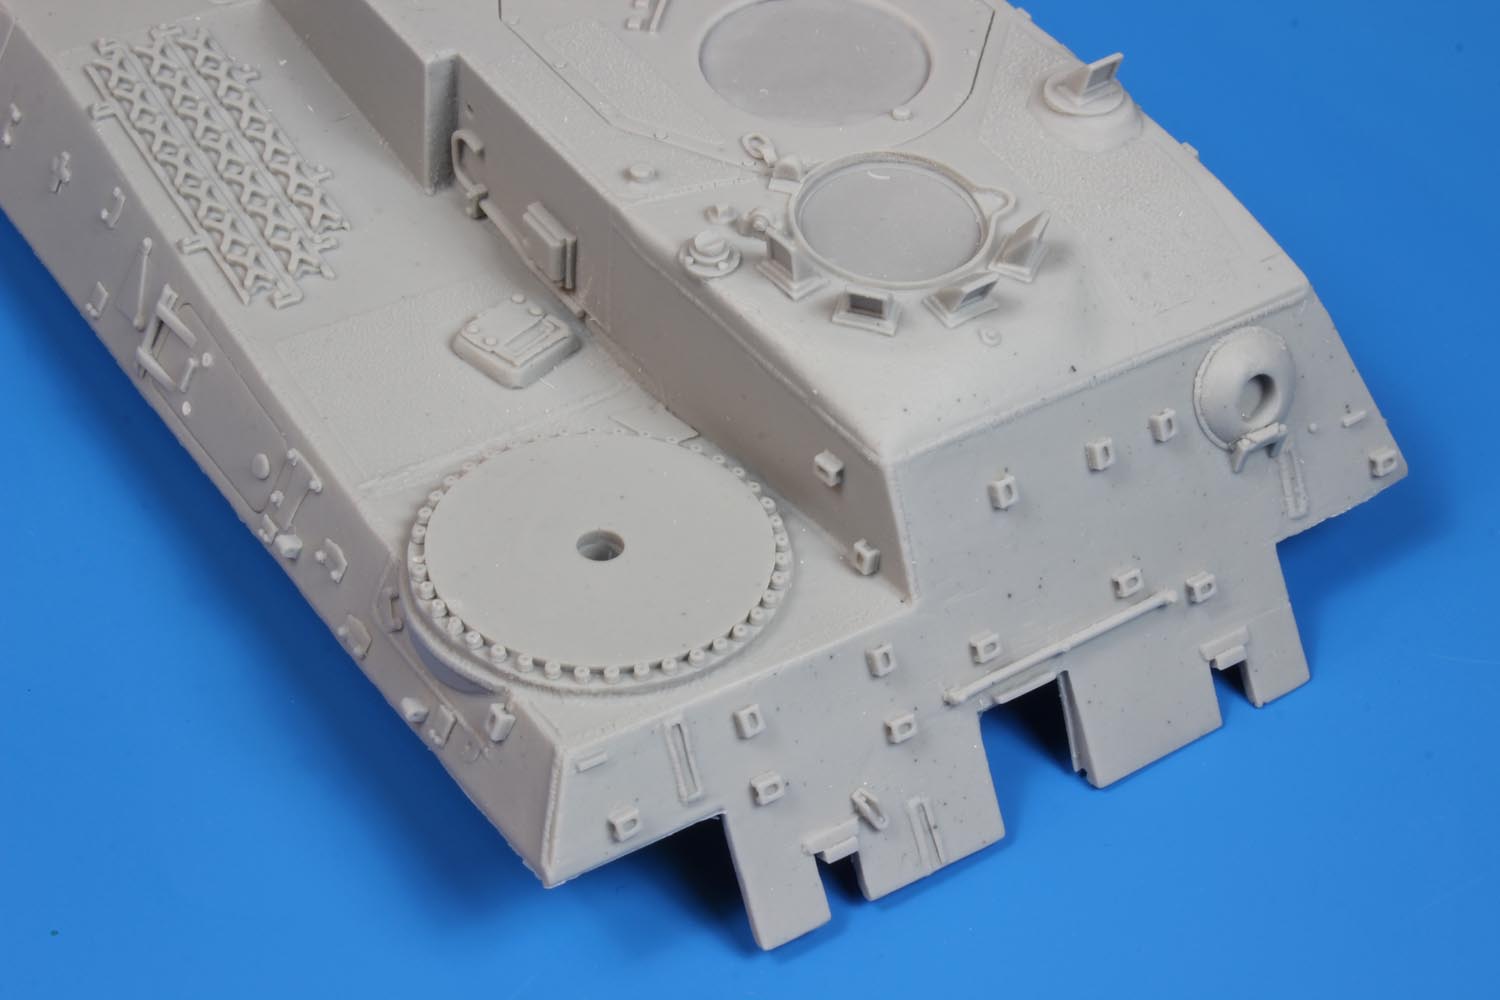
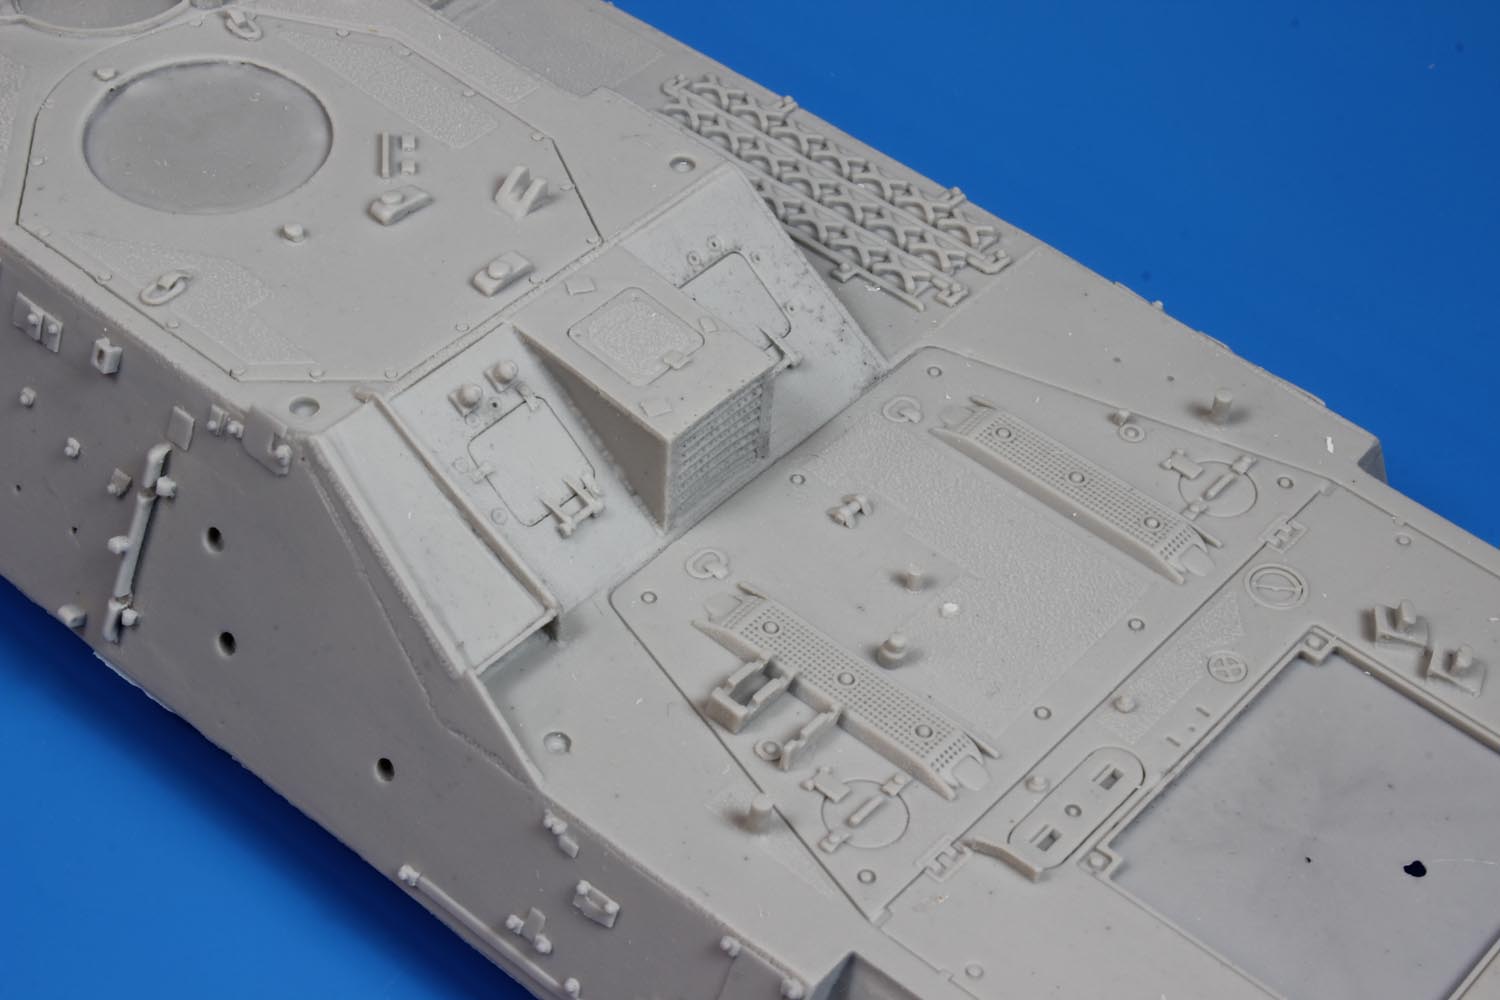
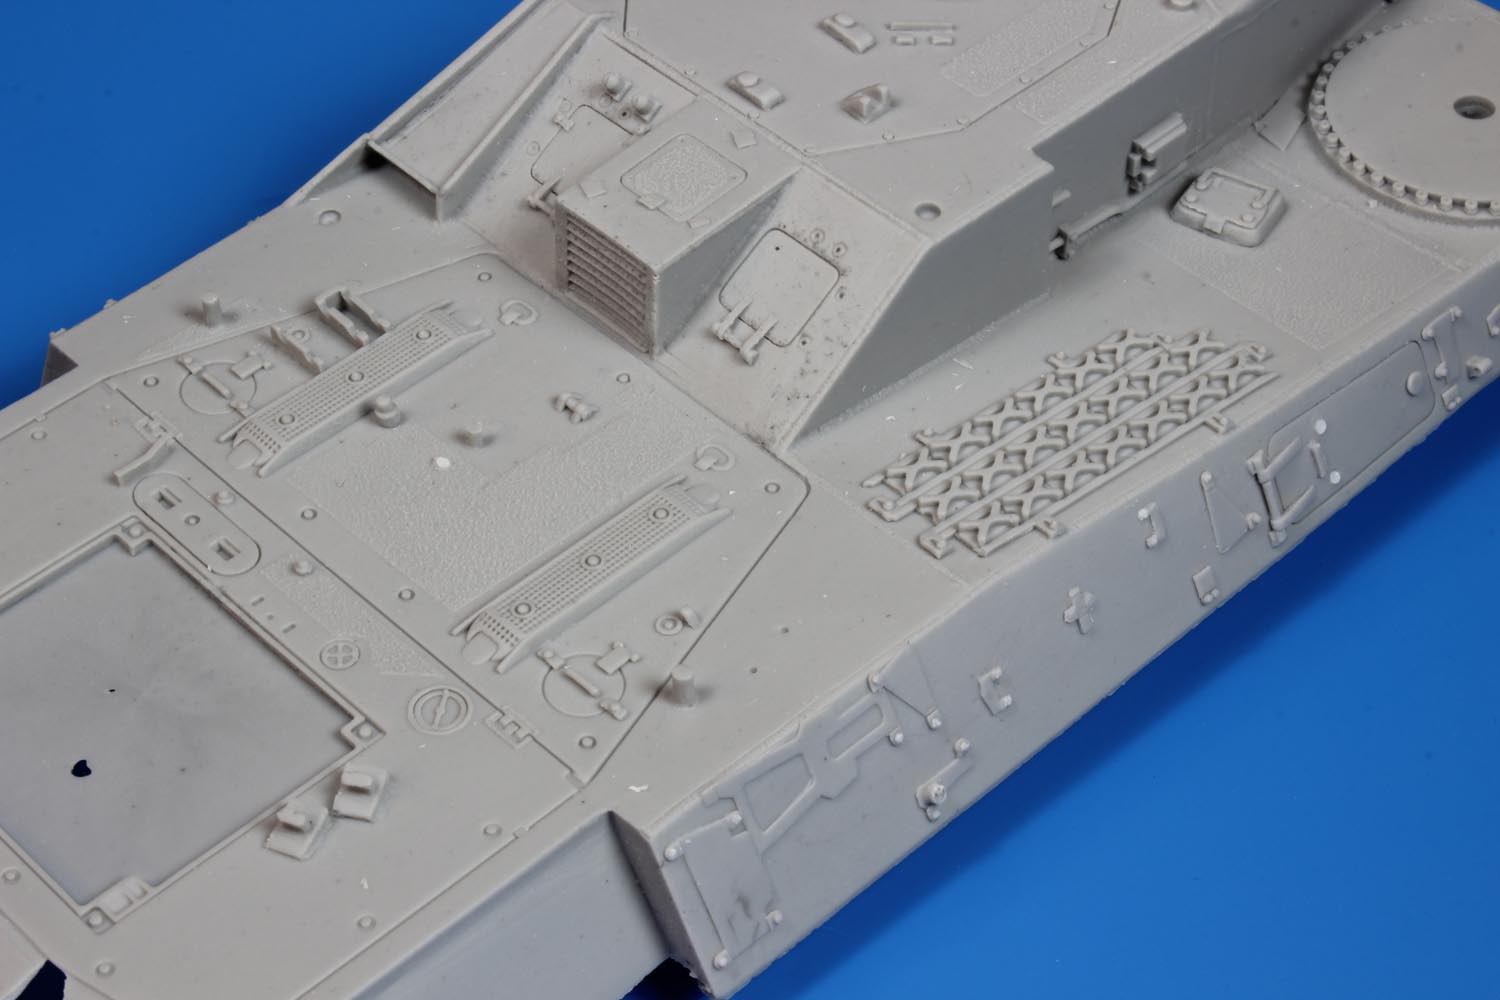
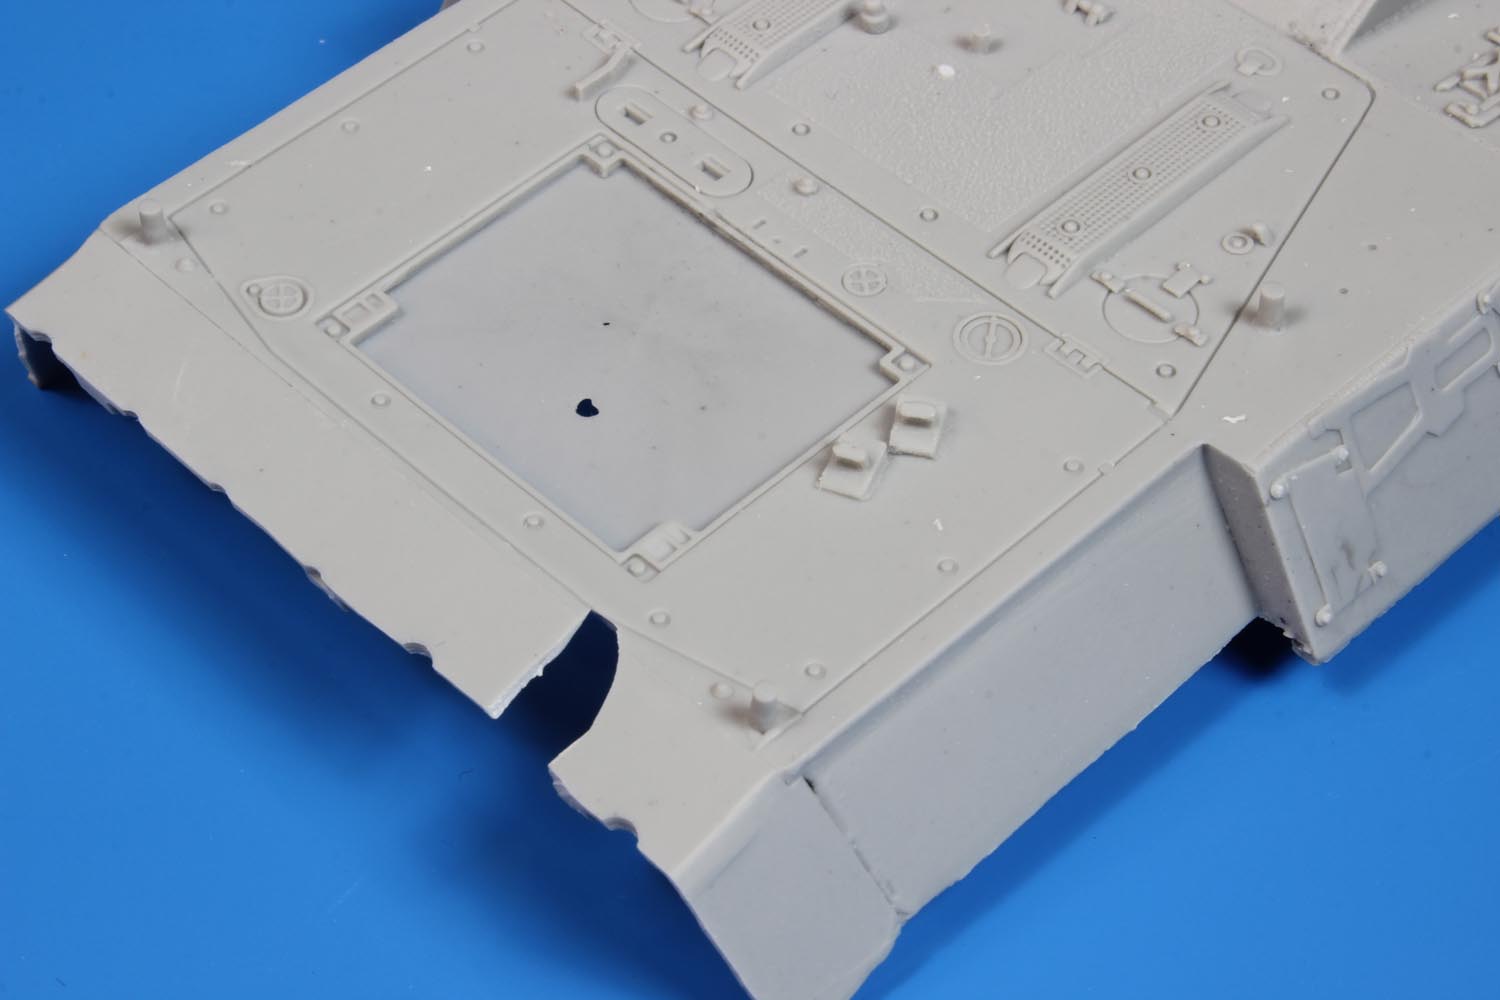
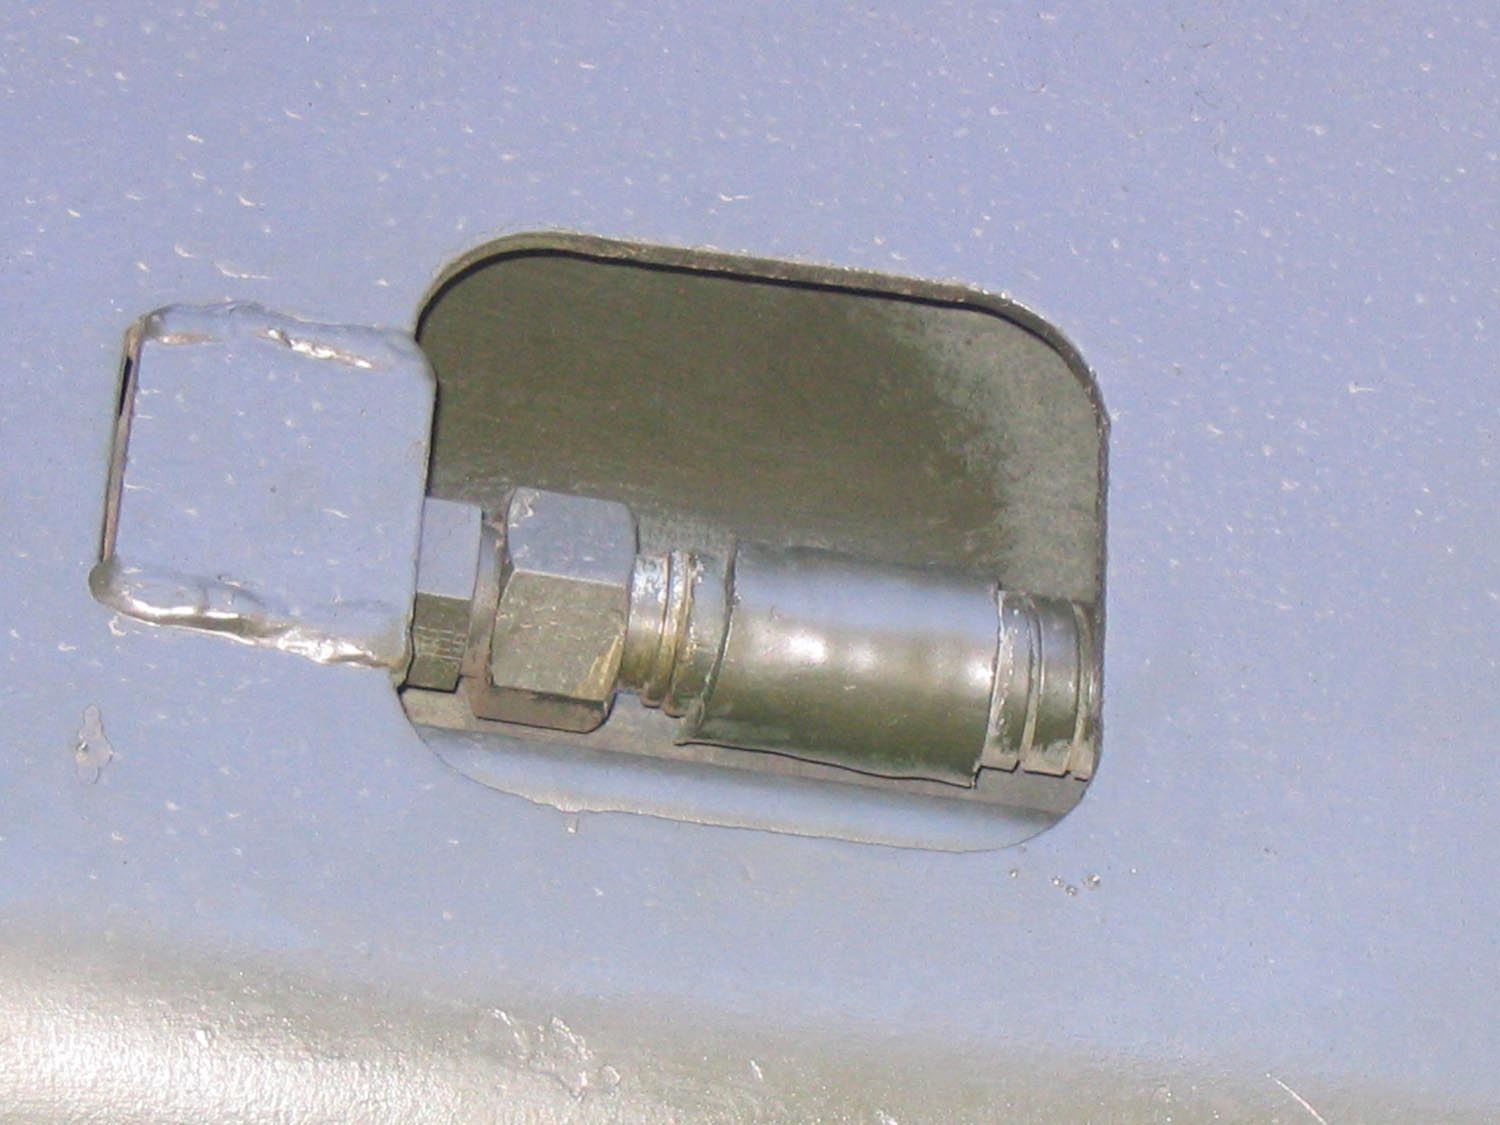
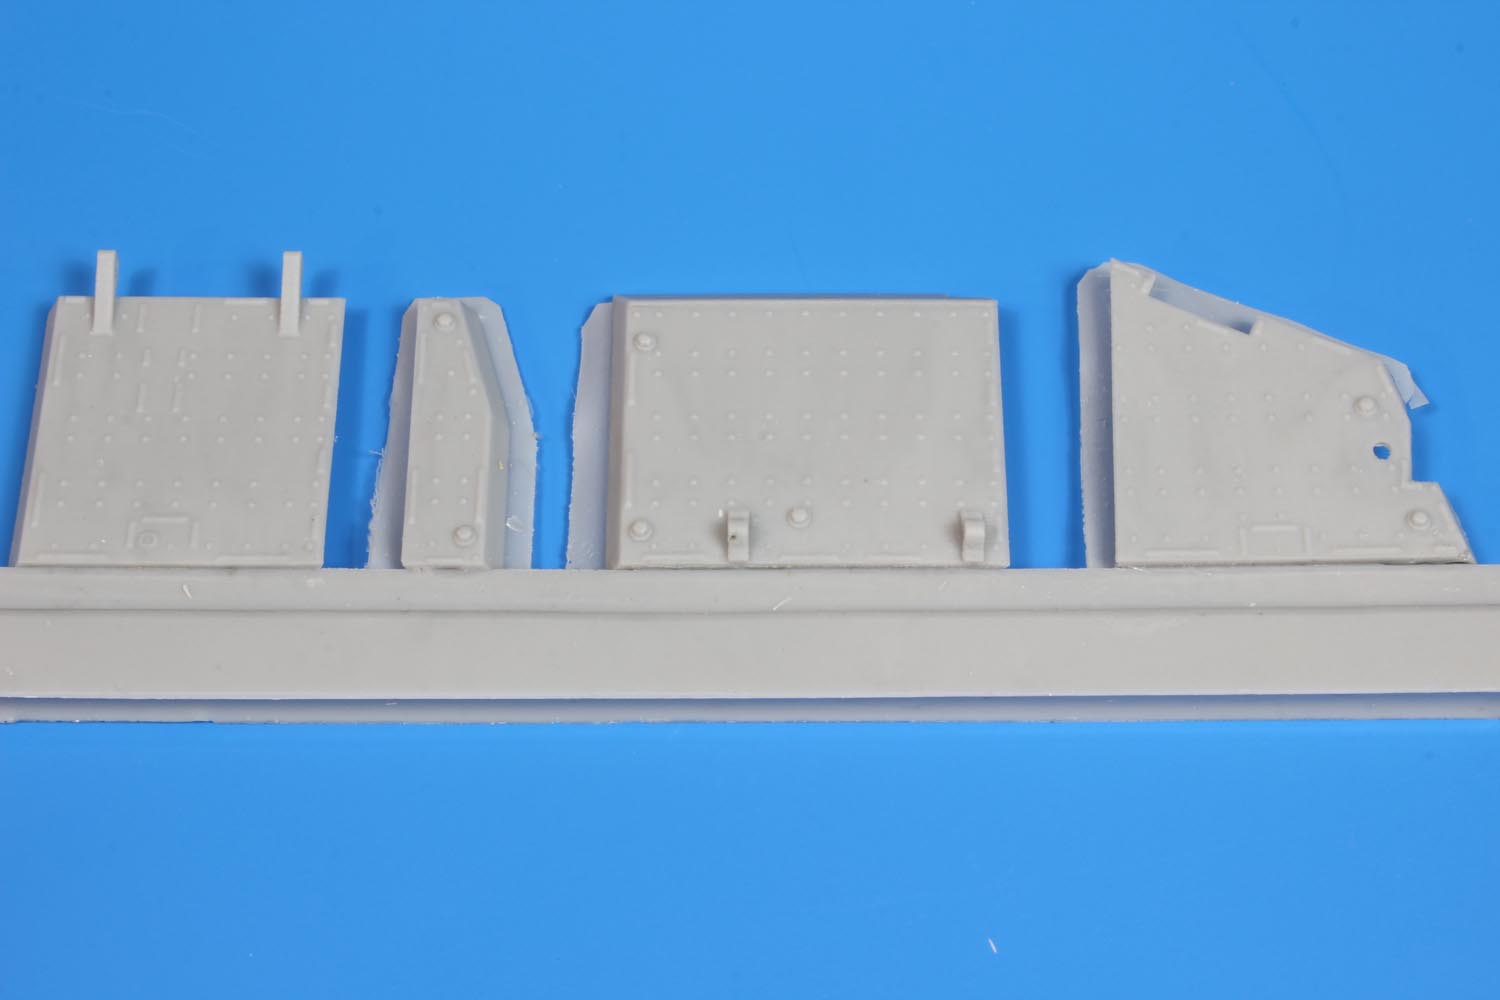
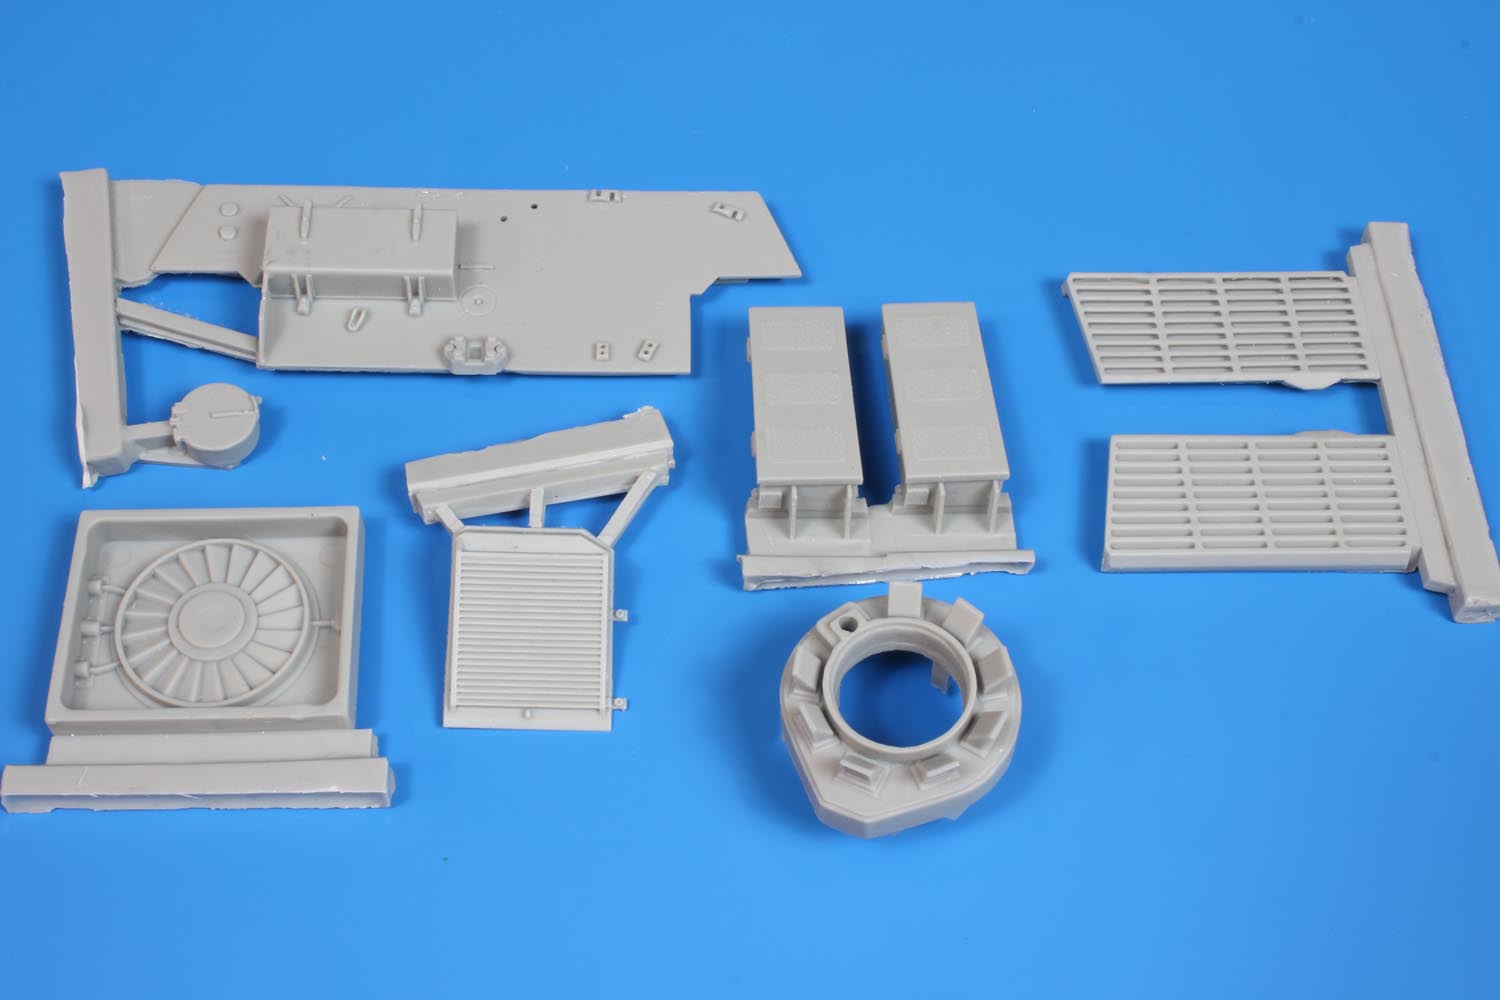
The commander's hatch, driver's hatch, and left hull side access hatch are all able to be posed open. There is no interior included in the kit. There are top notch anti-slip surfaces on the hull roof and trailing to the back deck. The weld seams on the upper hull are very nicely detailed and certainly add to the level of details visible in the kit. The engine deck will have a resin fan assembly and photo etch grille added during assembly.
Badger AEVs in Afghanistan were retrofitted with thermal covers as the deployments continued. This is not included in the kit and would have required a complete second upper hull and additional covered parts in order to provide that option. Perhaps in the future PSM will release another Badger kit with the thermal cover option- as was done with their Leopard C2 MEXAS conversion.

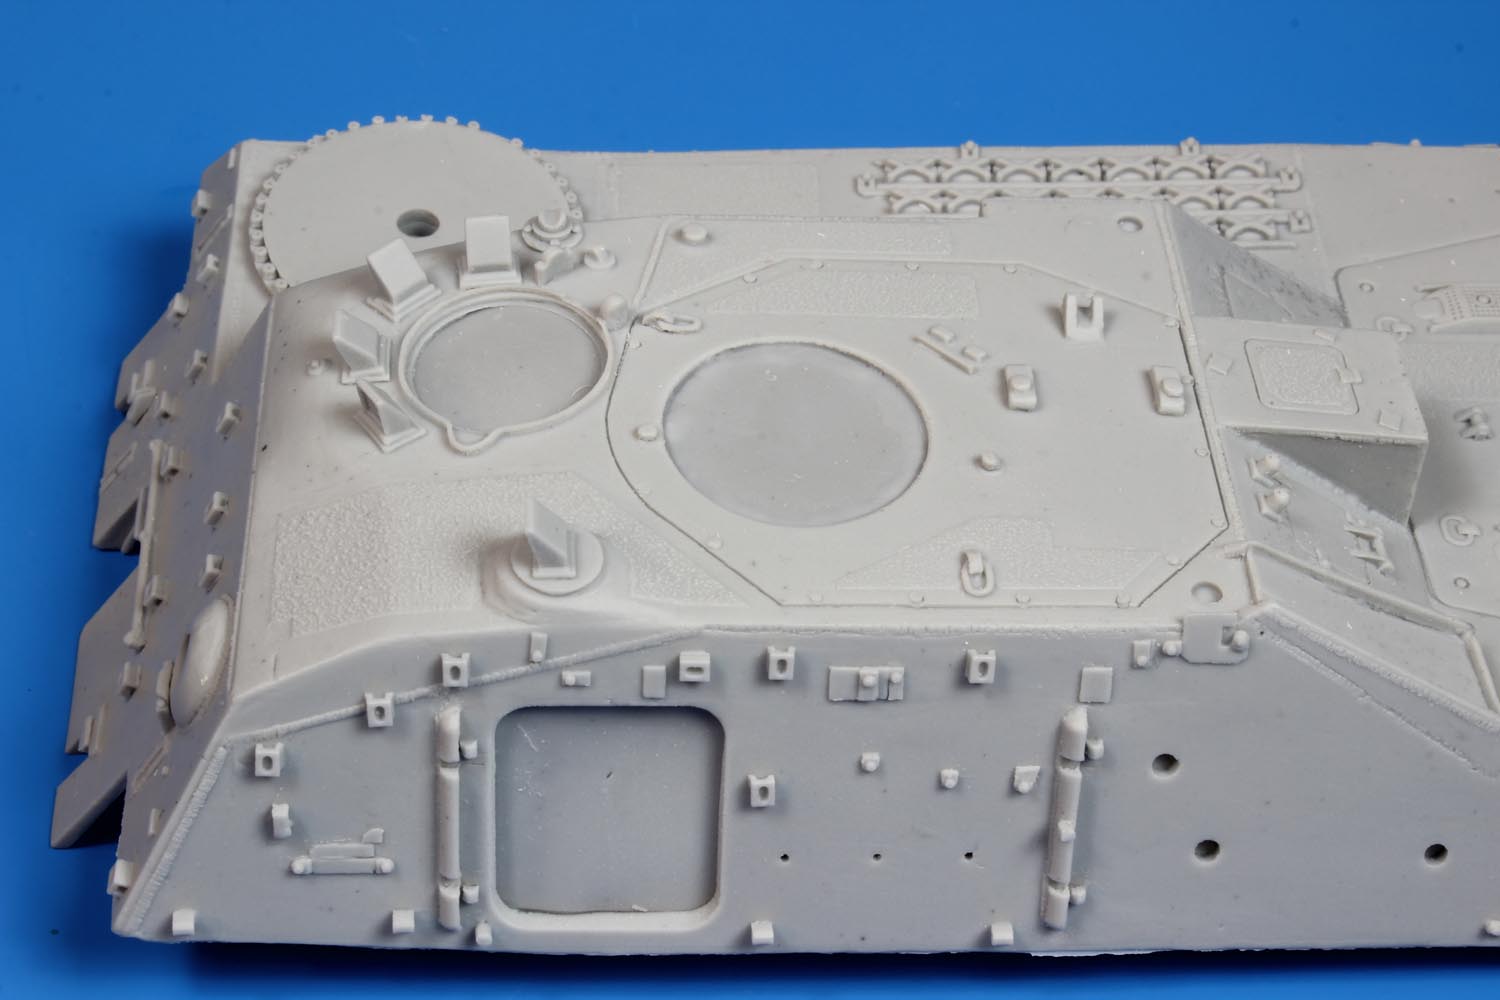
Pioneer tool mounts are cast on to the hull sides. This will aid in placement of the tools themselves. Note that some of the forward positioned mounts will have to be removed if the MEXAS is mounted. The three rows of grousers are cast on to the upper hull. The detail is good, but I found it interesting that they were cast on rather than include them separately, possibly with photo-etch brackets to allow for a variety of grouser display options.
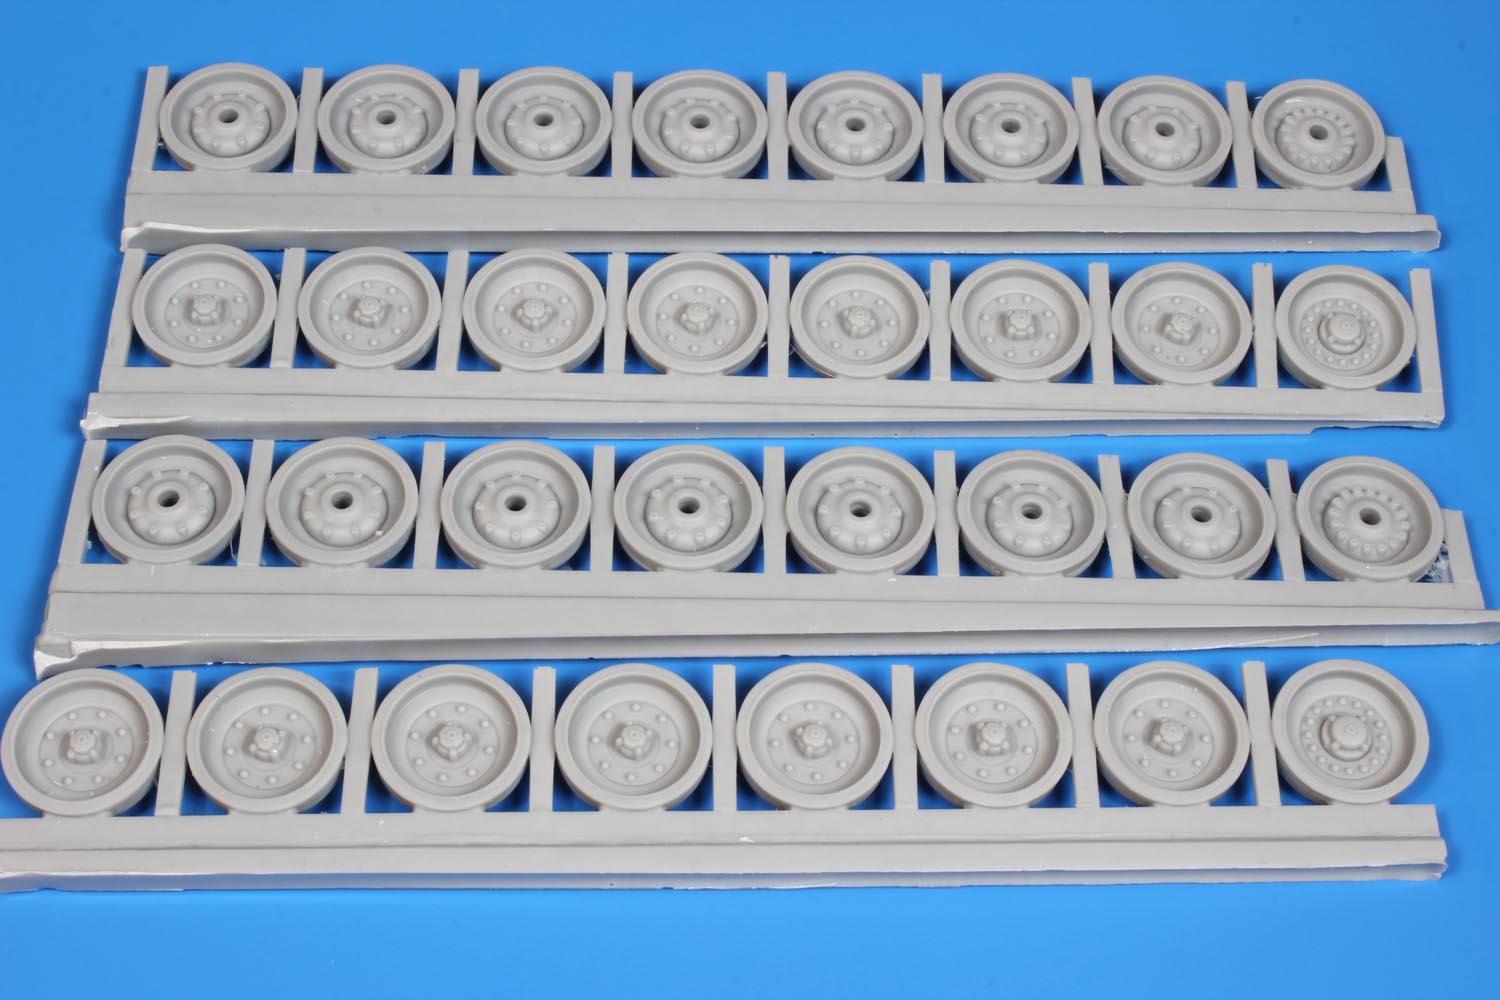
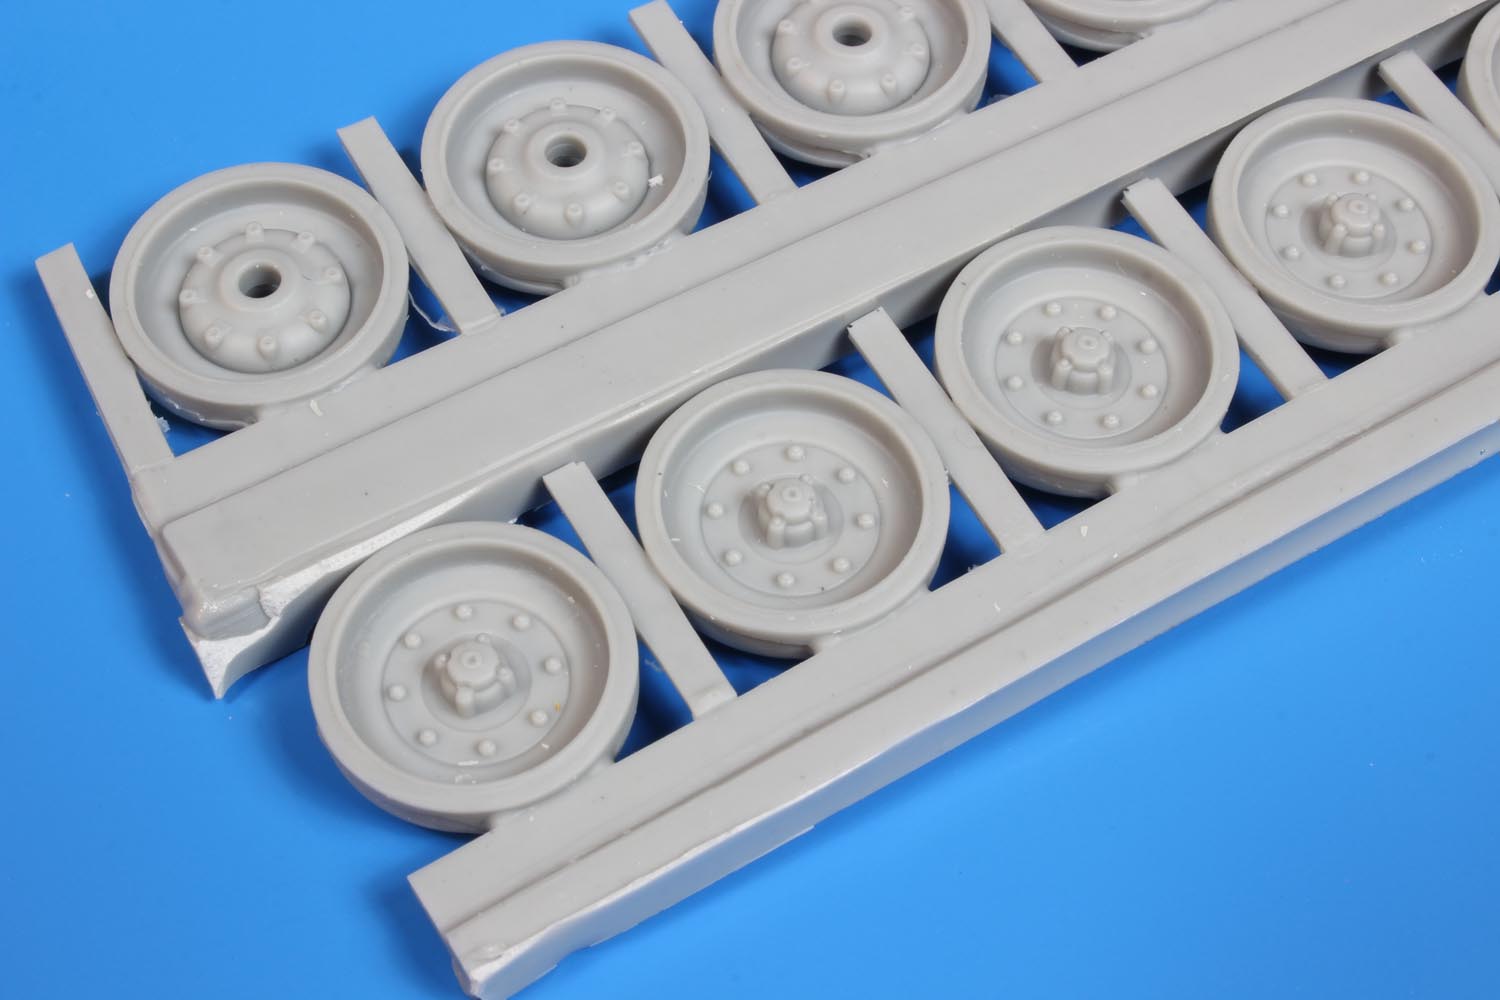
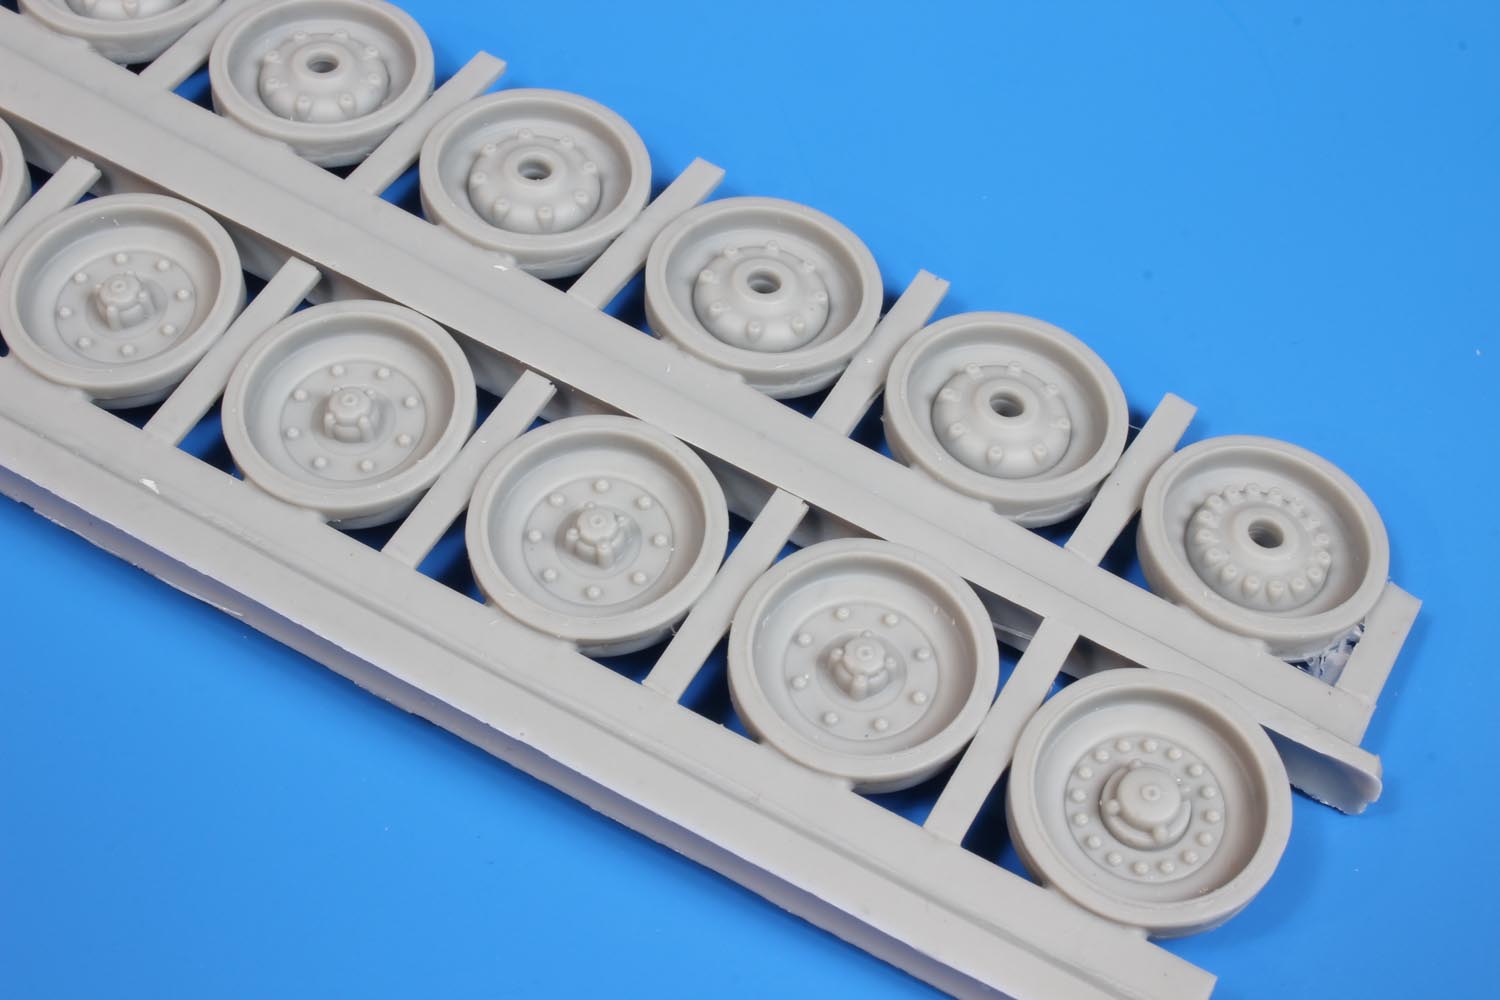
As this is a full resin kit the entire suspension is provided. The road wheels, idler wheels, and drive sprockets are all well represented. There is cleanup required on the road wheels as they are solidly attached to the casting blocks on three sides of each wheel. I subjectively feel there should be a more gradual curve in the bowl of the road wheel as it leads up to the inner sides. This is minor and does not detract from the overall look of the road wheel. The inner road and idler wheels are provided with rear-side details. The detail, while very prevalent, is not a match to the real Badger road wheel details. The circular hub on the rear of the wheels appears too bulbous and should sit much closer to the inner surface of the road and idler wheels. However, it is a nice addition particularly since the Badger suspension is not covered with side skirts and there is a higher likelihood of these details being visible (model contest judges breathe easy!). The road wheels appear to be strikingly similar in all manners to the road and idler wheels in the newer release Revell Leopard 1. Replacement road wheels can be sourced from the Leopard Workshop LW001-1 Leopard 1 Replacement Road Wheels and Idlers - Standard Wheels 'Type 1'.
The drive sprockets have some minor flash and will also require cleanup. I noted that there are eight (8) recessed bolts represented on the centre hub. There is also one bolt purposely missing leaving an open hole and seven recessed bolts. In counting the bolts on actual Canadian Badger AEV drive sprocket, the count is fifteen (15) small raised bolts. The eight-bolt drive sprocket is the configuration for the original production sprocket with the raised flange. The fifteen-bolt sprocket is the later version sprocket introduced during the life span of the Leopard 1. As Canadian Badger AEVs were new-produced vehicles in the late 1980s/early 1990, they were all fitted with the fifteen-bolt drive sprocket. It is very likely that PSM carried over drive sprocket parts from older complete resin kits such as their Leopard 1 ARV and Leopard 1 AEV without updating them to the fifteen-bolt pattern. Live Resin does offer a set of the Leopard 1 fifteen bolt drive sprockets, LRT-35002. However, I am not sure if the Live Resin parts would be a simple swap as the set includes the differential plate for the lower hull. Some surgery may be required to use the Live Resin replacement parts. Another alternative is to source the 15-bolt drive sprockets from one of the Meng Leopard 1 kits. Those parts may be more compatible with the PSM lower hull.
I also noted that the twelve larger (12) bolts around the outside of the centre hub are Allen-type bolts on the actual Badgers but are represented as flush, or slightly raised, in the kit. This can be corrected with some light drilling of each bolt. A bit time consuming but it will look accurate.
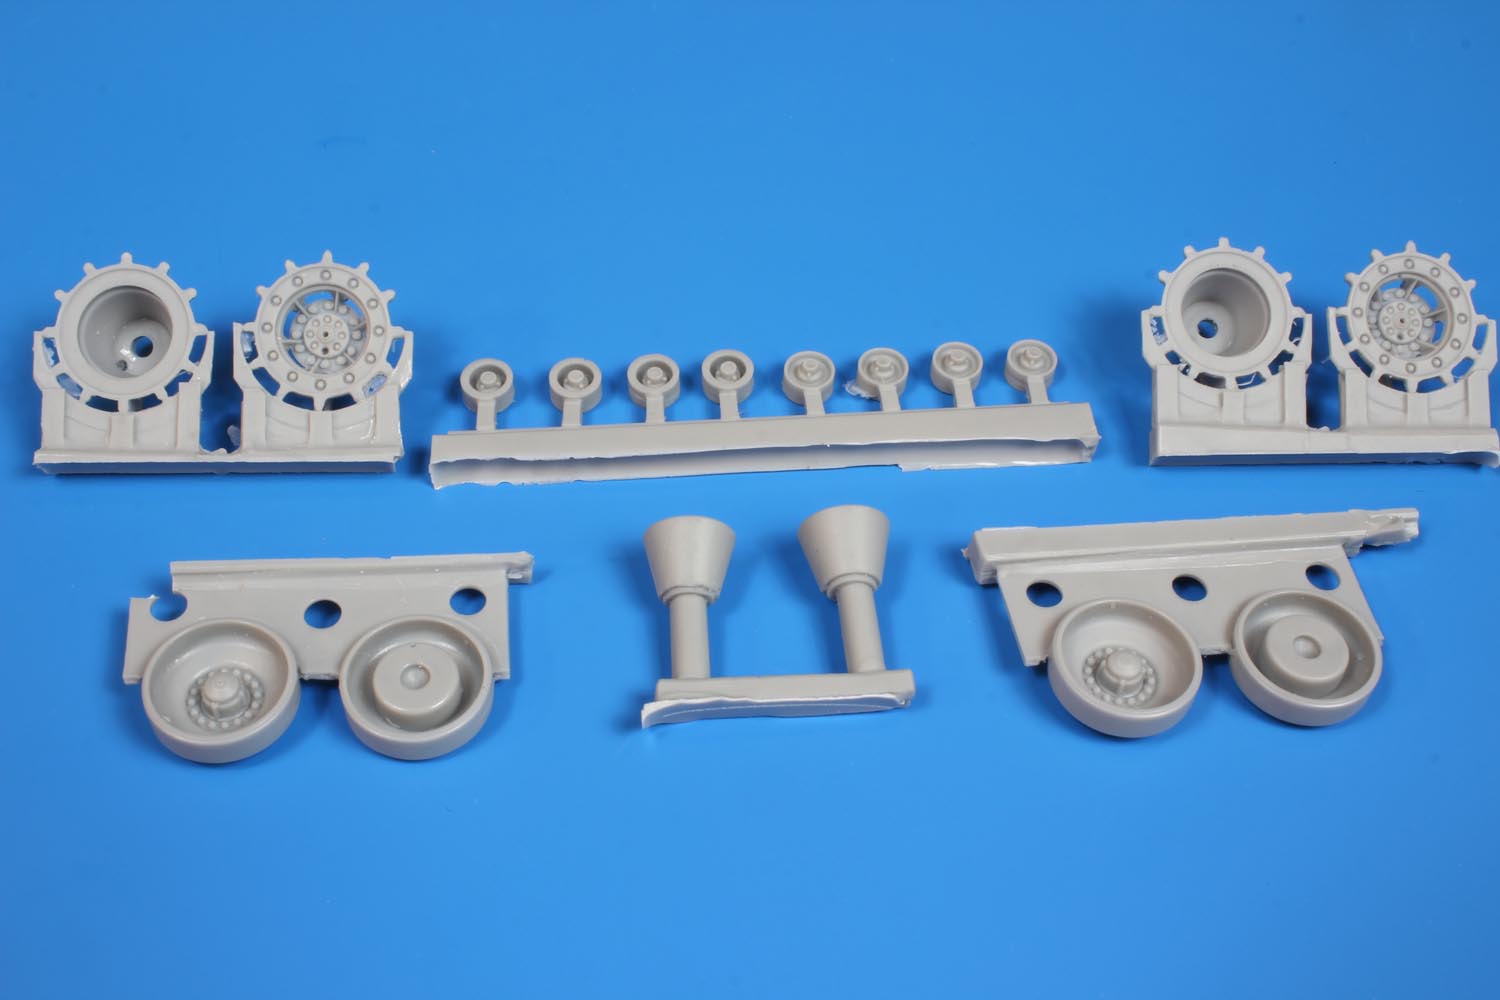
An interesting addition in the kit is a set of smaller idler wheels used as replacement idlers on some Canadian Leopard C1s and C2s. While I can find no reference images that indicate the smaller idler wheels were ever used on Canadian Badger AEVs, they are included nonetheless.
The suspension arms and shocks come cast together (as per newer release Revell Leopard 1). This eliminates any option for posing the suspension articulated in any manner unless modifications are done to the parts. The shapes of both the suspension arms and the shock housings seem rudimentary in shape and not consistent with standard Leopard 1 components. While the majority of the suspension arms and shocks are hidden by the road wheels the shapes of the components do not appear to be true to the real vehicle suspension. Replacements are available from Leopard Workshop LW010 - Leopard 1 Suspension Upgrade.
A very nice inclusion in the kit is the option to install either the original spring volute type suspension dampers or the later hydraulic dampers. The spring volute damper is round and has a visible coiled flat spring, while the hydraulic version is much squarer and has a metal rod protruding from the bottom. Both types were used on the Badgers and could be seen intermixed.
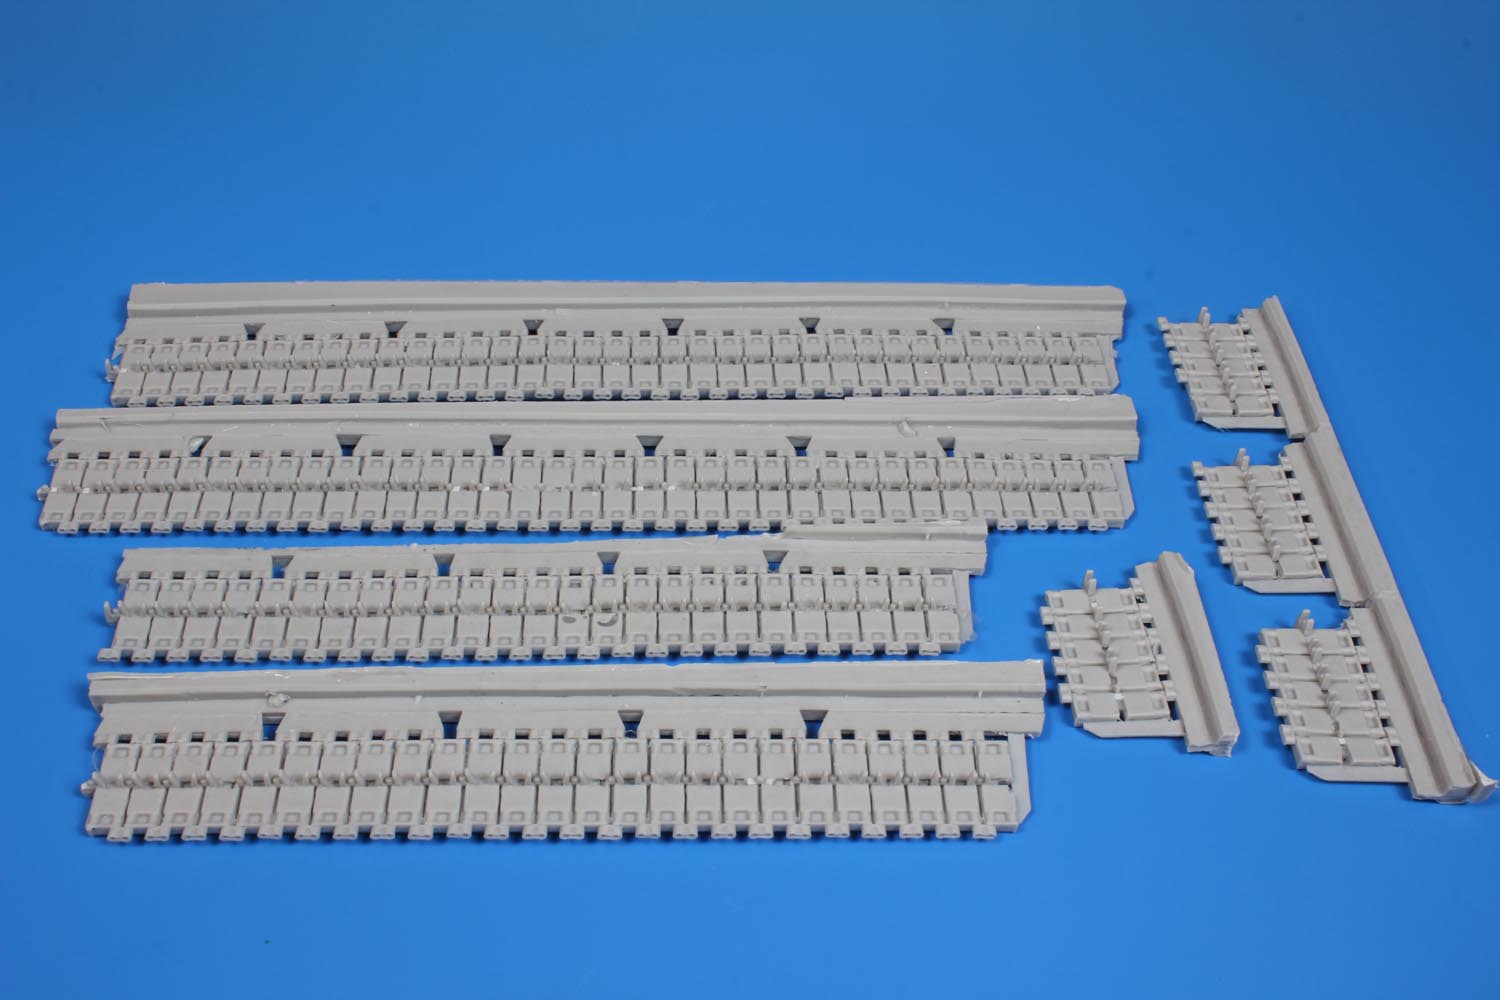
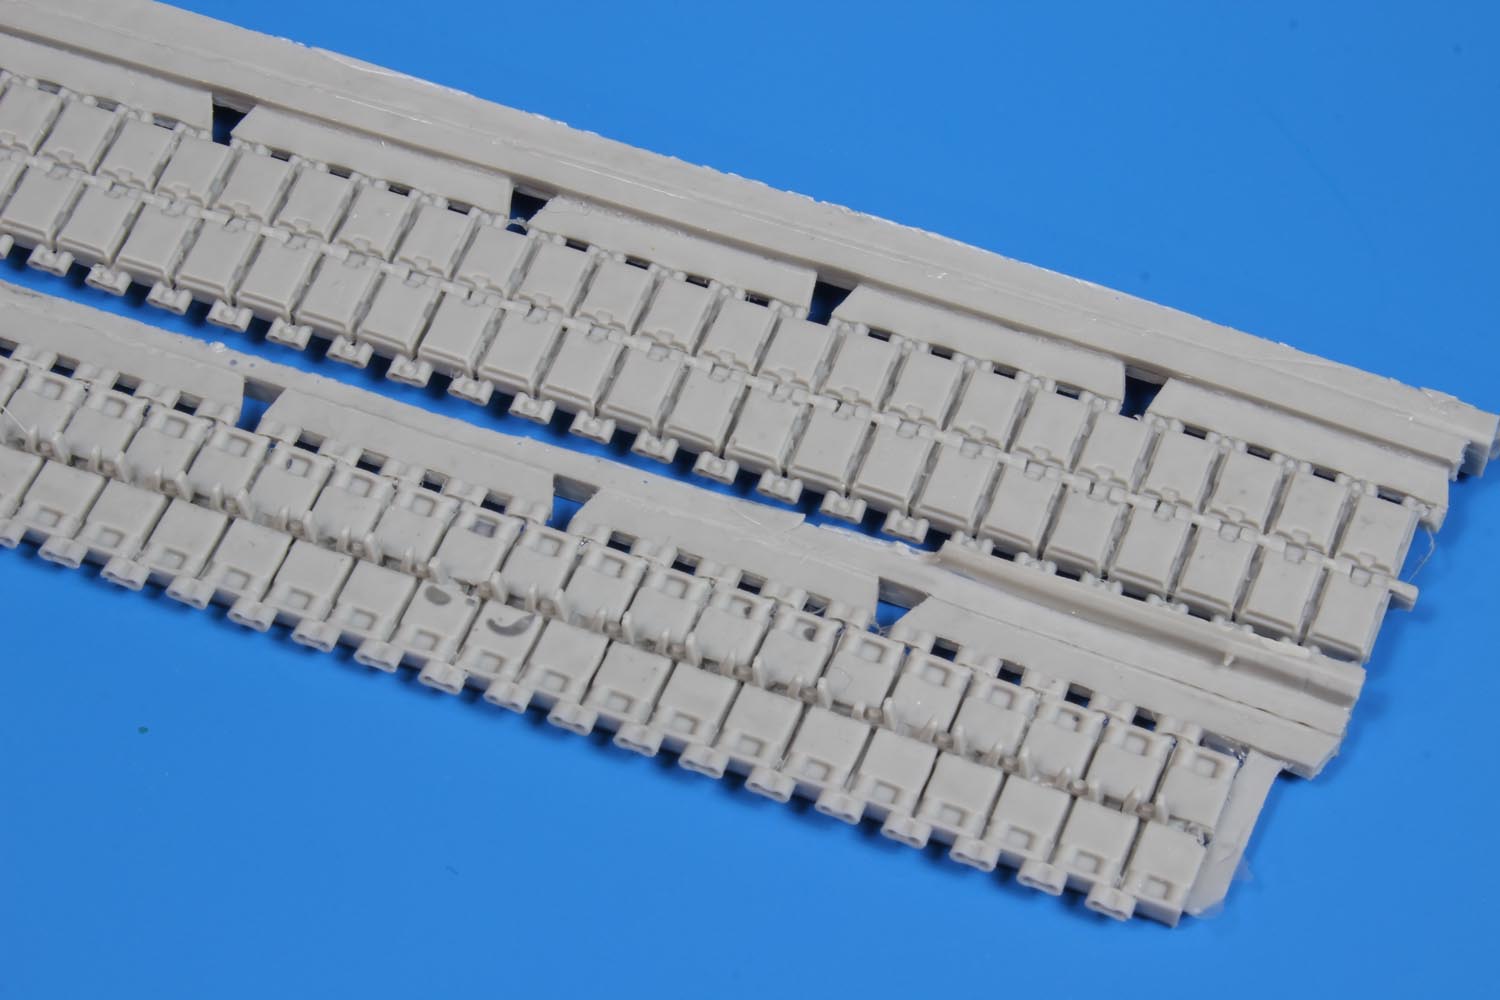
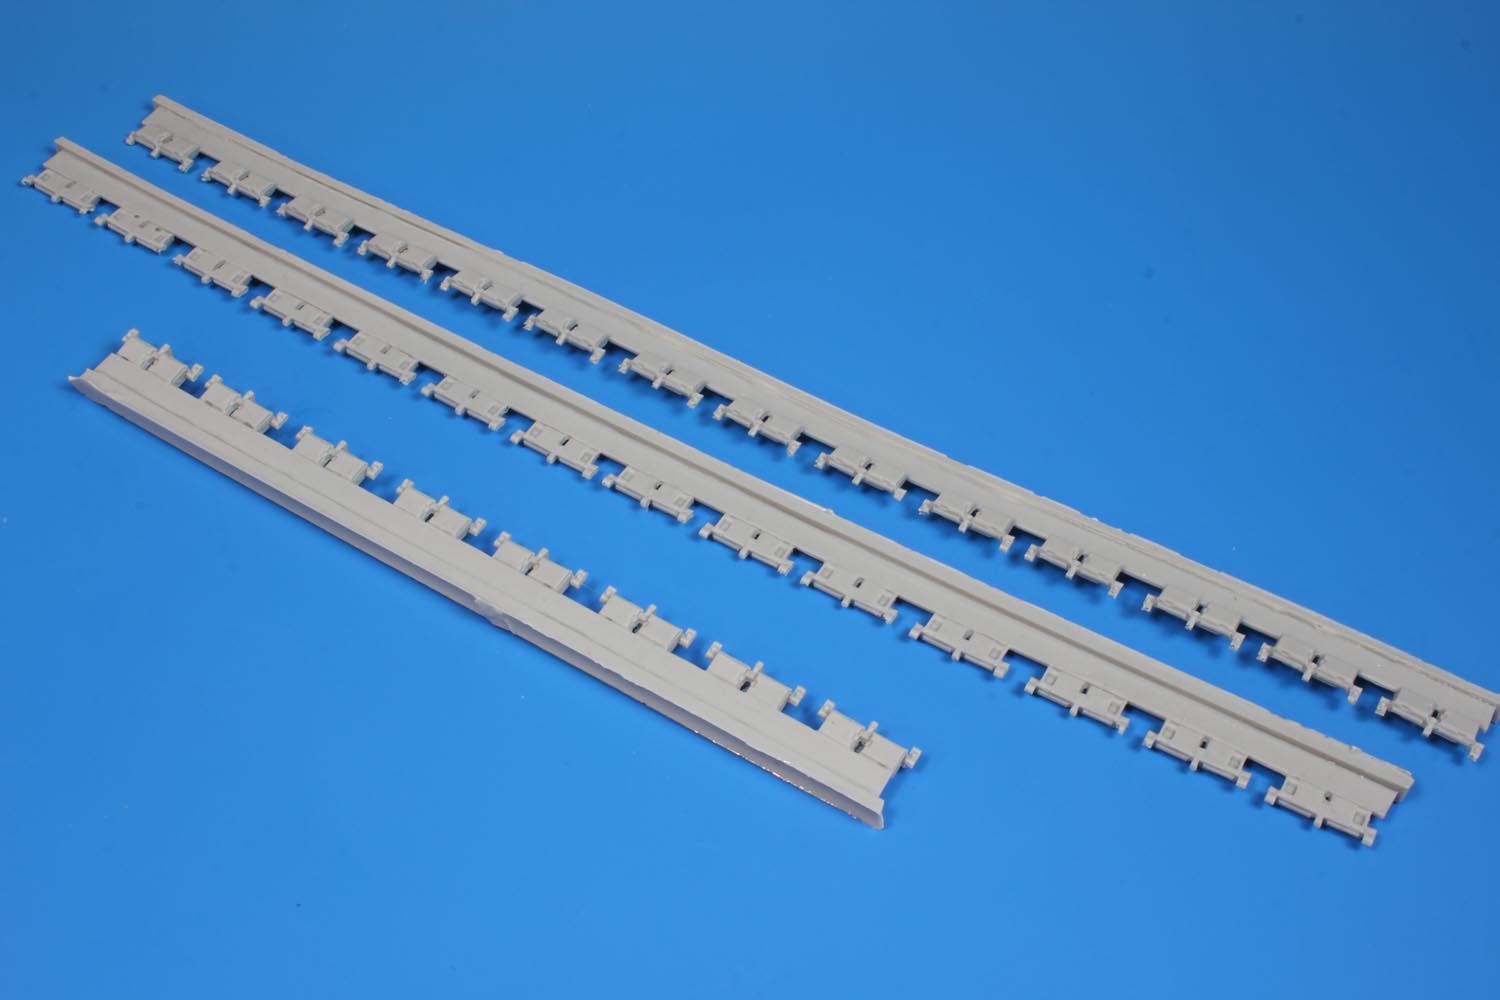
Love them or leave them, full-length runs of tracks are provided in resin. As the Badger has no side skirts, the tracks are very visible. PSM provides each set of tracks in multiple components:
The track sections are nicely detailed. The bolt detail on the end connectors and centre guides is noticeable as are the defined cut outs on the track pads. In my review kit there were approximately 24 centre guides damaged in some form. This is very likely due to the packaging. Repairs would be very time consuming and would require using other individual link Leopard 1 tracks to repair the resin parts. Modellers may choose to simply go directly to aftermarket individual link tracks. This would not be so much of any issue if the Badger had side skirts but with completely visible tracks they should be as intact as possible for realism.


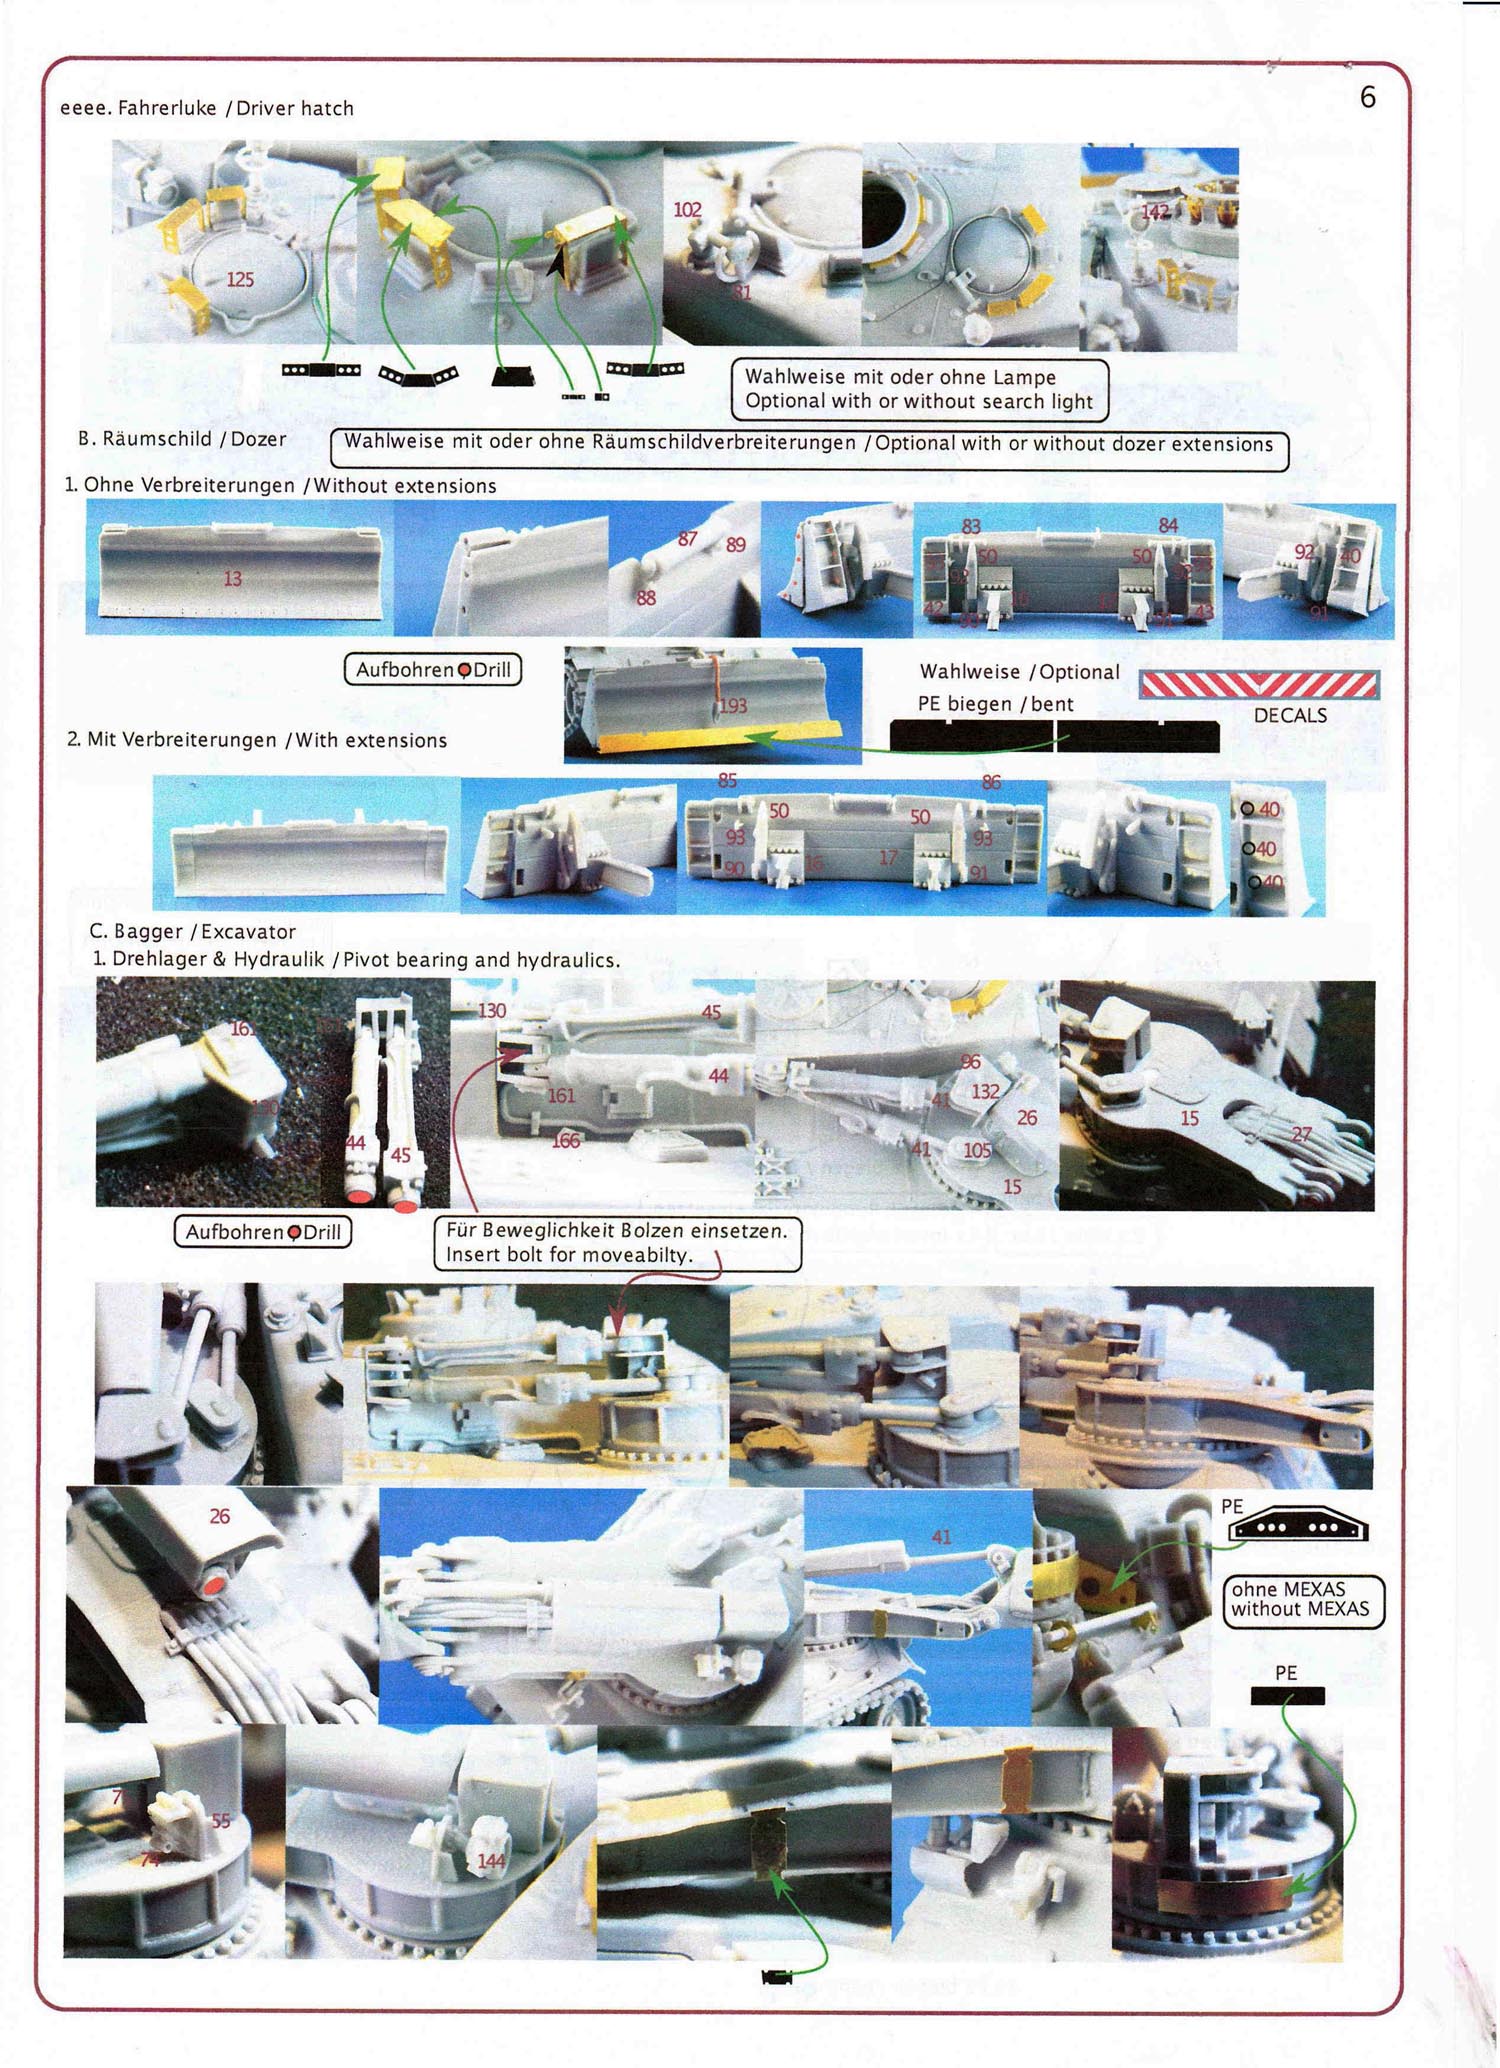
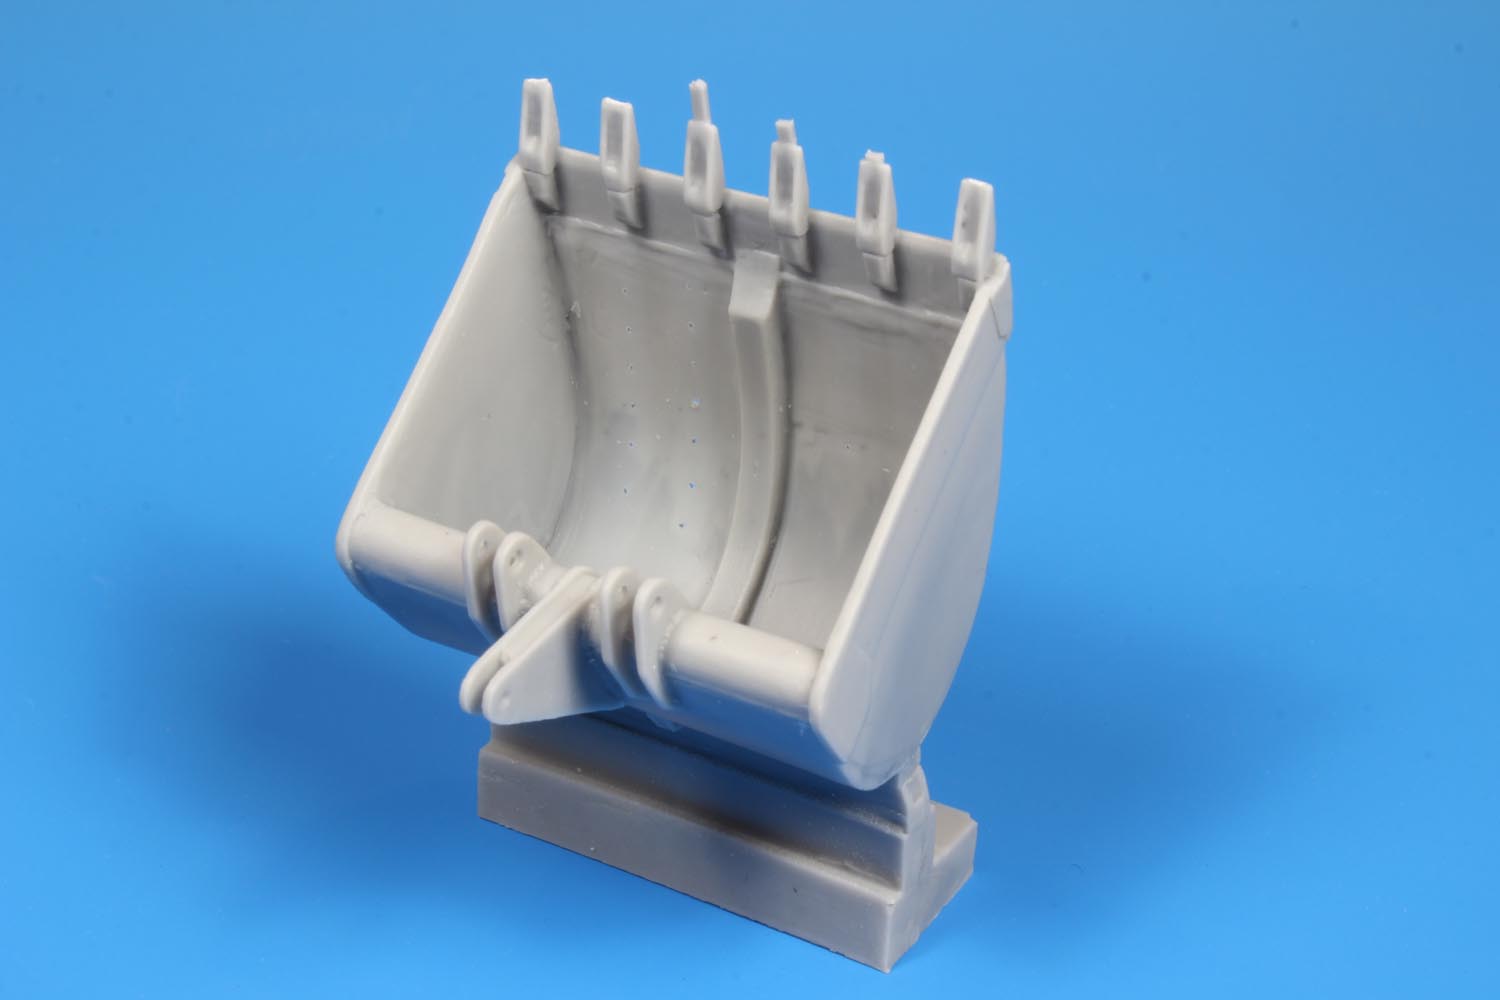
The dozer blade of the Badger is a massive piece of metal designed to push, smash, scrape, dig, and claw its way through anything that stands in its way. It can also be used to support the Badger and create an anchor during winching tasks, and to enhance the use of the excavator arm when it is extended. The dozer blade is integrated into the hull of the Badger and a permanent feature - unlike a dozer tank or more modern modular AFV designs such as the Wisent 2 or Ram AEV where implements such as blades and mine plows can be interchanged. The Badger AEV blade includes removable extensions on both sides, as well as attachable scarificer teeth that attach to the bottom rear of the blade for breaking up challenging ground or obstacles. The blade in the kit is a solid well-formed piece of resin. The extensions can be mounted on the blade ends, or stowed. Some minor drilling is required for the blade end if the extensions are to be stowed. These are the attachment holes when the extensions are mounted (study the instructions). The claw-like scarificers are shown mounted in the stowed position in the instructions with no guidance for a working position. Solid resin mounts are provided for attaching to the rear of the dozer blade and into the front hull guides positions. The dozer blade should be able to be positioned as the modeller chooses but it is not functionally moveable. It must be glued in place in the desired position. Additional add-ons to the blade include the winch cable roller at the top centre of the blade and the option to mount a photo-etch extension to the bottom blade edged. This extension was used for the red and white traffic warning placard (decals provided). The blade warning placard coincides with using the rear mud flap placards. These placards were commonly used on Bundeswehr and Canadian Badgers in Germany due to the heavy use of civilian roadways but seldom, if ever, used in Canada or any overseas deployments. I would recommend not using the dozer blade placards for any MEXAS mount or armour related Badger even though it is a temping colourful addition.
Overall this subassembly looks accurate, a limited amount of parts, and very well detailed.
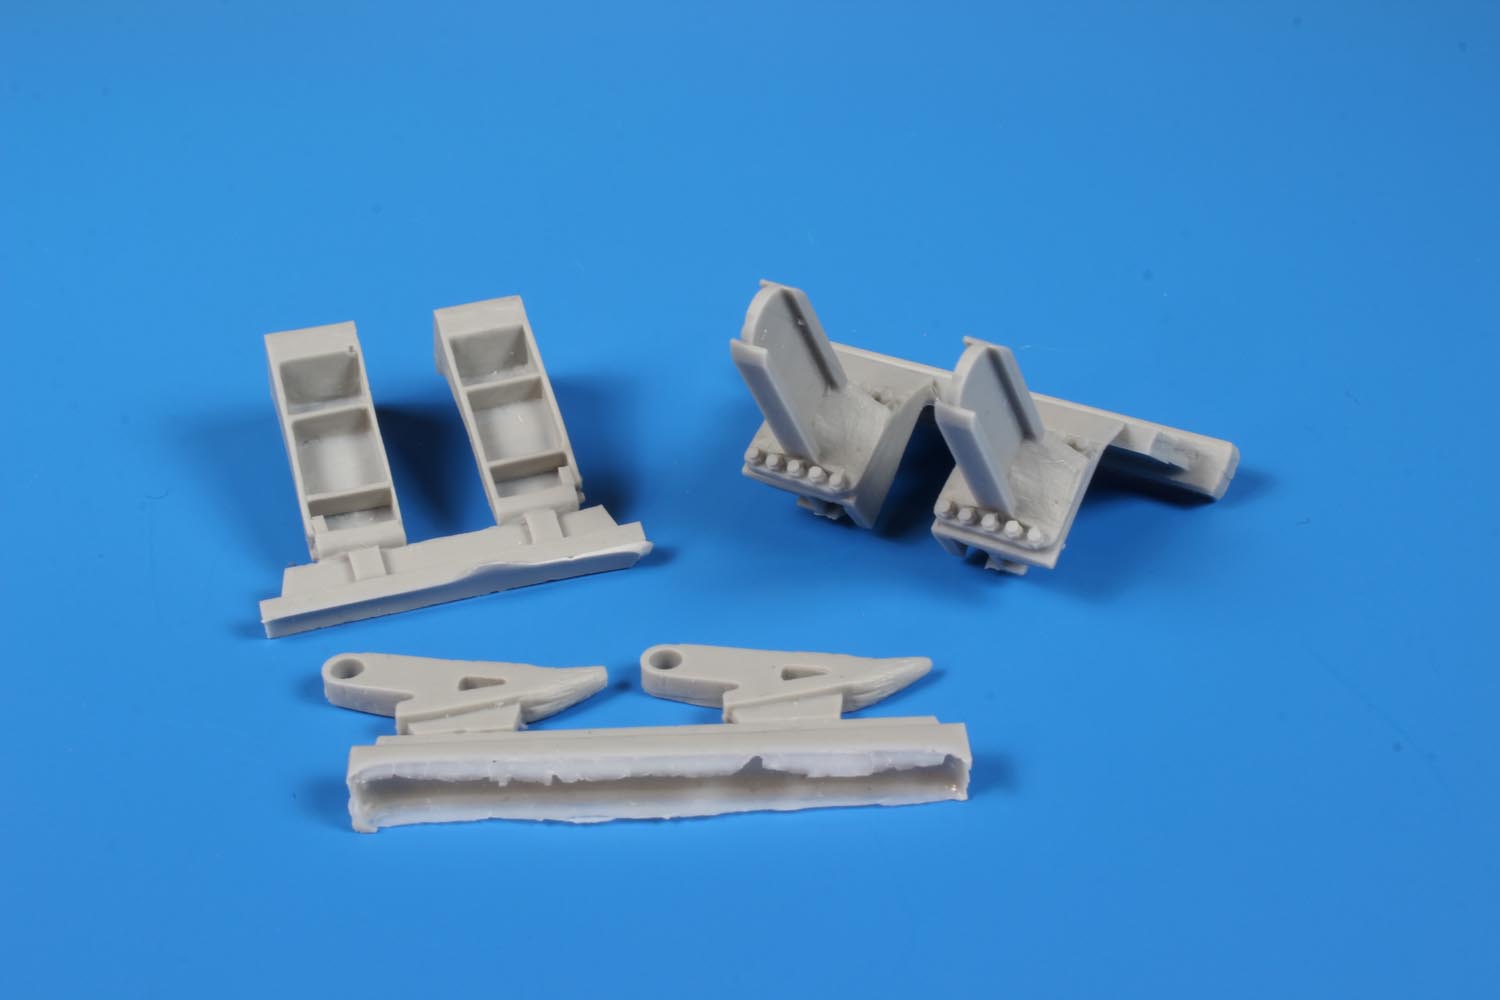
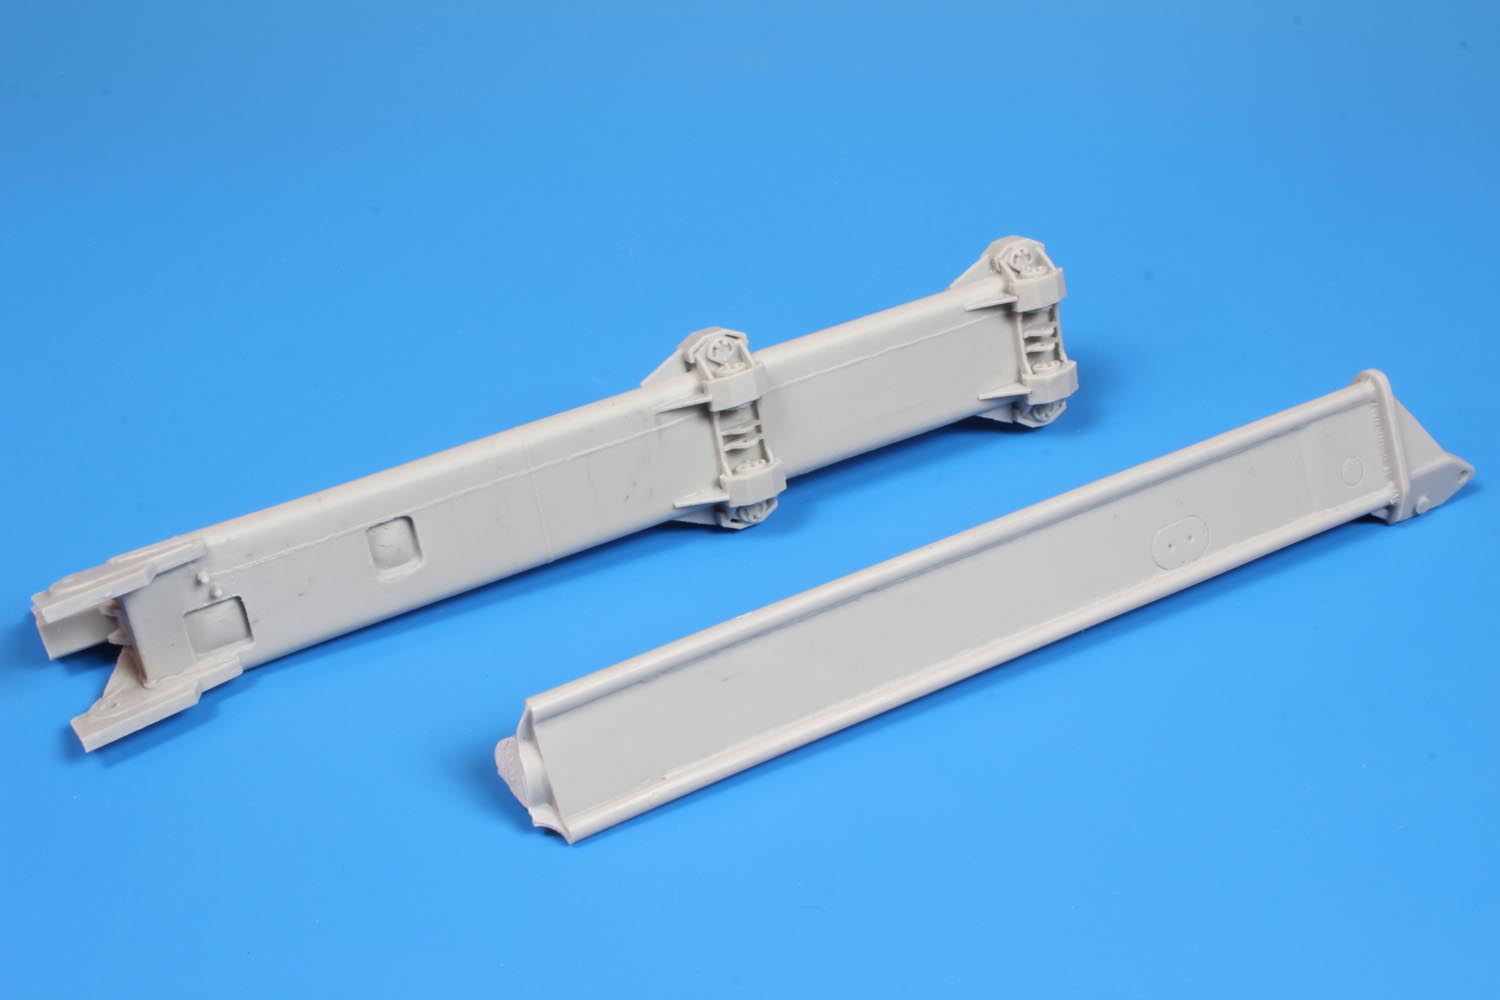
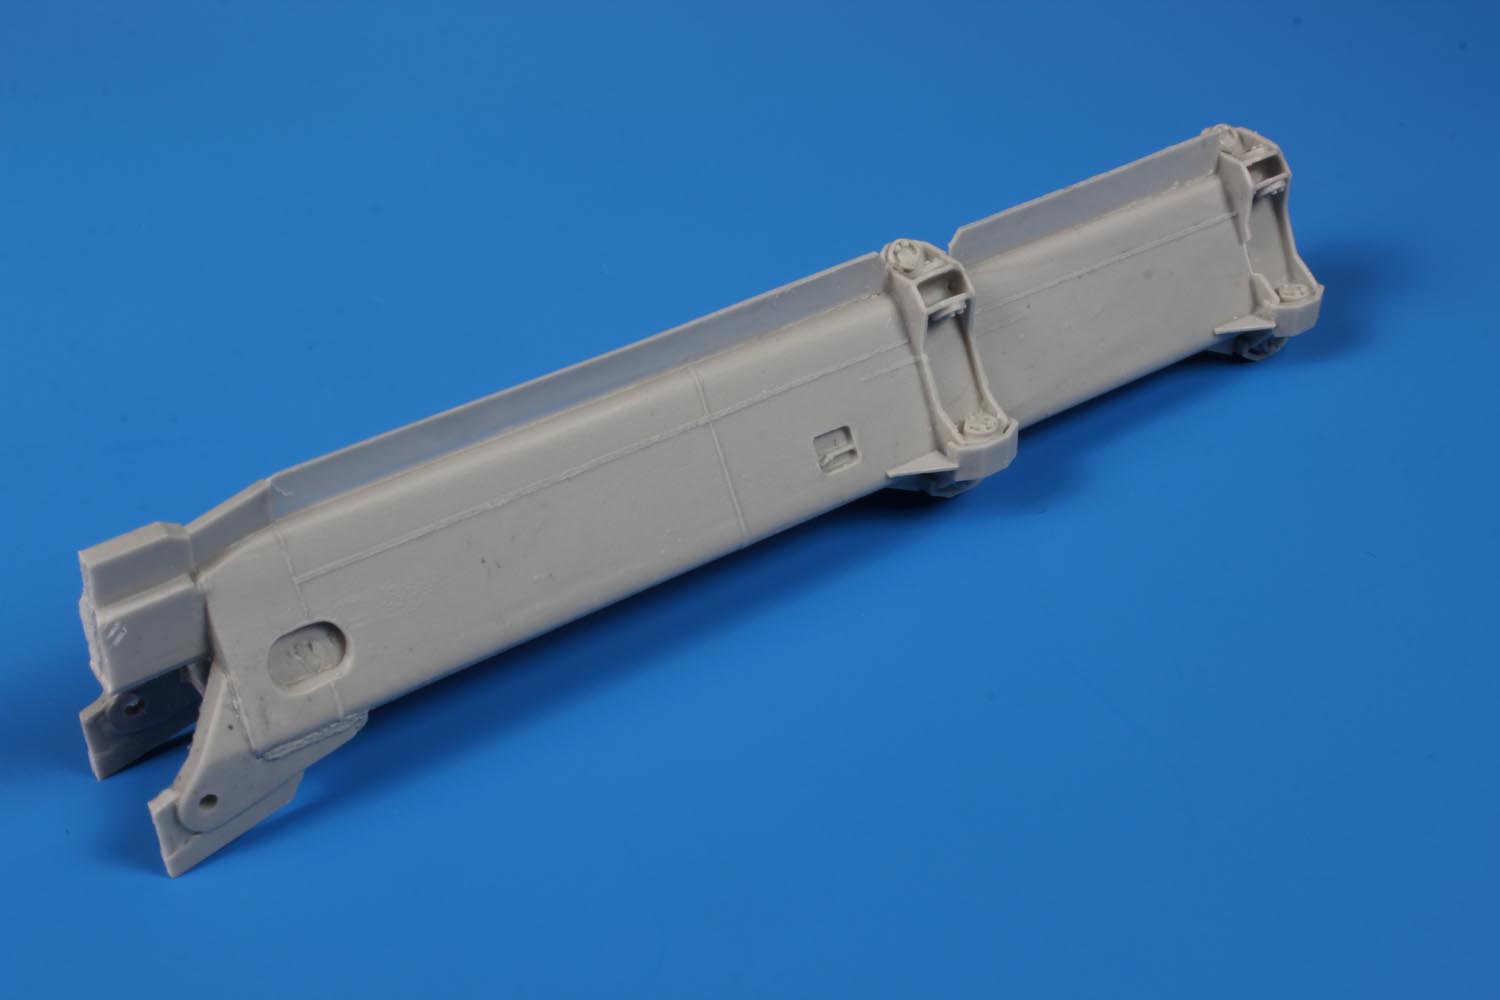
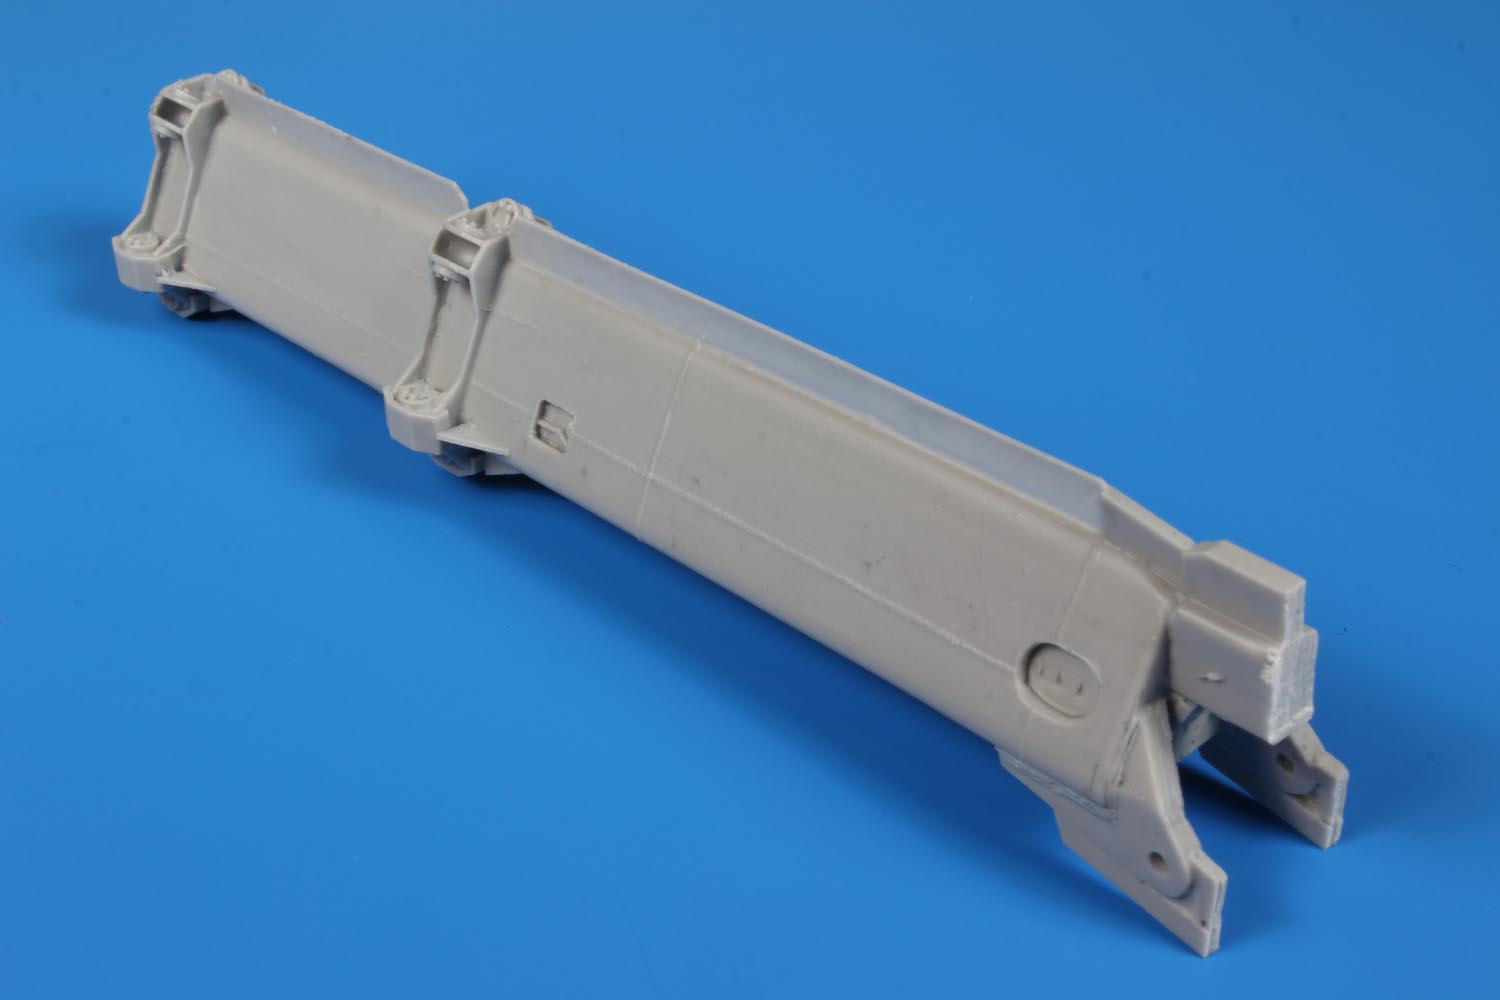
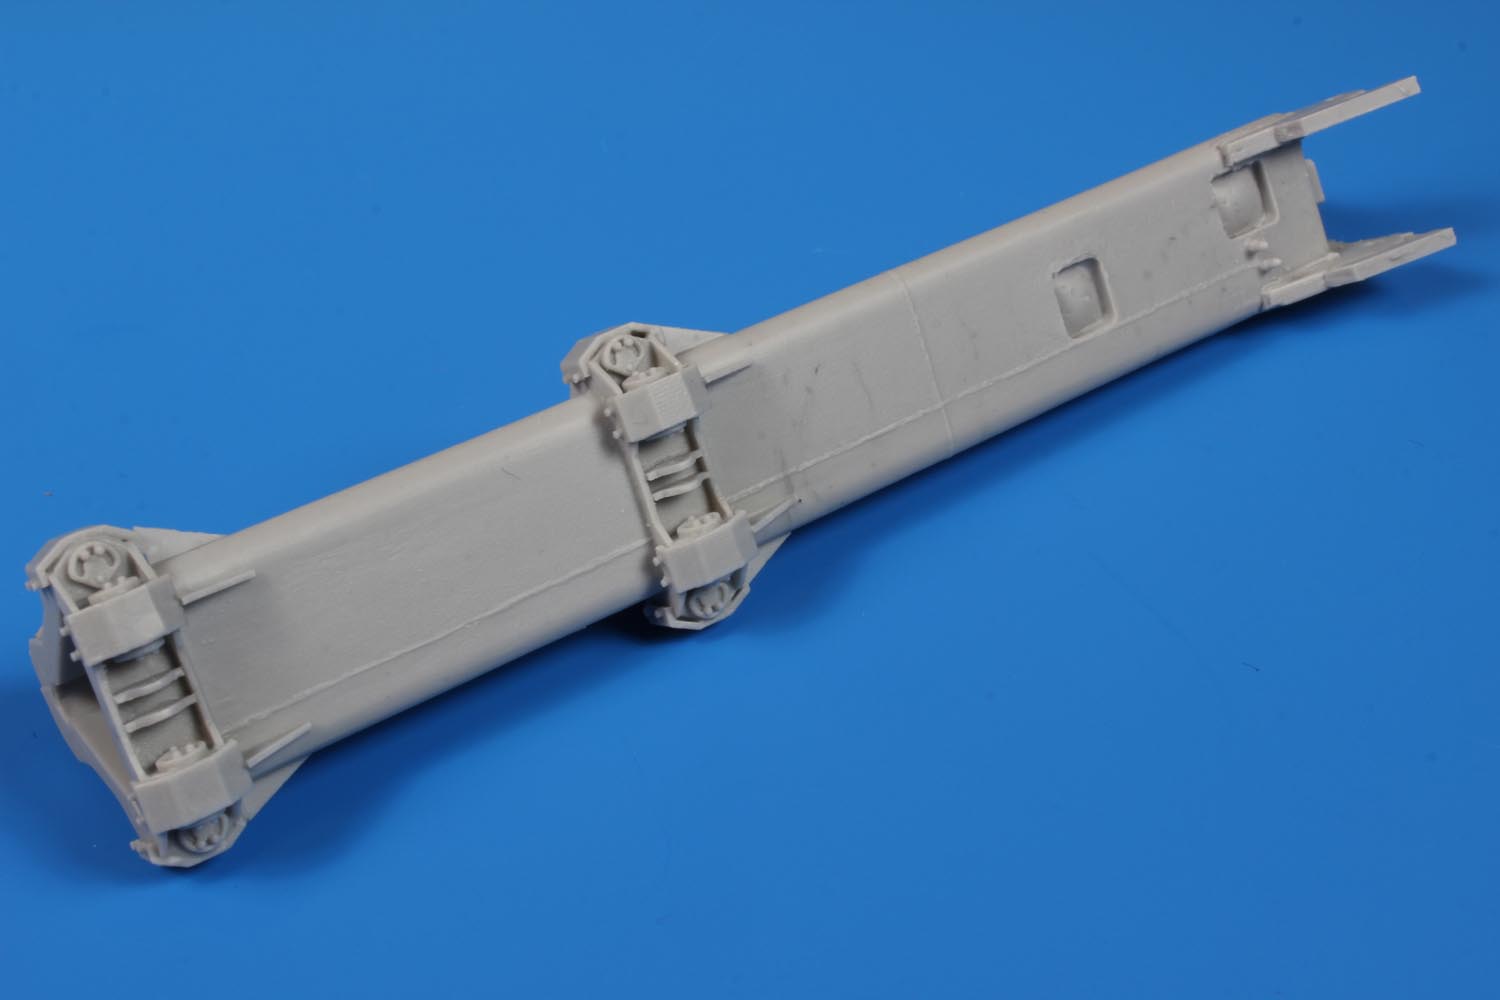
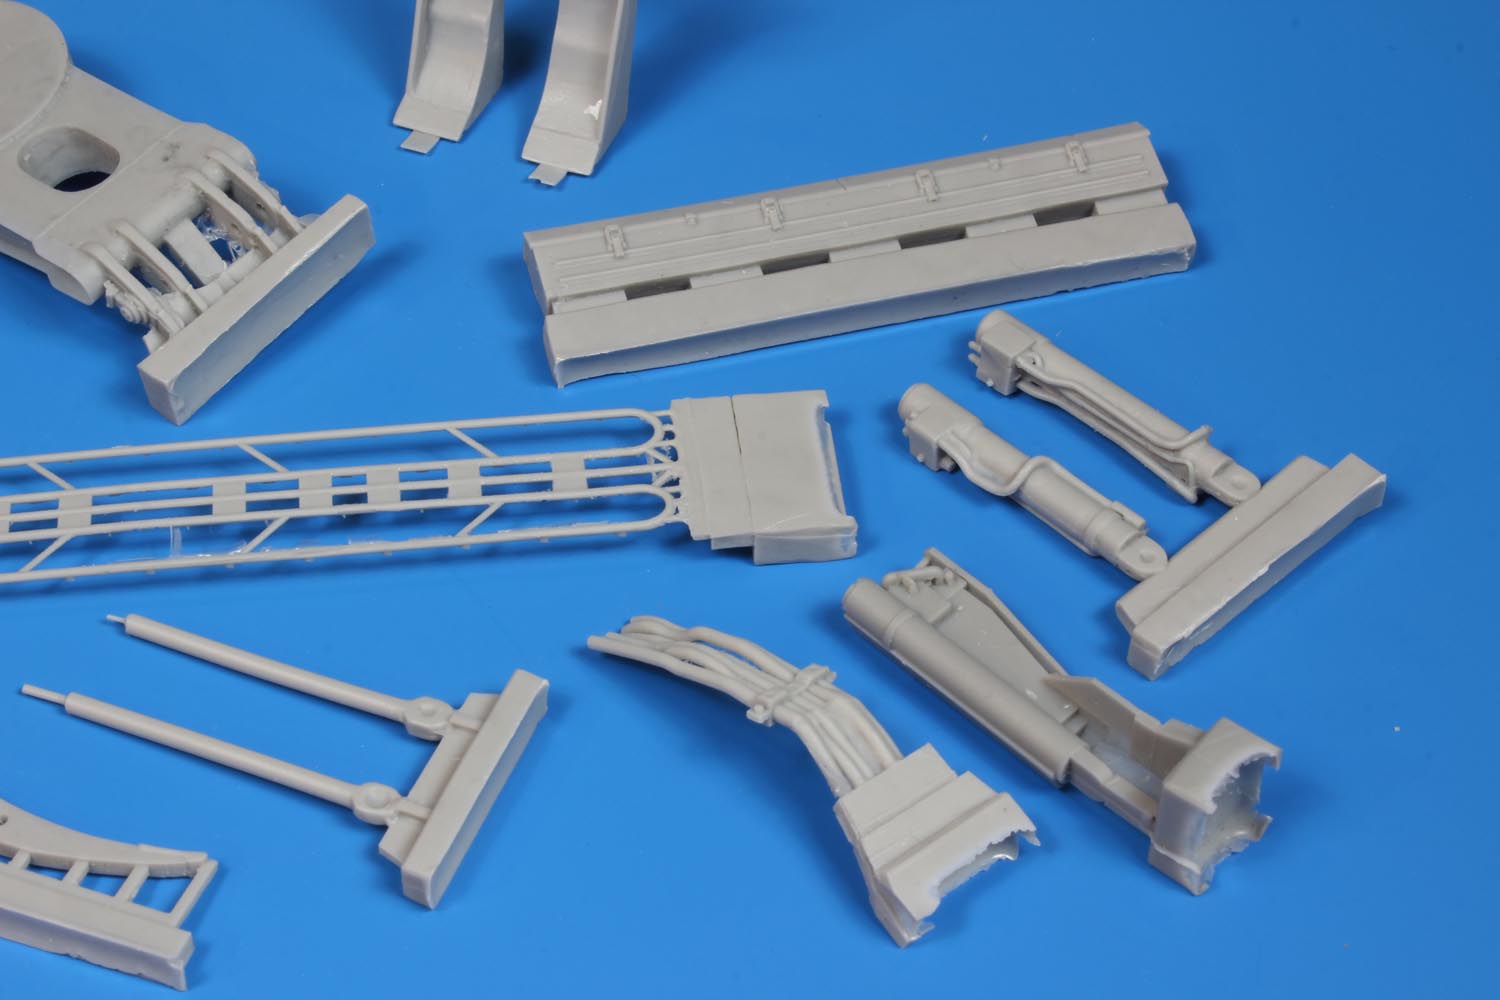
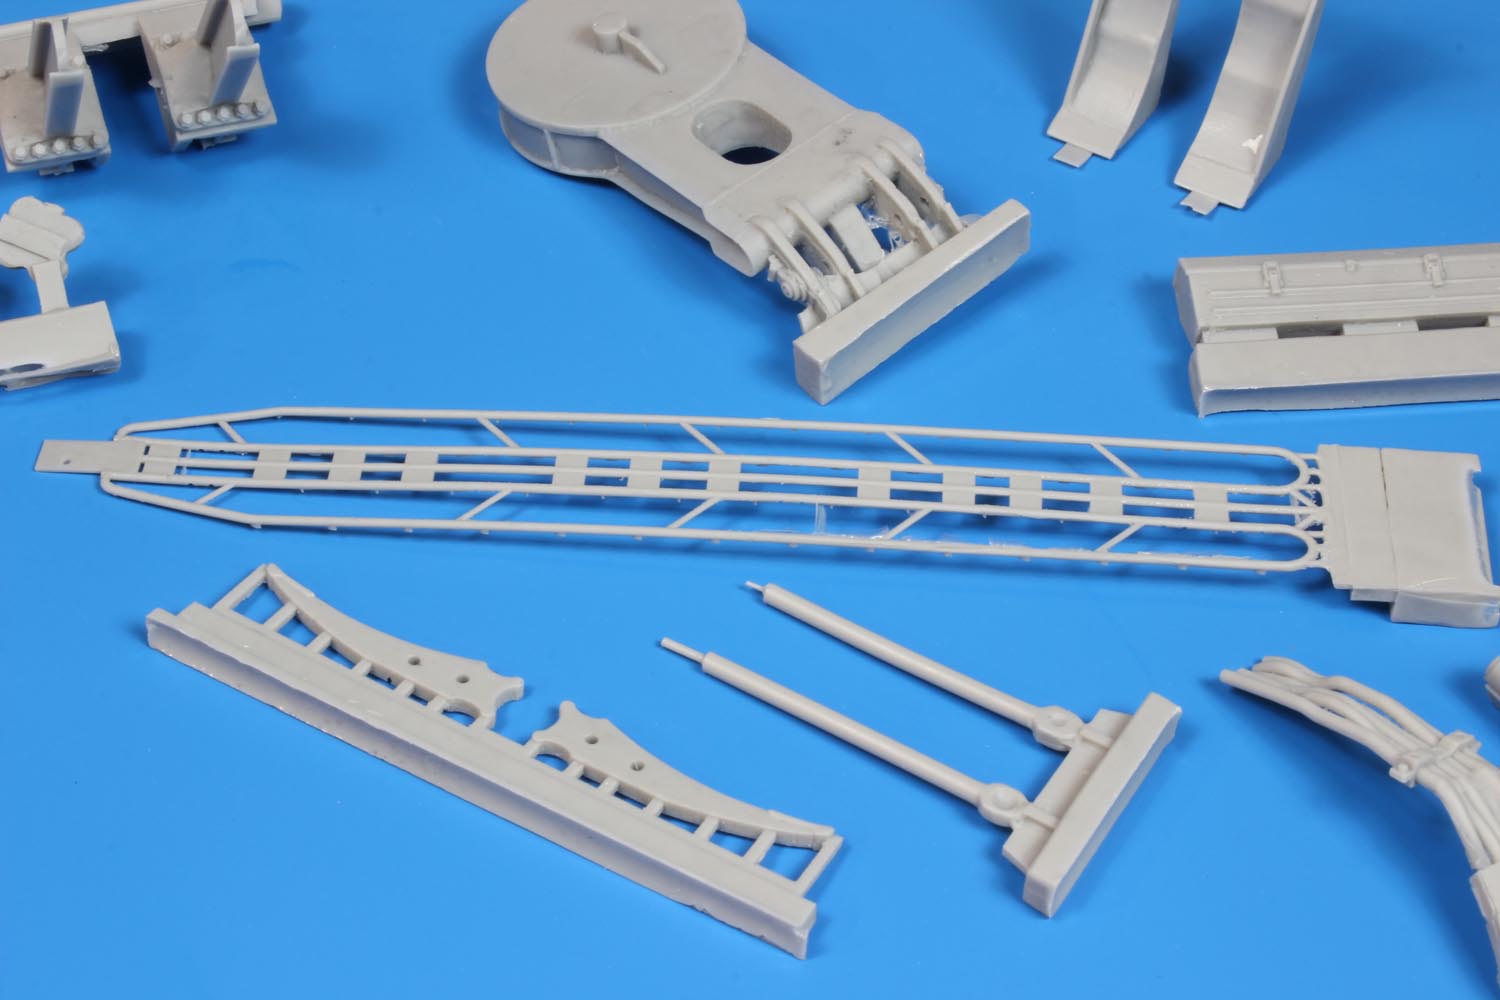
The giant excavator arm is truly an intimidating component on the Badger and unforgiving when destroying obstacles or anything else it is set loose on. The excavator arm is a multi-piece subassembly within the kit and can be built to move and articulate with pre-planning and careful preparation. Bear in mind, it is resin with lots of delicate parts and not a toy for the sand box.
There are four main components to the excavator arm:


The MEXAS (Modular Expandable Armour System) designed for the Badger covers the frontal arc area across the hull front and sides. On the Badger, there are a total of ten MEXAS modules added to enhance crew protection against cannon fire, rocket fire, shaped charges, and mine blasts. The MEXAS modules in the PSM kit are faithfully reproduced and appear to have the correct level of detail to accurately represent these chunky armour pieces. Also included are small resin loops that attach to the various modules as lifting rings. It is very important to decide early in the build if you are - or are not - attaching the MEXAS to the Badger. There is preparation work required to the upper hull in the form of removing the MEXAS attachment points cast on the hull and not using a number of pioneer tools, accessories, and details parts on the front hull. Study the instructions and reference images. Forecasting into the future, when the Takom Bergepanzer 2 is released, there may be opportunities for PSM to use some of these resin parts to create a conversion to create a Canadian Taurus ARV with MEXAS.


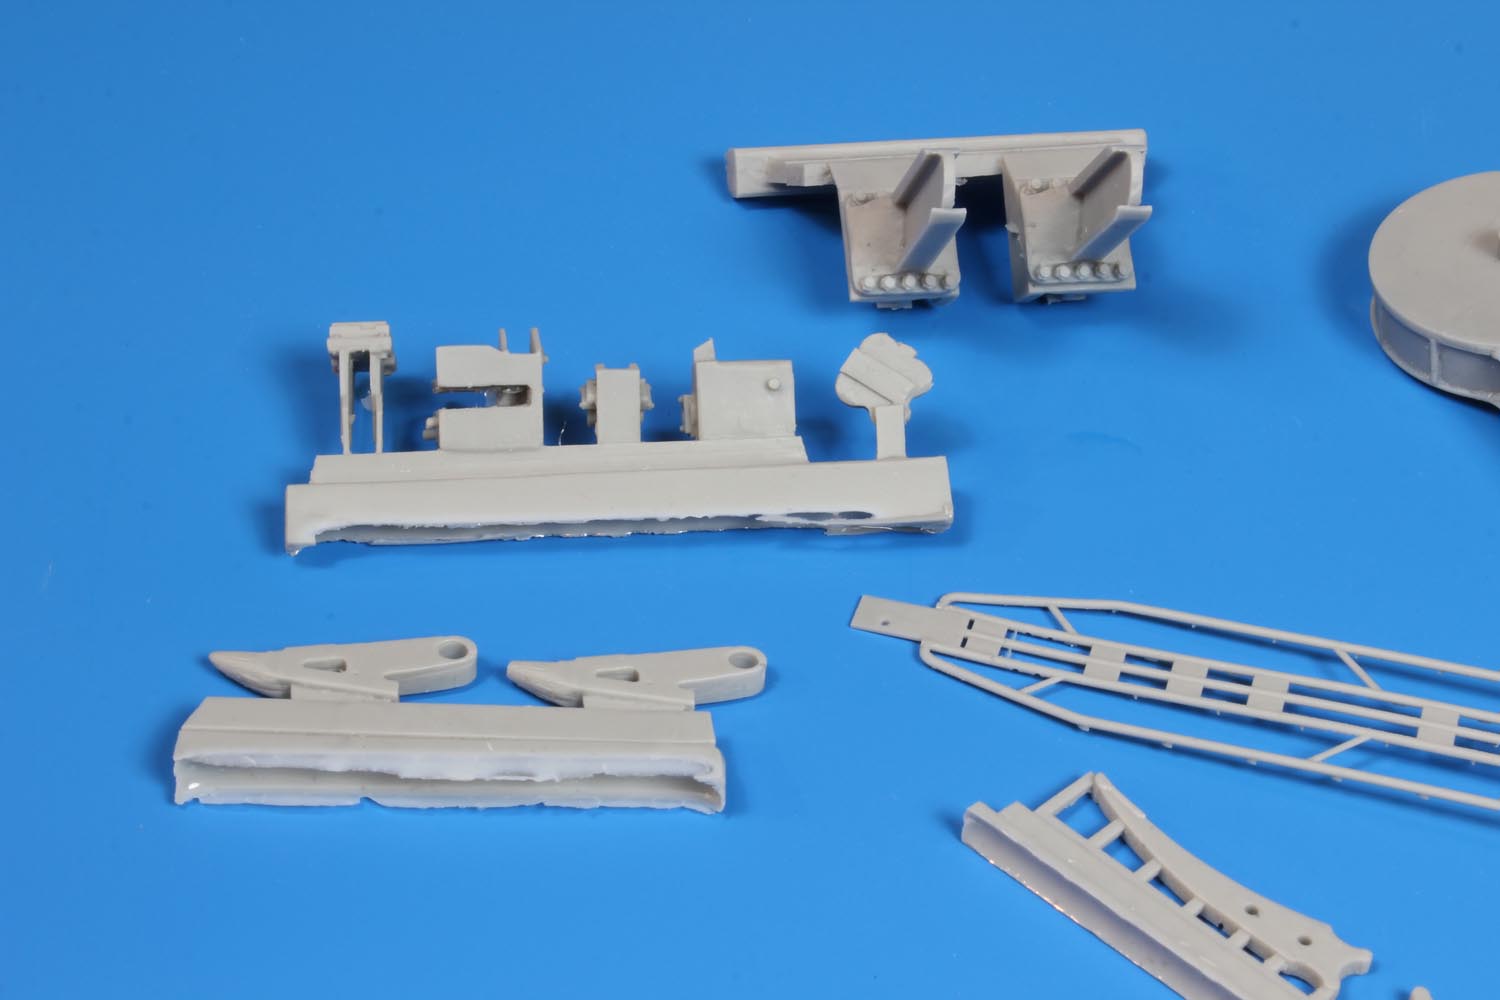
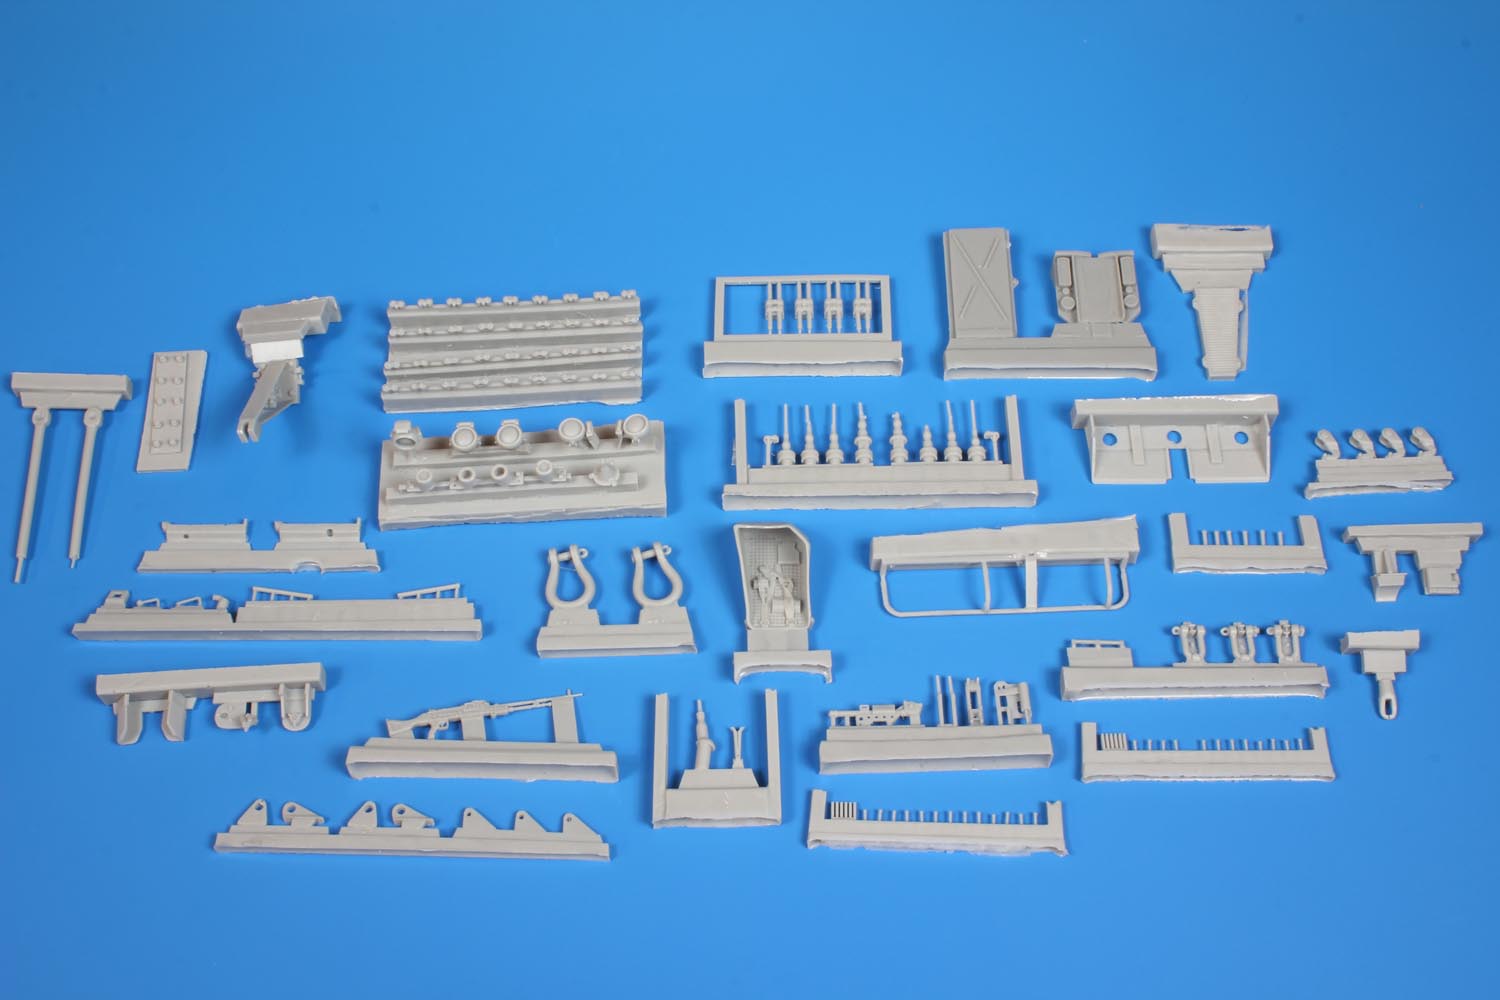
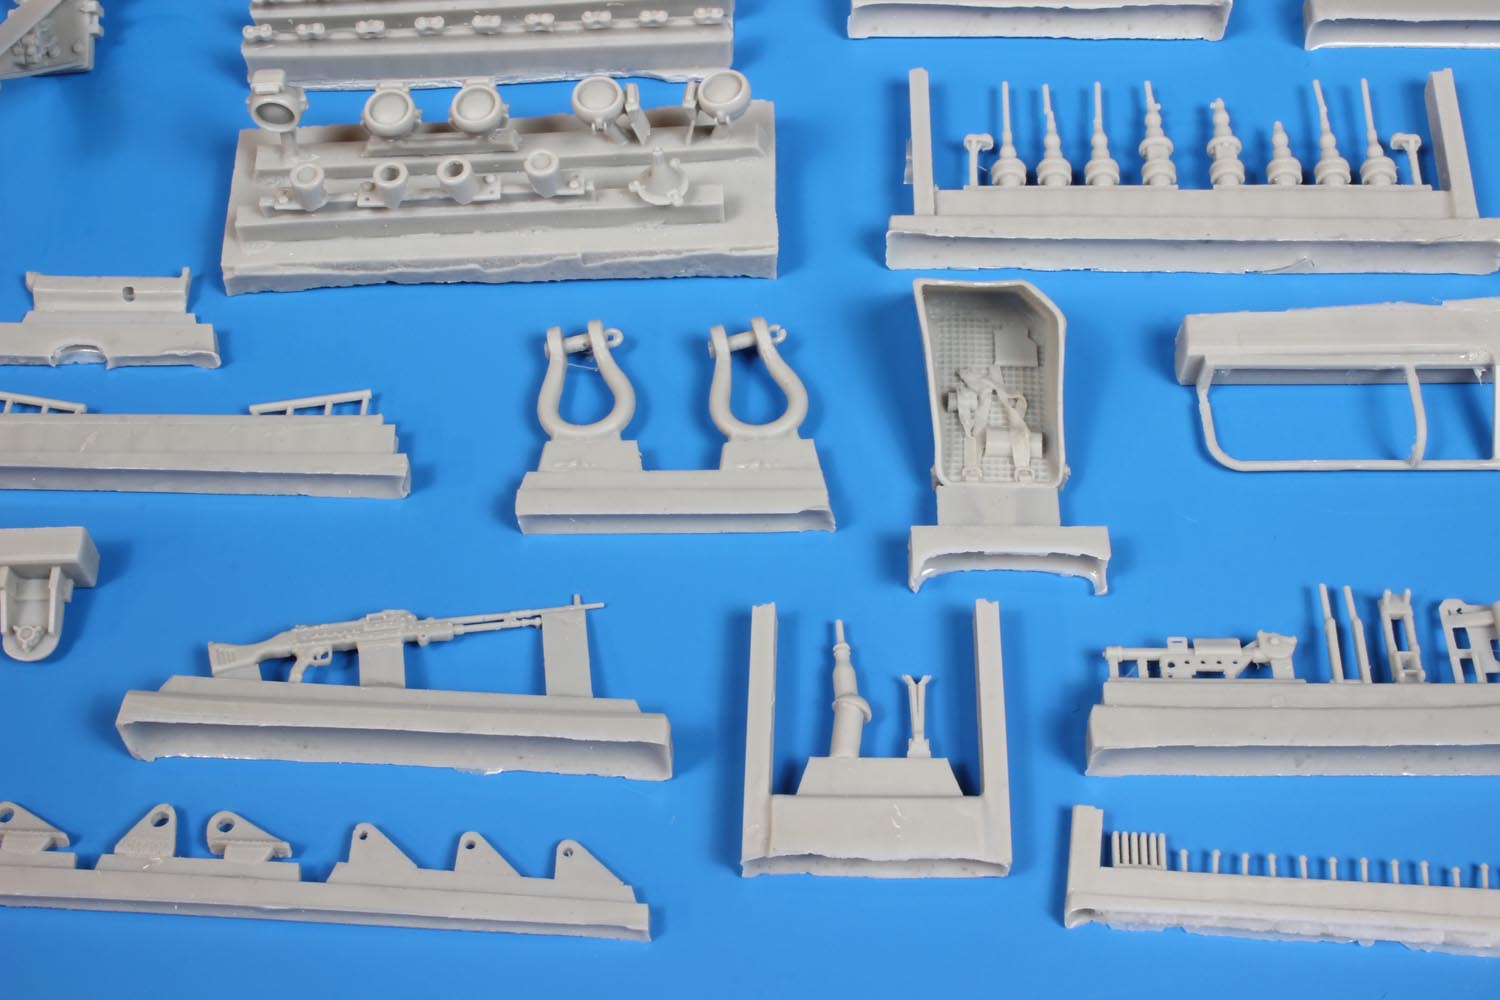
The rest of the kit parts are details that will flesh out the true working look of the Badger. From pioneer tools to tow bars, to hatches, clevis', to lights, tow hooks, lifting eyes and stowage boxes, the parts are plenty and the details are solid. There are casting blocks and some resin flash to clean up on some parts, so this is definitely not a shake and assemble kit. I did note some air bubbles on smaller parts such as mirrors. This should be easy to fix with putty and sanding. Air bubbles are not uncommon in cast resin parts and by far the majority of the parts in this kit are blemish free. The commander's and driver's hatches can be positioned open and will add to some terrific realism with modern Canadian tank crew figures in the hatches. The commander's cupola is a standalone component and it literally becomes adorned with PE when being assembles.
There are a variety of types of antennae mounts provided and you will have to decide based on references which ones to use.
A very nicely detailed C6 GPMG is provided as well as a multi-piece mount for the commander's cupola. There are two things missing from the mount. The first being an ammunition box. I found this strange and searched the instructions and parts to no avail. The Badger uses the standard Leopard AA mount and it should have either the original open style cradle or the later solid box. The later style box can be fashioned with a 1/35 ammunition box with a small amount of effort. The alternative is to seek out an accurate C6 mount from a variety of Canadian Leopard kits or from Leopard Workshop. If you wanted to forego the box, you would have to have a 7.62mm belt hanging from the feed mechanism of the C6 receiver. Leopard Workshop LW047 - Leopard Turret Top FN MAG/C6 Machine Gun has the proper late style ammunition box.
The ultra-large towing shackles are provided in the kit for mounting on the rear lifting eyes. This is a great addition, but they come with the bolt fixed in the eyes, so you will have to either create new pins or cut the cast pin to fit it on the lifting eye.
All in all, the detail parts are going to add tons of detail to the major kit components. No one can say the level of included detail is not impressive.


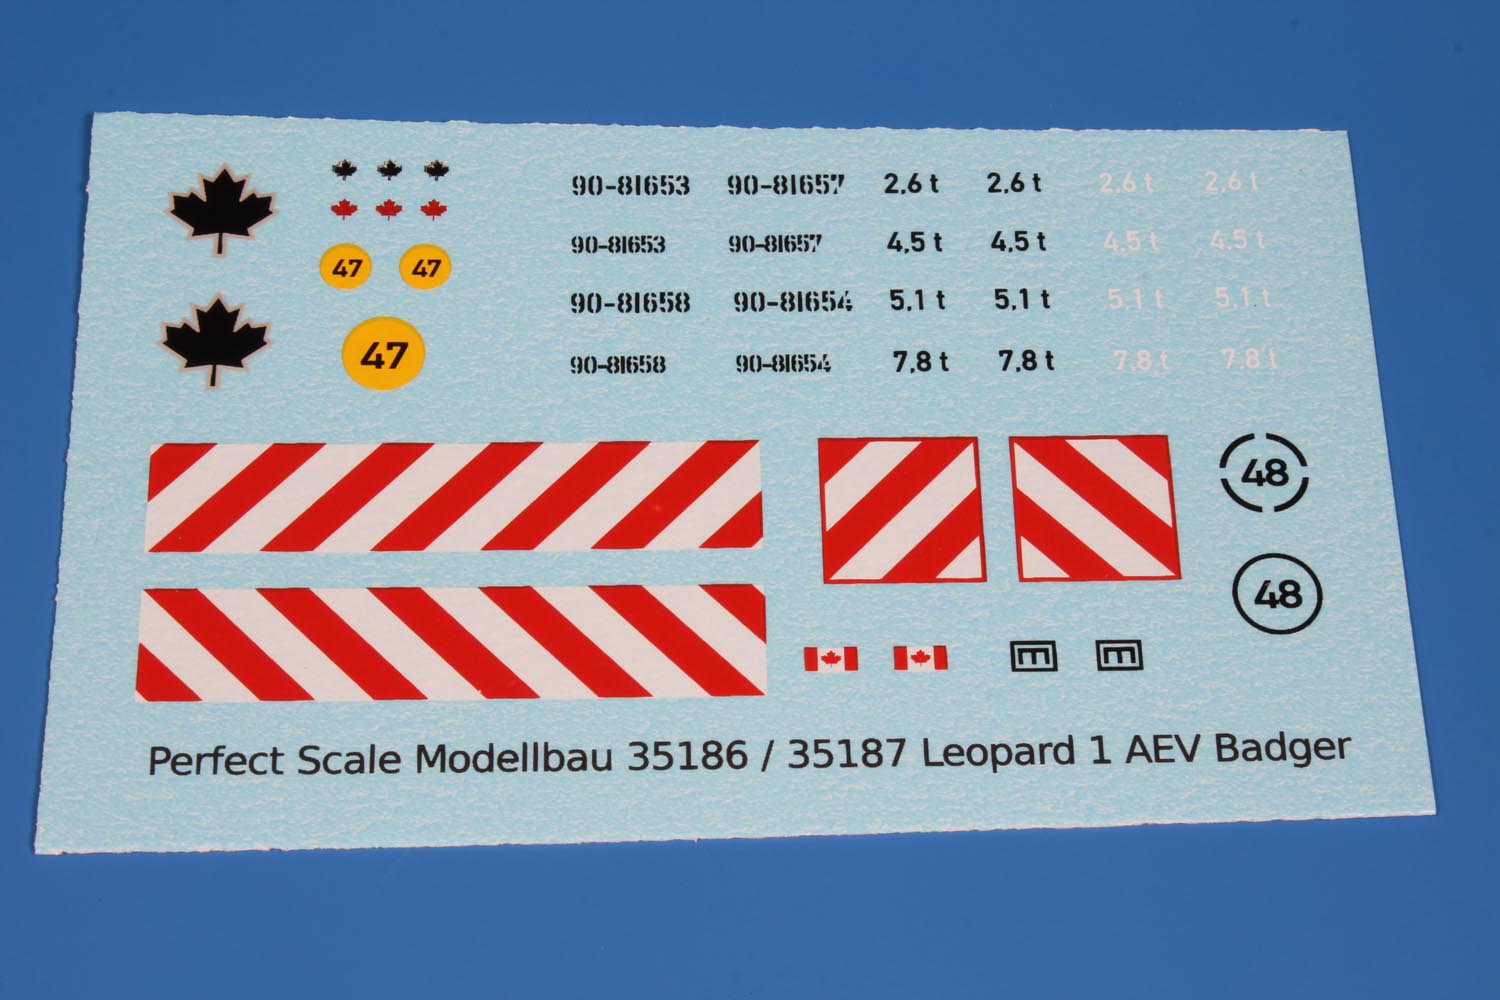
Two sheets of decals are provided in the kit. One set is generic for both kits 35186 and 35187 in the sense that four different Badger Canadian Forces Registration (CFR) numbers are provided. Four different styles of Bridge Classifications are provided, along with excavator arm weight markings in black and white, red and black maple leaves, Combat Engineer tactical signs, white-outlined black maple leaves, and red and white warning placards provided for the rear mud flaps and dozer blade (these high visibility markings were used in Germany).
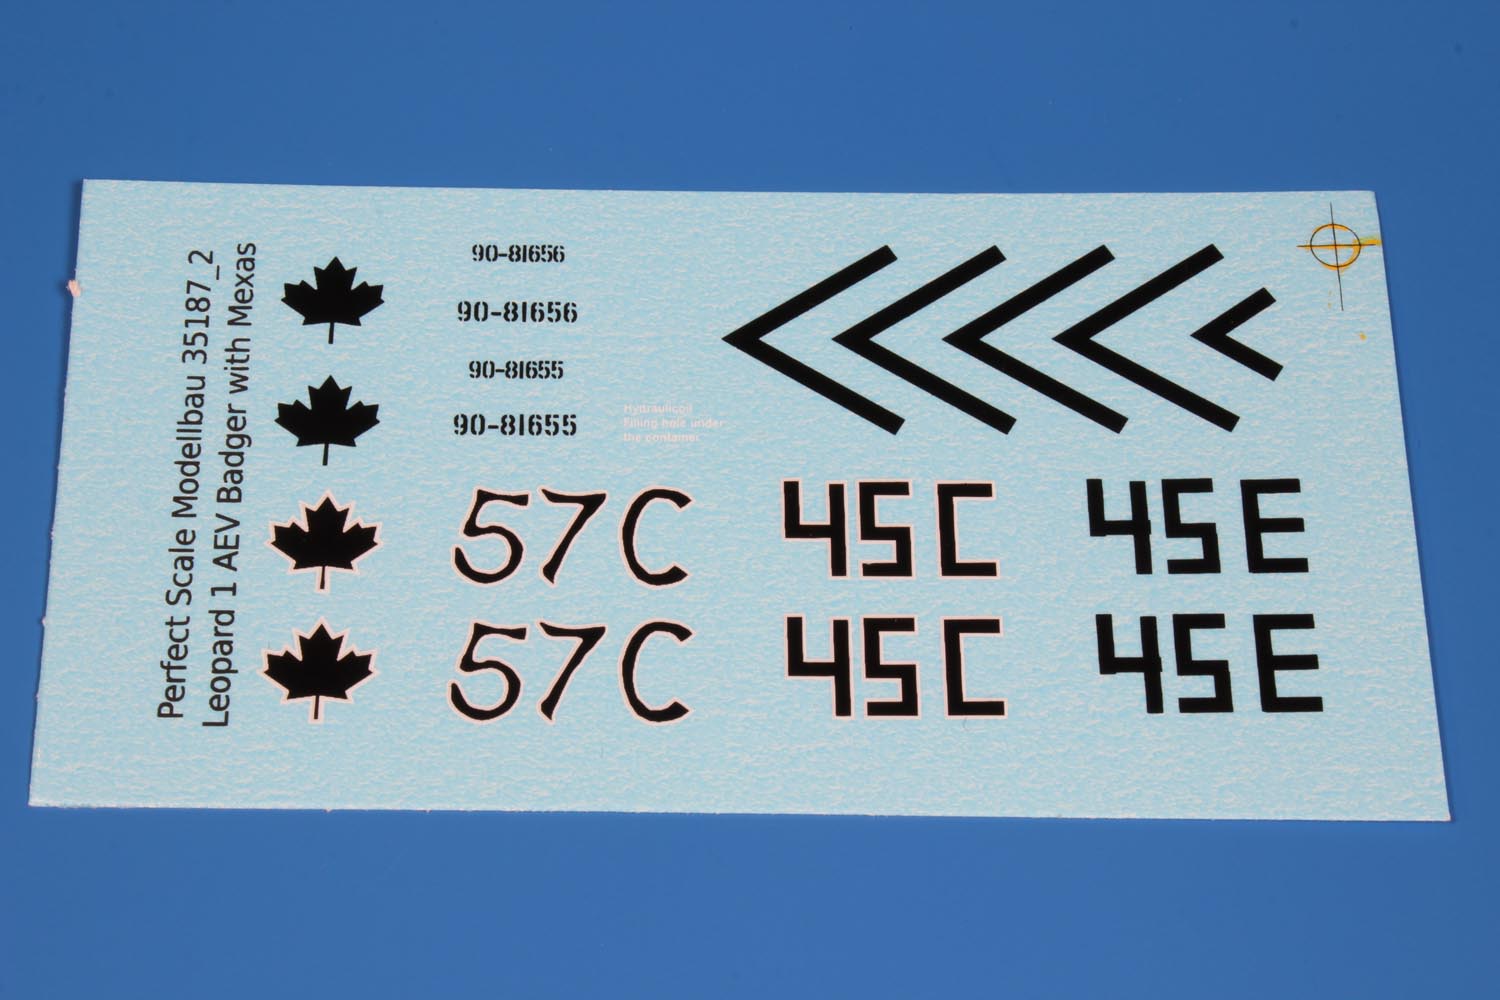
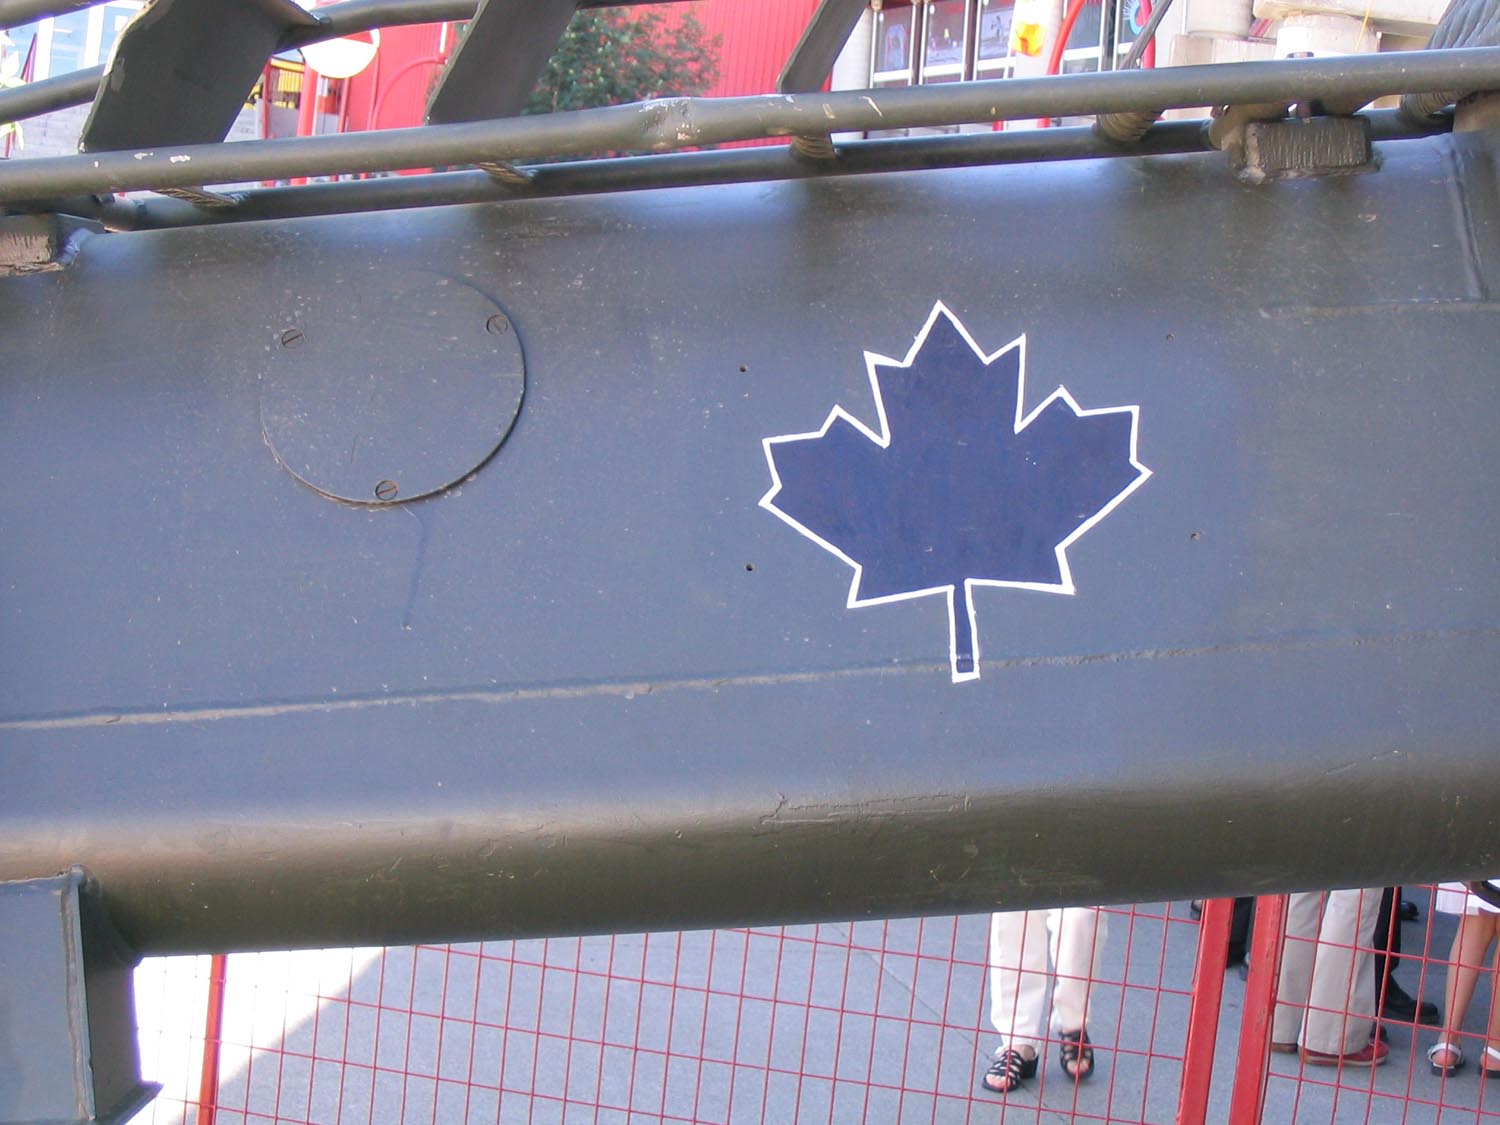
The other decal sheet is specific to 35187 and includes a series of black chevrons (used in Afghanistan), all black and white outlined black maple leaves, two additional Badger Canadian Forces Registration numbers, a hydraulic warning label, and three sets of Badger call-sign markings. The call-signs consist of 57C, 45C, and 45E.
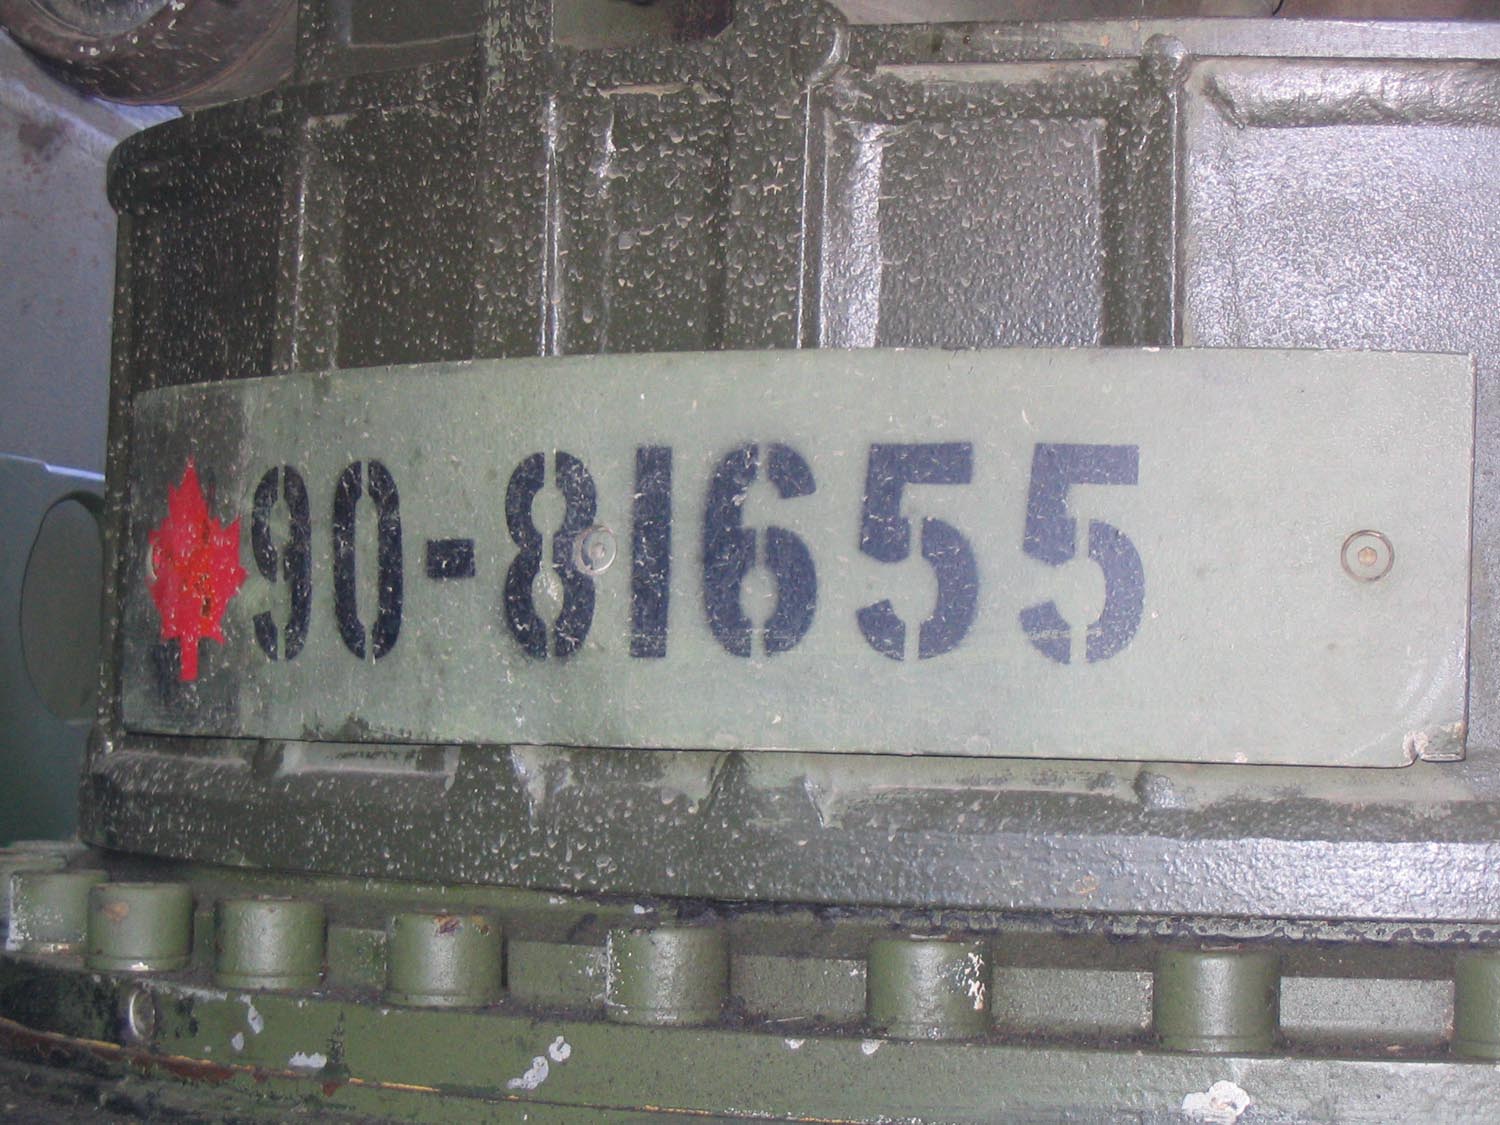
57C - uses a stylized white-outlined font for the call-sign and they could be found on a very clean CARC green-painted Badger with CFR 90-81655 with 1 Combat Engineer Regiment (1 CER) at CFB Edmonton in 2005. In 2005, this Badger had the MEXAS mounts attached and had a Chieftain MBT hull stowage bin mounted on the excavator arm. 90-81655 was one of the four Badgers that deployed from Germany with 4 Combat Engineer Regiment with UNPROFOR to Croatia in the early 1990s (pre-MEXAS era). This Badger later deployed to Afghanistan with full MEXAS package.
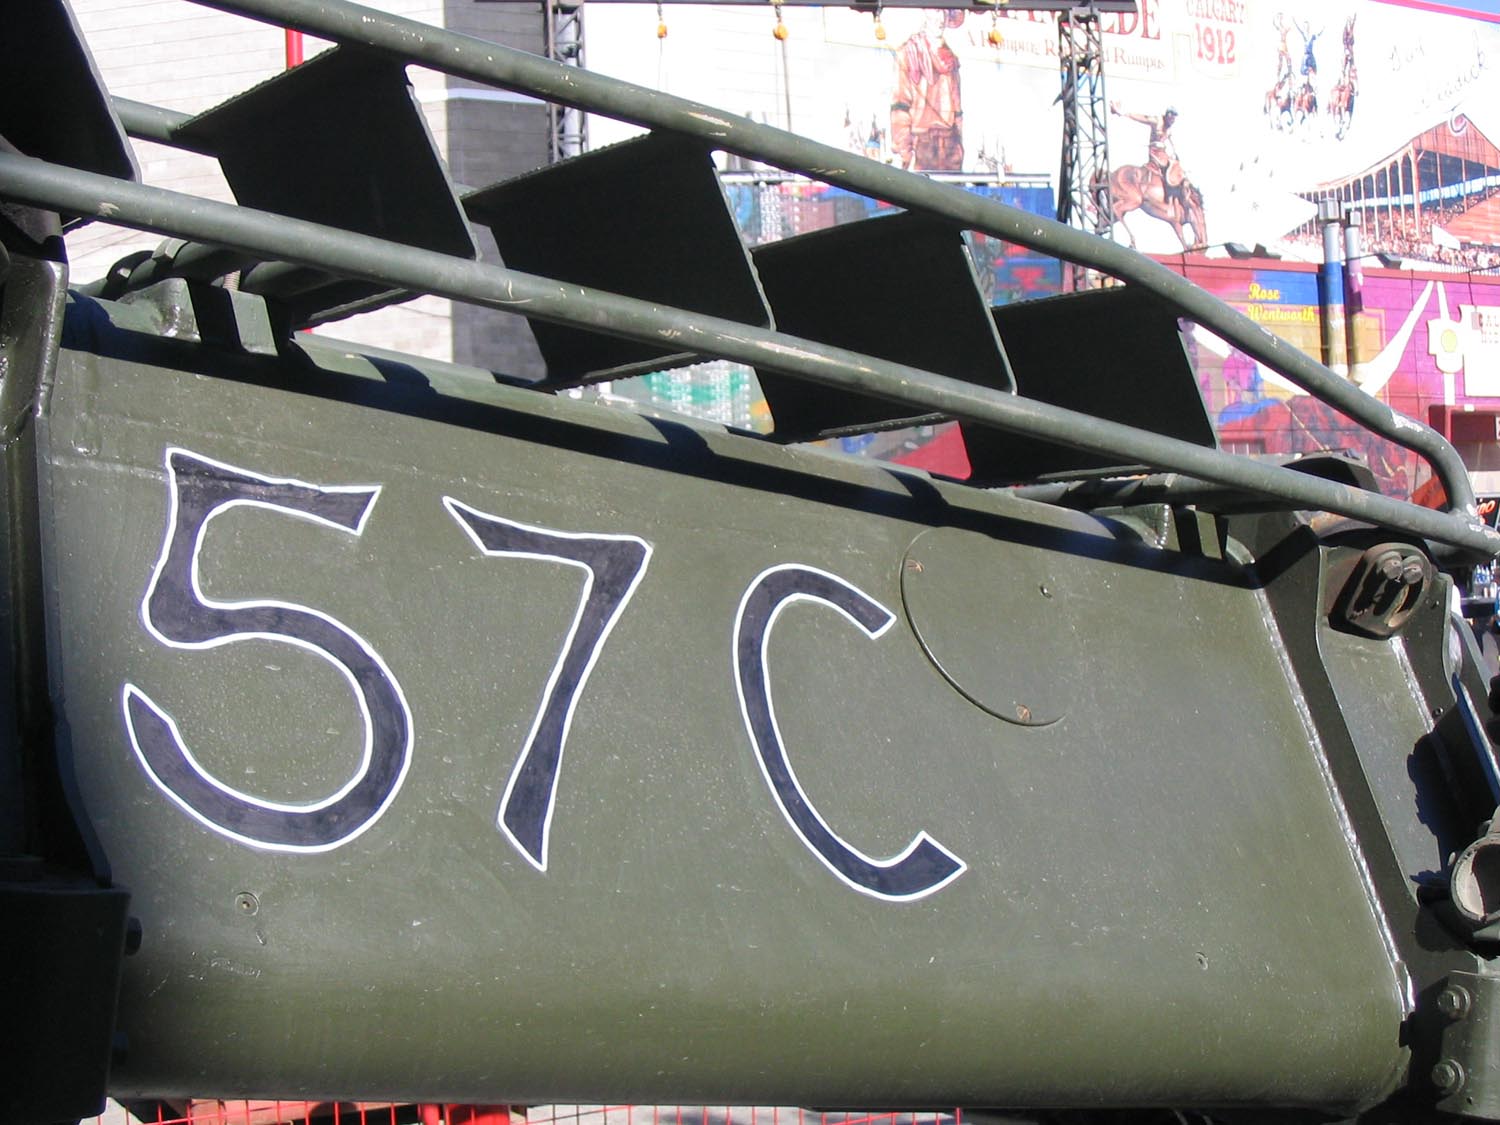

Badger 57C call sign, 2005 (Jason Bobrowich Images)
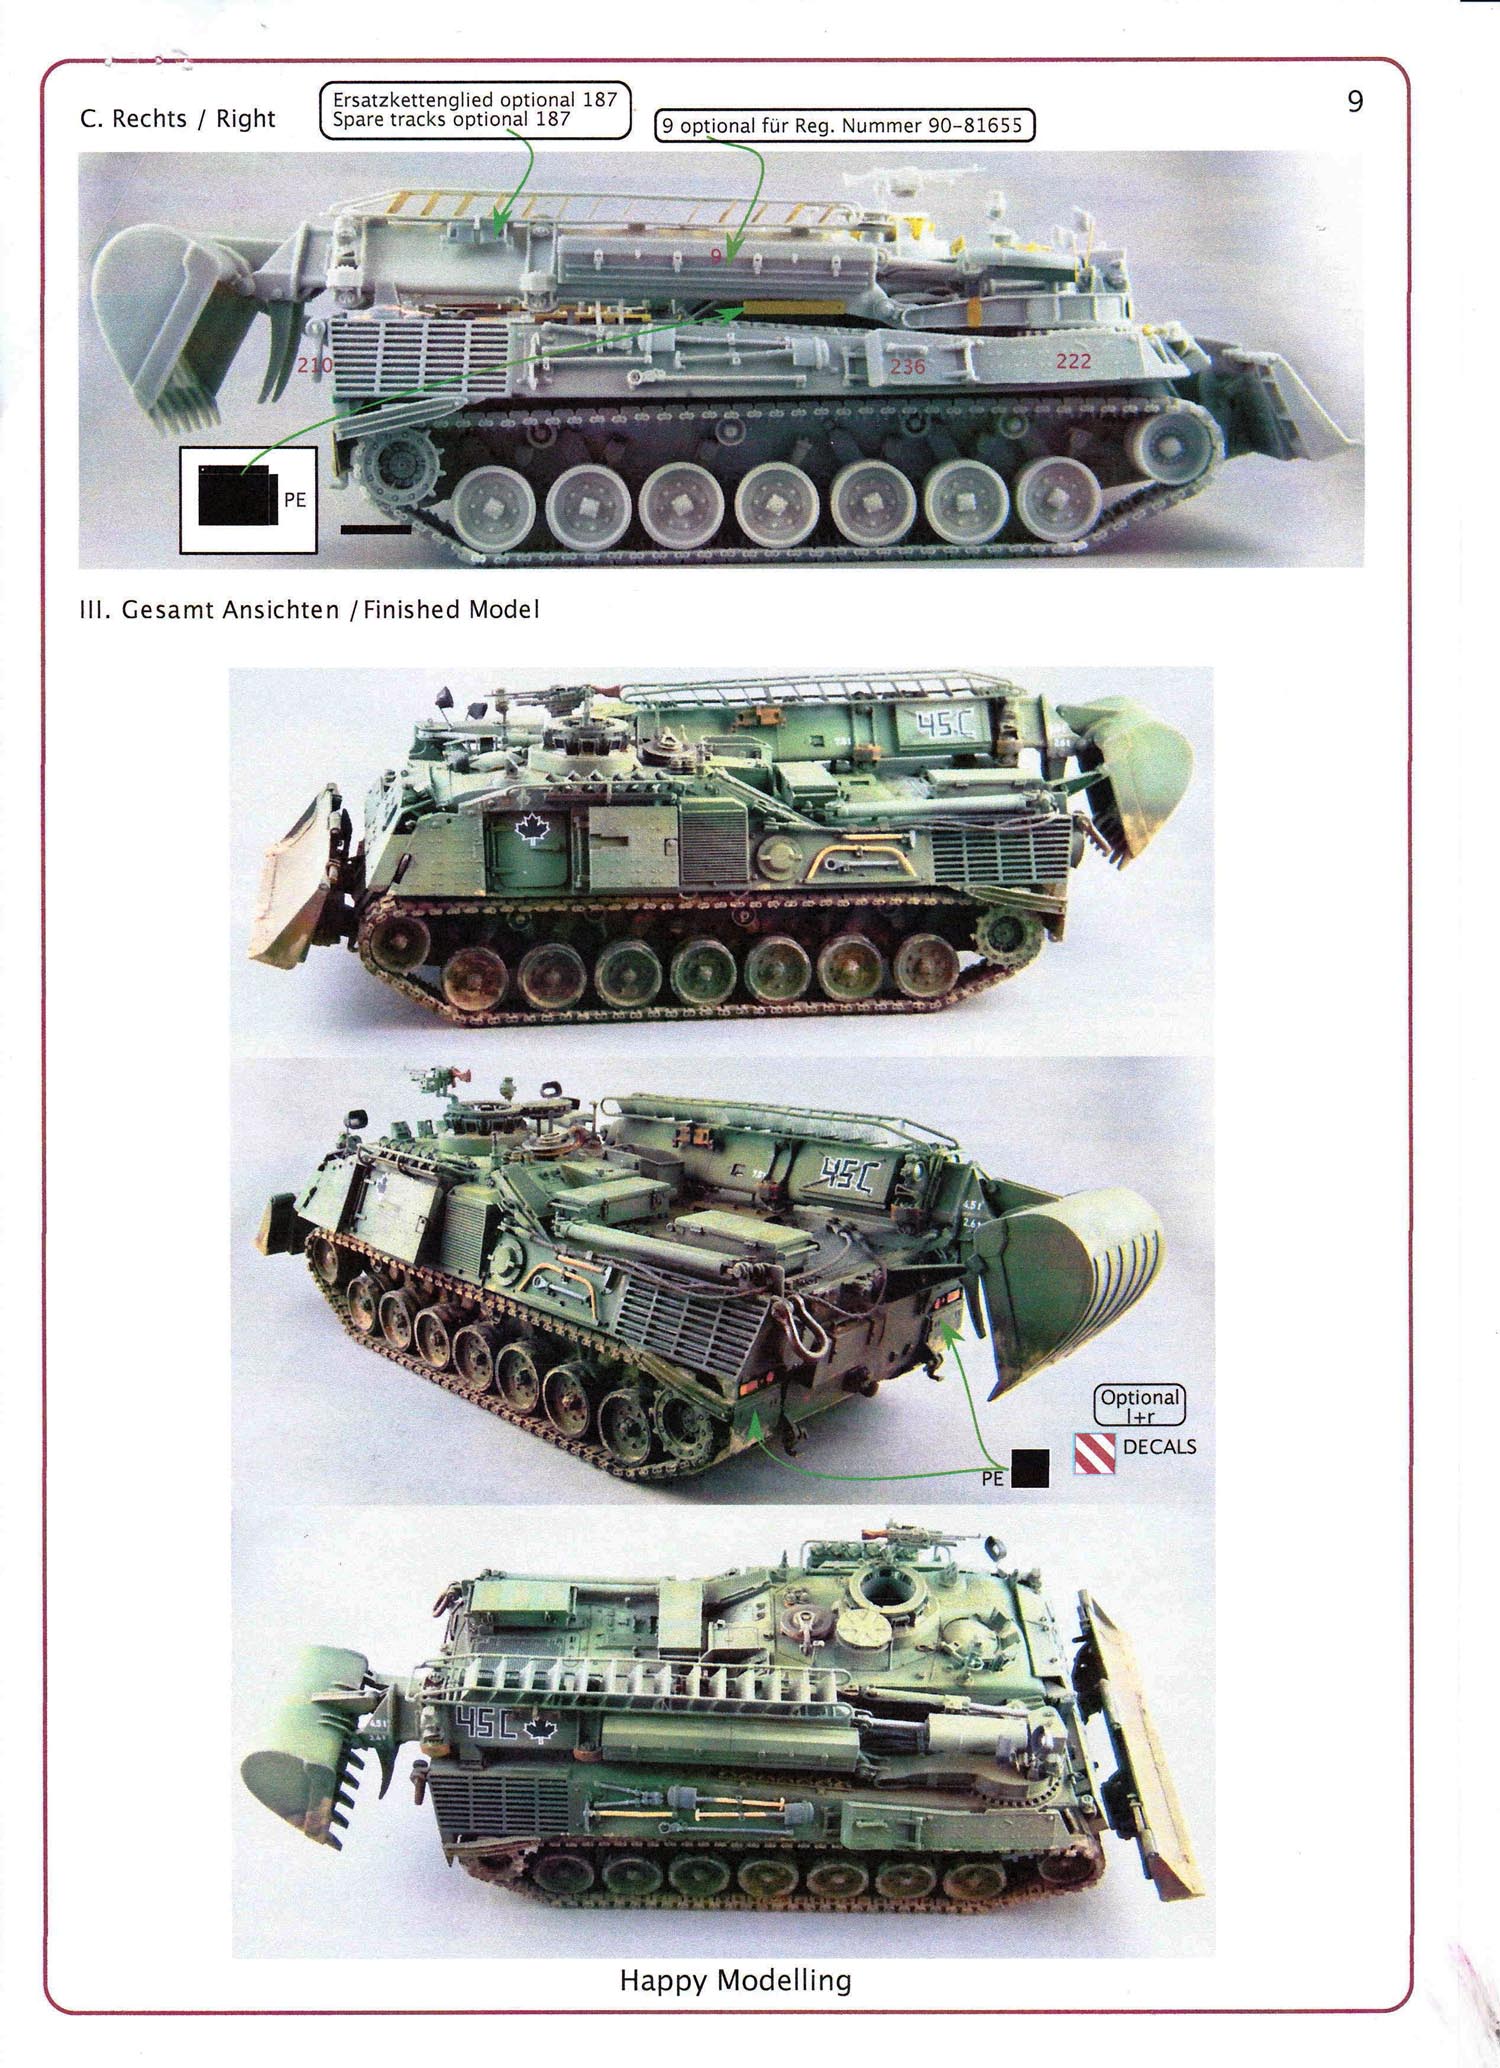
45C - uses a solid block style font and could be also be found on CFR 90-81655. This, of course, is the same Badger CFR that used call-sign 57C back in 2005. 45C is also used as the call-sign on the fully-built and finished example in the instructions and on the PSM website. To build 45C as indicated in the instruction images (and the PSM website images), this would represent the Badger first deployed to Afghanistan in October 2006.
45E - uses a solid block style font and could be found on CFR 90-81656. 90-81656 was a veteran of deployments in Germany, UNPROFOR, Kosovo, and then on to Afghanistan. While with 1 CER in Edmonton in 2005, this particular Badger sported the call-sign 57E using the same type of font as 57C. When 45E deployed to Afghanistan, it also initially had a Chieftain MBT hull stowage bin mounted on the excavator arm. This Badger had its dozer blade completely blown off by an IED while conducting operations in Afghanistan. During the recovery operation by a Canadian ARV 3 and a Canadian Armoured Heavy Support Vehicle System (AHSVS) tank transporter with DOLL S7H-OYS5 trailer, the trailer detonated a secondary IED and was totally disabled. A second AHSVS tank transporter and trailer eventually recovered the damaged Badger back to the FOB.
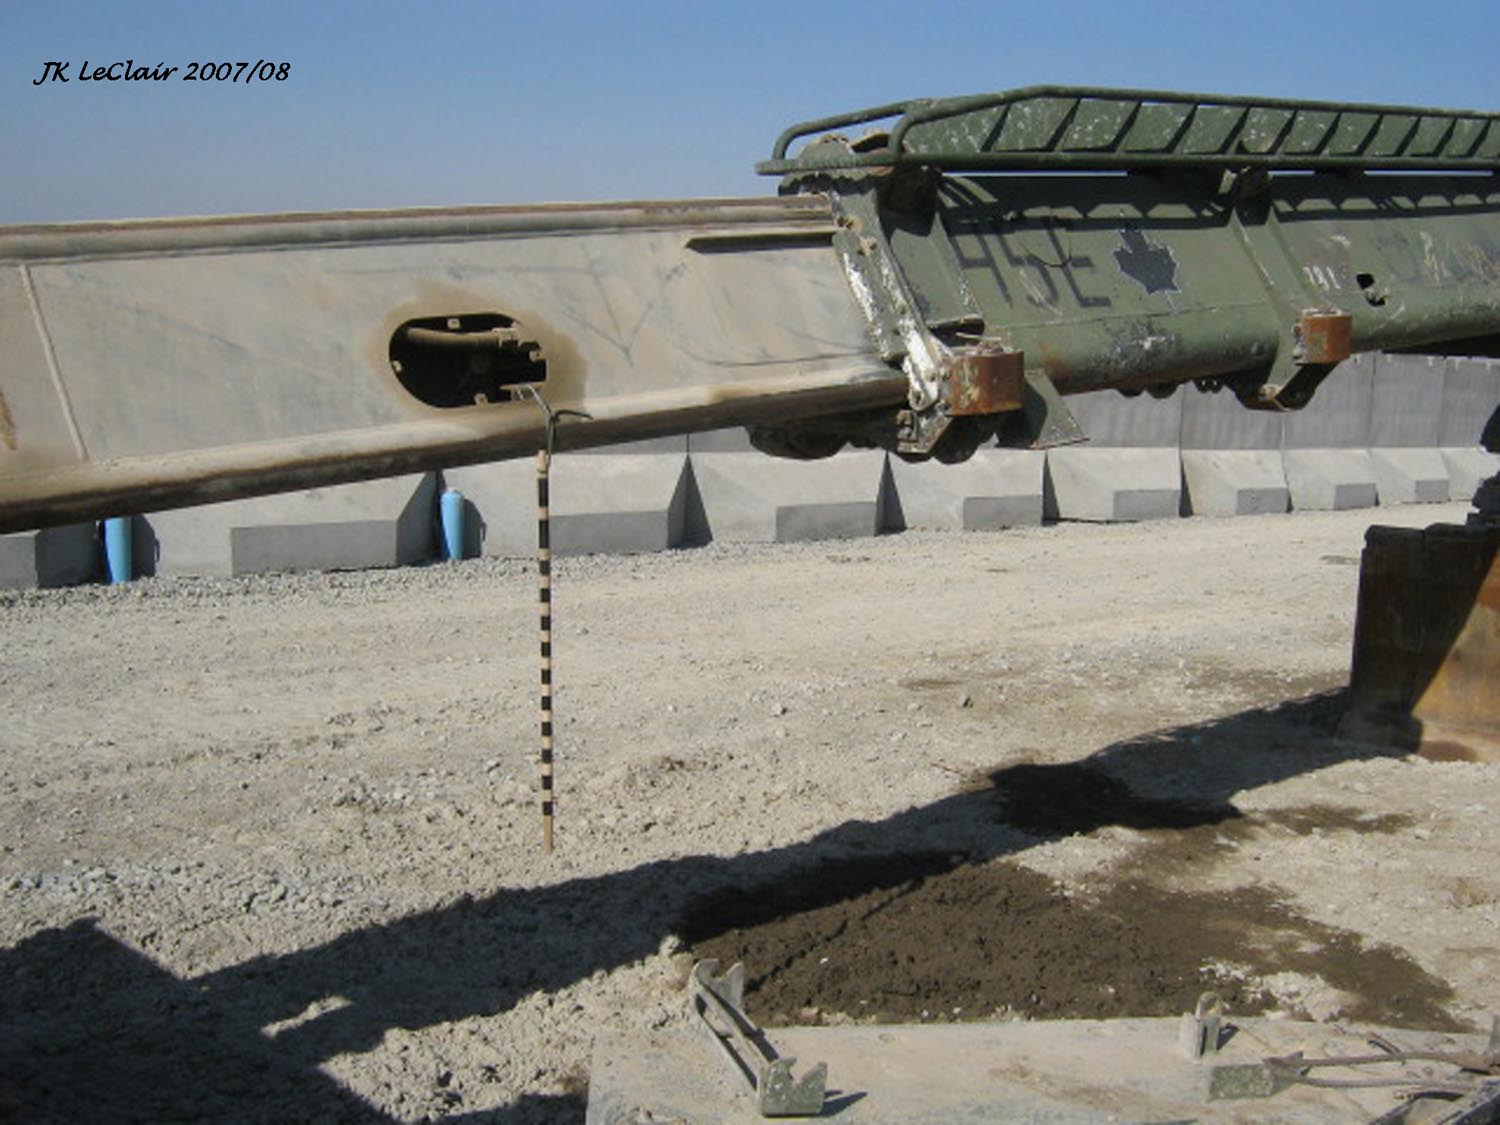
Badger 45E call sign, 2008 (Ken Leclair Image)
While Badgers were deployed in Canada, IFOR, SFOR and KFOR, they sported a variety of different call-signs on both sides of the excavator arm. During IFOR, SFOR and KFOR, additional call-signs and IFOR, SFOR, KFOR markings were added to the hull sides and front hull for additional identification. Decal options for IFOR, SFOR and KFOR Badgers are not provided in the kit.
Well worth mentioning for builders of this Badger kit is that after they began combat operations in Afghanistan, the call-signs were removed from the excavator arms by way of either removing storage bins painted with the call-signs, or simply painting them over. Black chevrons were retained on the hull sides and rear. The call-sign removal was done in order to reduce opportunities for the enemy to gather intelligence on the number of vehicles deployed.
Perfect Scale Modellbau has produced modern Canadian AFV conversions for some time now, ranging from the Leopard 2A6M CAN (with and without Barracuda), Leopard C2 MEXAS (with and without thermal covers), and the Leopard 2A4M CAN with Barracuda.
Perfect Scale Modellbau has taken a huge leap forward in producing a full resin kit of the Canadian Badger AEV as it appeared operationally from the late 1990s in Bosnia, to the 2010 timeframe in Afghanistan.
It is visible to me that time was spent working to get the details right. Many aspects of the kit stand out to me from the anti-slip surfaces, to the excavator arm, the suspension detail options, and the Canadian-specific decals.
This full resin kit is not perfect, but the issues I have identified can be corrected with some extra effort and additional parts if desired. A Canadian Badger AEV kit has been a very long time coming and kudos to Gerold Betzler of Perfect Scale Modellbau for producing this Leopard variant in 1/35.
I would recommend this kit to modellers who have working experience with resin kits who are willing to dedicate the time needed to build this kit into a very impressive looking model of a Canadian Badger AEV.
The kit is available here:
© Leopard Club
![]() Contact us at leopardfibel@gmail.com
Contact us at leopardfibel@gmail.com