 35116
35116
Scale: 1:35
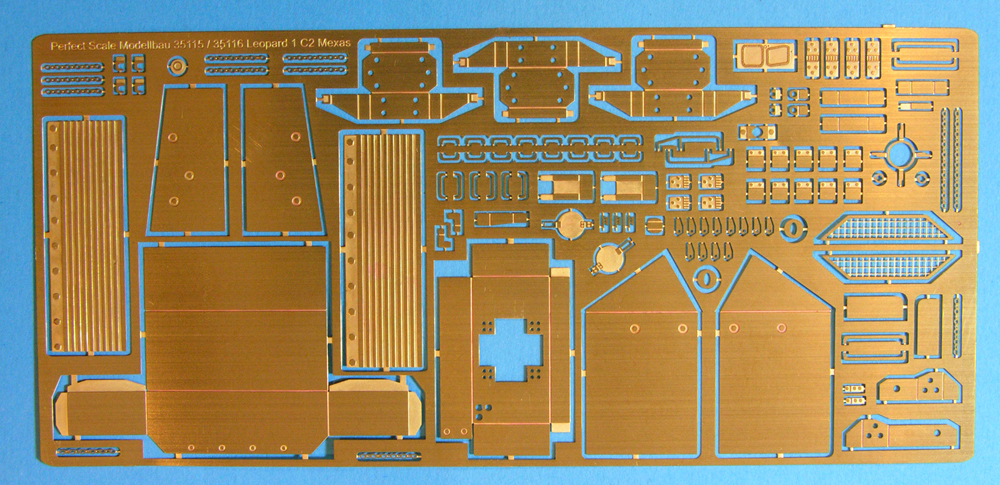
Media: resin and photo-etch
Reviewed By: Michael Shackleton
Model kindly supplied by Trackjam for this review.
Photos of Canadian vehicles reproduced with thanks to Anthony Sewards.
Currently, there are four different resin conversions for the Canadian Leopard C2 MEXAS. These should all prove popular as this Leopard 1 is one version that has proven it's effectiveness in combat in Afghanistan. Perfect Scale Modellbau from Germany have released two different versions both with and without the later thermal blanket. Already reviewed in these pages is the Legend C2 MEXAS. A few years ago, Maple Leaf Models in Canada released a C2 MEXAS conversion kit and this is thoroughly described in Leopardfibel LF05 Afghan Cat. This same kit has now been re-released by Trackjam with many upgrades to bring it up-to-date.
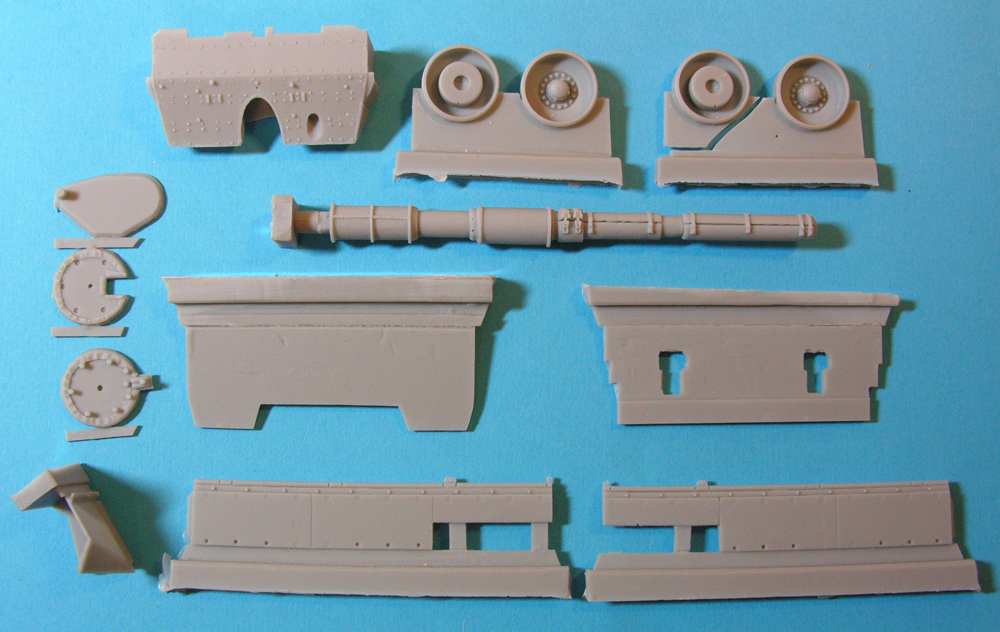
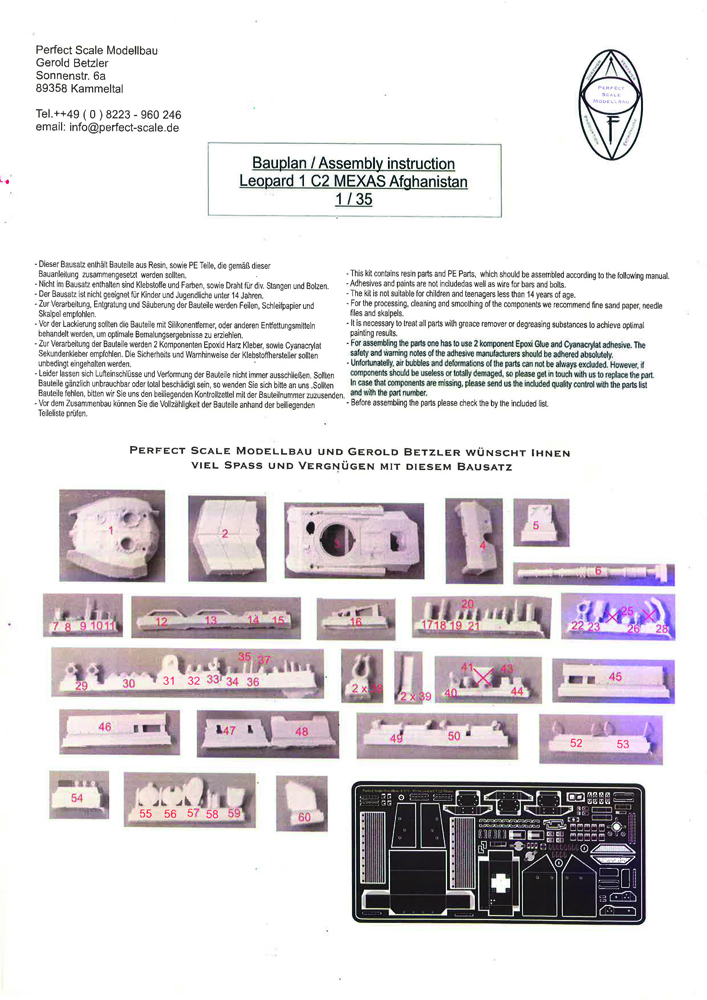
Inside the sturdy cardboard box are: two polythene bags with the resin components; separate hull and turret castings; a photo-etch brass fret; a 4-page, full colour A4 instruction sheet.


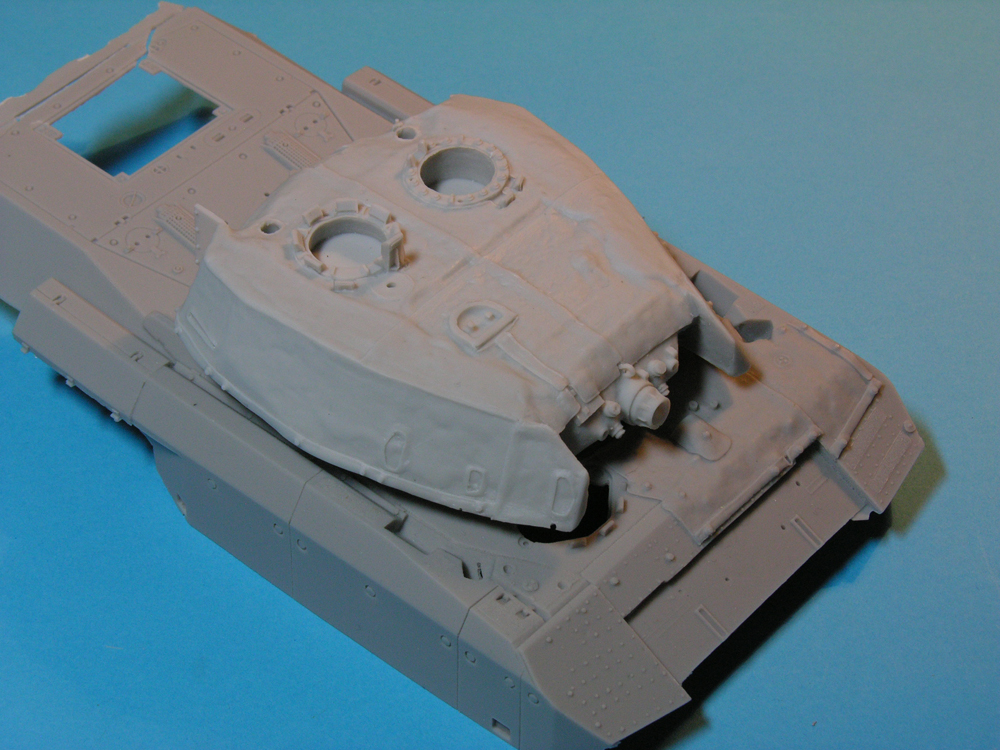
What does the PSM kit offer that the others do not? A reworked turret is included, so any of the Italeri/Revell Leopard 1 kits can be used, including the welded turret 1A4 kit. The first things you see when opening the box are the two main castings of the hull and turret. This is an altogether simpler kit than the Trackjam and Legend alternatives simply because the hull has all of the MEXAS armour modules in place, as does the turret. In this case, we also have the thermal jacket already moulded on. Both pieces are very well moulded and carry a lot of convincing detail.
If you prefer the alternative PSM model WITHOUT the thermal jacket, this is pretty much the same package except that this turret comes in three pieces, not one - the turret itself and two side modules of MEXAS armour already joined together. Their have been comments that the modules mount a little too high on the turret on this version, but I don't see this problem on the thermal jacket kit.
The instructions are quite brief but surprisingly descriptive. This is actually quite a simple conversion thanks to the simplicity of the two major castings, so reams of instructions are not needed. Photos of the resin and etch parts are clearly labelled with the component parts.
Although it doesn't actually say anything in the instructions, it is fairly obvious that construction starts with the hull bottom and running gear. Assemble as per donor kit instructions. Smaller diameter Leopard 2 idlers are included, though some C2 MEXAS retained the original idlers. The instructions show the kit's vinyl tracks installed, but how the modeller deals with this problem is up to the individual. Because the top run is invisible with the armour modules in place, the tracks could be left until later if you are using individual links or resin link and length (which PSM offer separately) alternatives to the kit's vinyl tracks. PSM also offer replacement wheels which don't have the dreaded grooves on the tyres that the donor kits have.
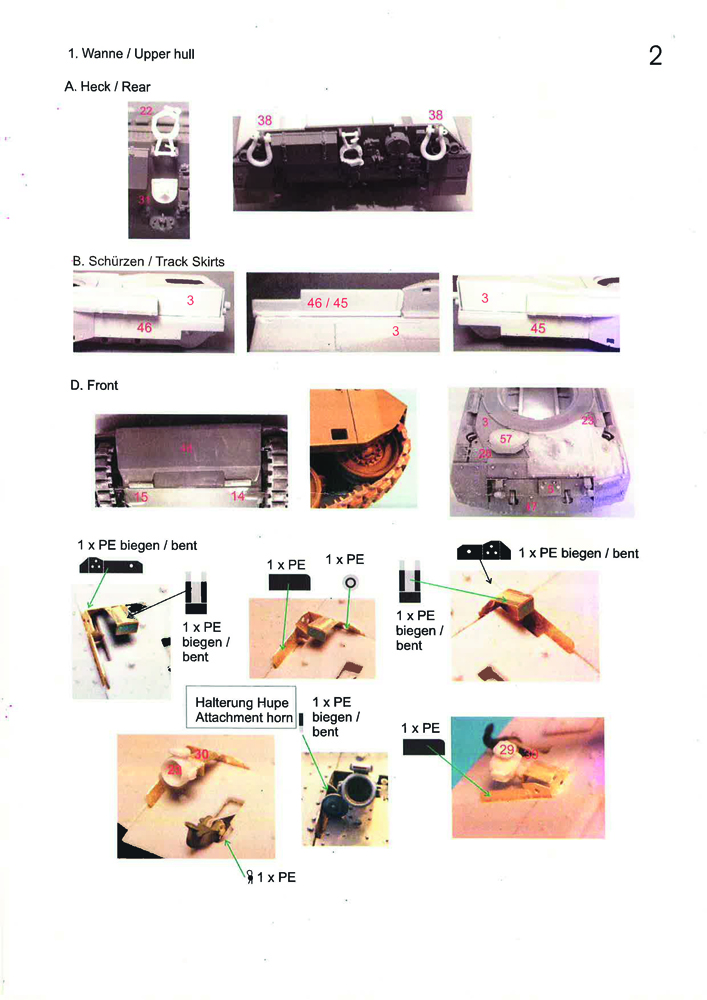
The hull rear plate can be detailed as per the donor, but a new gun travel lock in resin is supplied as this was always a weak point of the Italeri/Revell kits. Also in resin is a replacement convoy light shield. The huge Ballard tow shackles are included in resin, However, the clevis pins are not separate so you will have to remove a small piece from the middle and spring them into the towing eyes - I guess. Strange idea.
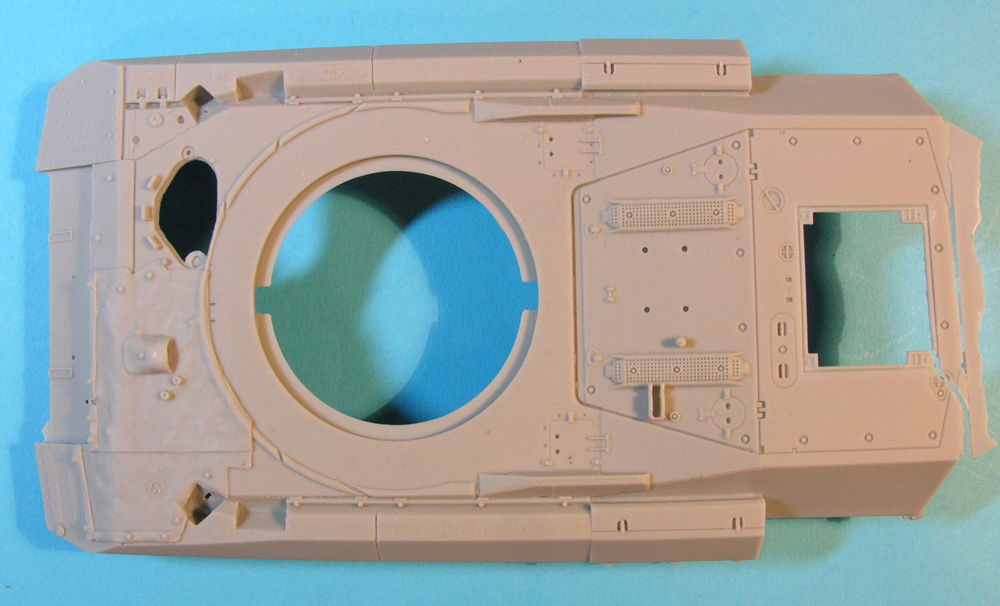
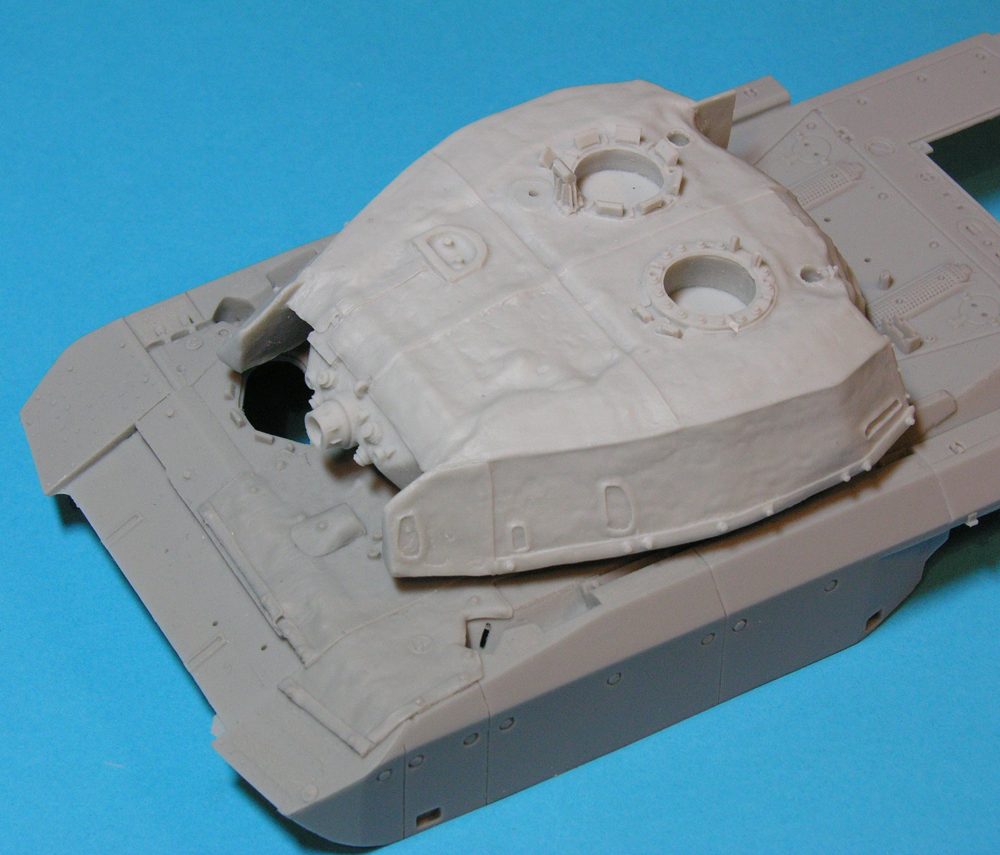
This is the single biggest casting in the whole kit and it is very impressive. As mentioned already, the top is cast with the side armour modules in place so there are no worries about getting everything to fit properly. The casting itself is amazing with a lot of undercuts and very little flash. Barely noticeable are various non-slip patches on top of the side panels and left-side trackguard - all missing on the other MEXAS kits. There is no discernable warping either! The only real clean up is quite large circular pour plug underneath the nose which can easily be ground off with a Dremel. My hull top was broken just behind the rear deck grille opening. However, my example had crossed the Atlantic twice (Germany to Canada and then to the UK) before it got to me! The rear deck grilles will have to sourced separately from PSM, Eduard or Real Models. I'm surprised these aren't included.
There is quite a lot of photo-etchery needed to build up the extended headlight brackets on the nose which won't be to everyone's taste, but it is all fairly simple right-angle bends and easy joinery. The headlights are supplied hollowed out but you have to find your own lenses. I cannot locate any parts for the tow hook extensions (as they have to reach through the extra nose armour) so these will have to made from plastic card. The nose armour plate is supplied separately which will allow the mounting of a mine plough, mine roller (also from PSM) or dozer (available from Mouse House). A cover to go over the driver's periscopes which covered small wipers on the periscope blocks is included. This was driven by a cable which disappeared down behind the right corner block of MEXAS. This is not mentioned in the instructions. Even the driver's hatch has a thermal cover.
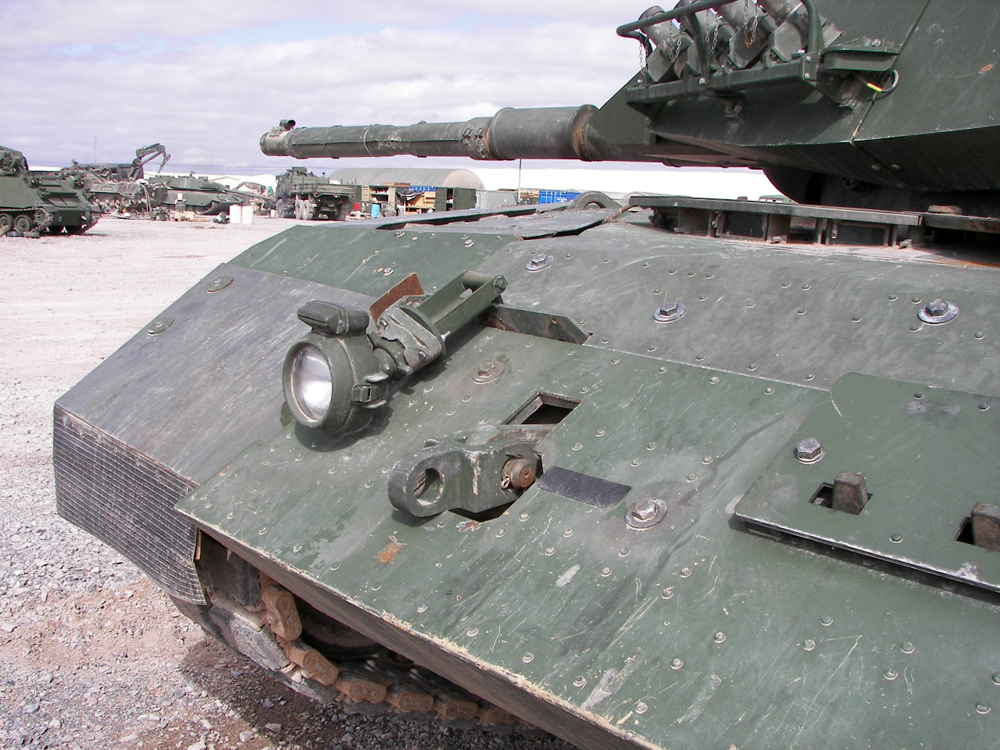
Photo © Anthony Sewards
Here you can see the extension for the front tow hook missing in the kit

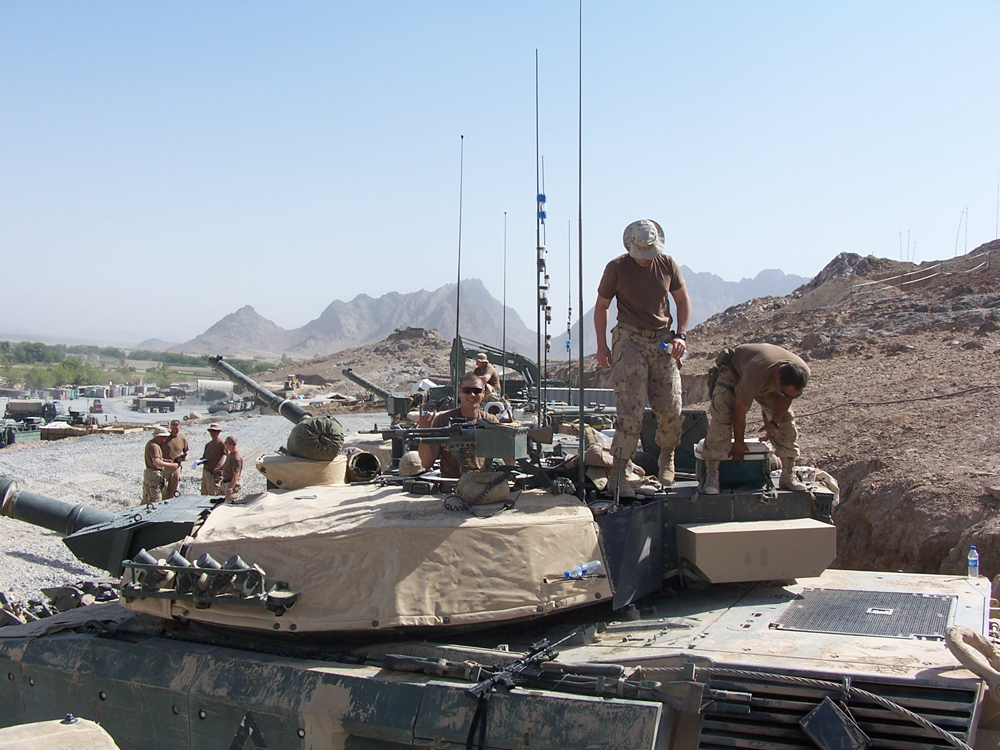
Photo © Anthony Sewards
The wiper system over the driver's periscopes - note the cable down the side
Dust shields are supplied in etch brass. These were beaten up fairly quickly. By the time the thermal cover was introduced most, but not all, were missing. You can find photos with just one in place on the right OR one on the left. Be careful - if they were fitted with the thermal cover, the dust shields went UNDER the dust cover on the left side.
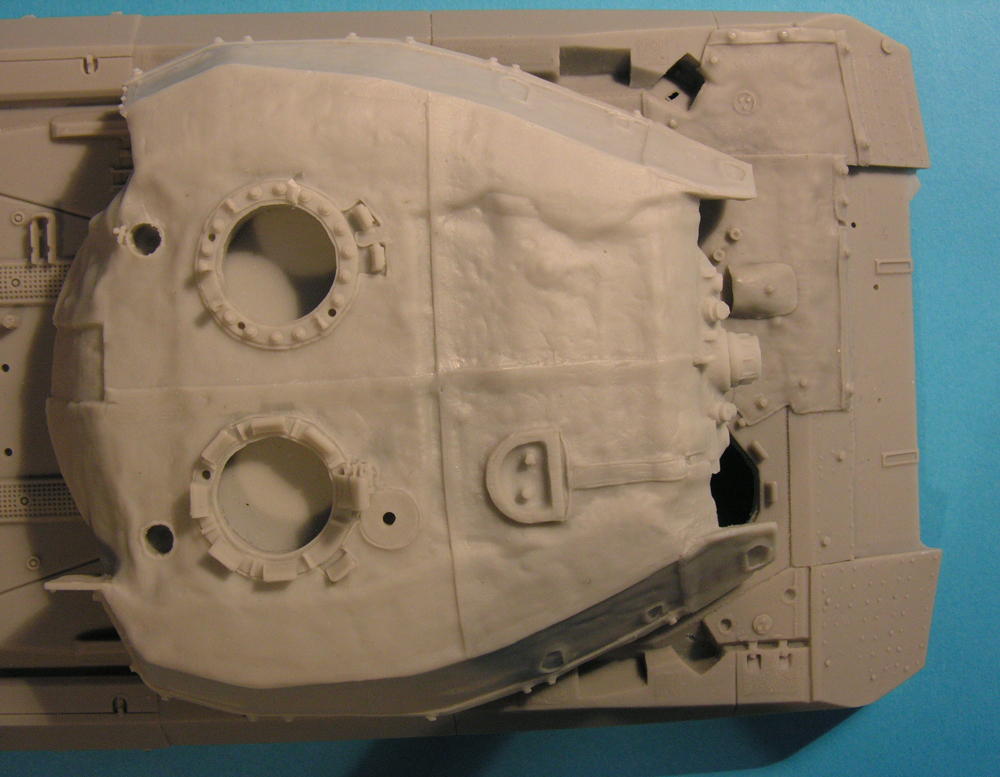
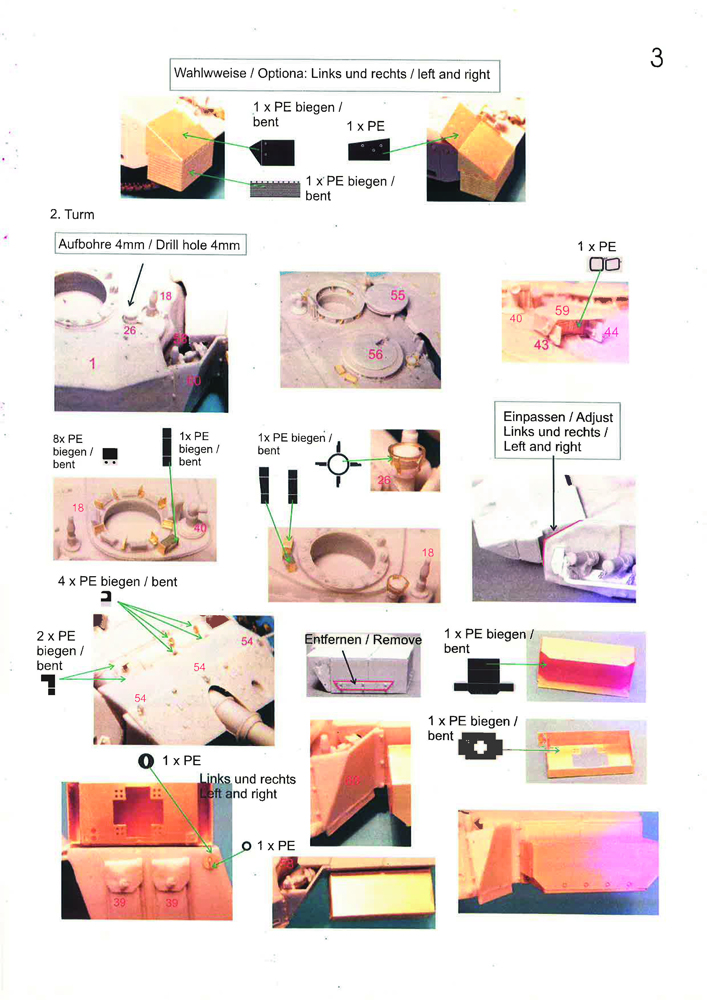
Just like the hull, once again there is no need to worry about lining up all of those MEXAS modules. It's all been done for you as the turret is a one-piece moulding that basically only needs the large rear stowage box and the uparmoured mantlet adding. Once again, this is an impressive moulding and the thermal cover looks very convincing. There was only one air bubble in my example. Whereas the hull MEXAS has non-slip panels included, the thermal jacket doesn't. You might think this strange to have non-slip on material but on the real thing they have been added on the sloped edges - see photo. These are easily taped and sprayed on with your preferred texture paint such as Rustoleum or Plastikote Terrcotta Touch aerosol. In reality, they rubbed off very quickly and looked very patchy.
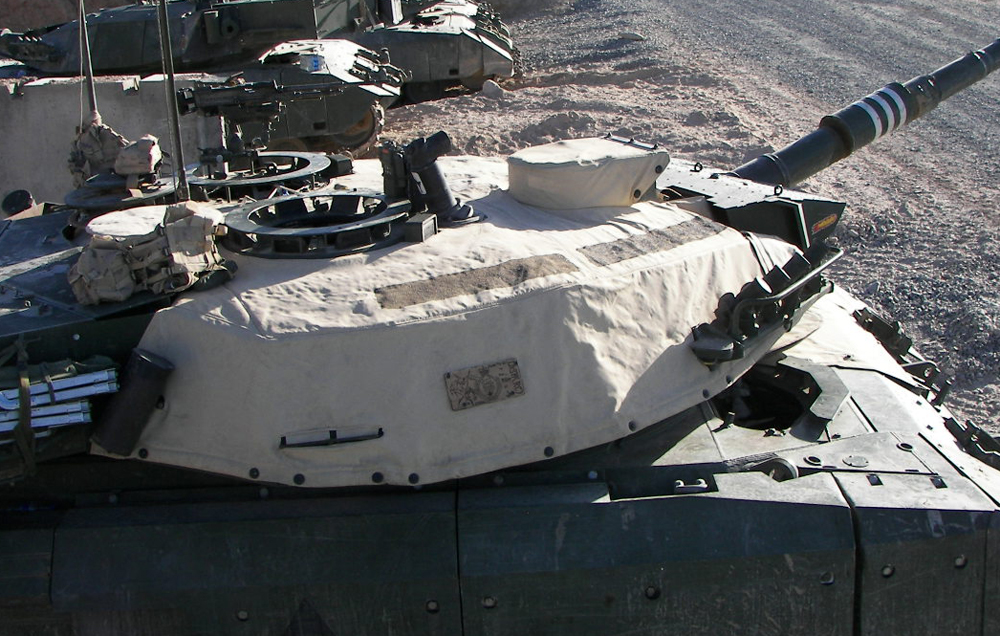
Photos © Anthony Sewards
This turret has the correct number of commander's periscopes and even the rain gutter is depicted! The instructions suggest that the front protruding corners of the side armour are carefully thinned back. This is necessary as the mantlet is over a millimetre too wide. Looking at photos of the real thing, the clearance is very tight. If you force it into the existing gap, the mantlet will bend and the thin top corners will break off. I know - I foolishly tried!
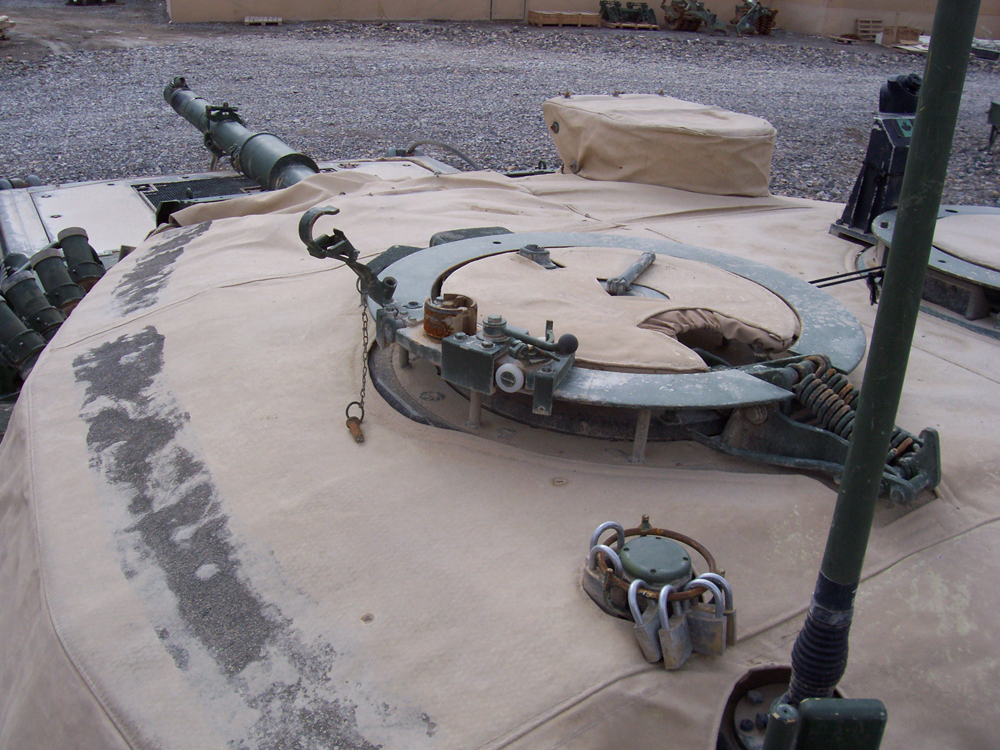
No cupola rings are supplied, so use the kit ones. The hatch tops are replaced with ones with the thermal cover in place. The rest of the turret top is then detailed with the EMES-18 sight (with cover as well), GPS unit and an etch (flat not tubular) guard, aerial mounts, etch periscope guards, etc. Searchlight hooks for the mantlet are also in etch but these are much too thin to depict the actual cast hooks. Small mantlet lifting eyes are cast in resin.
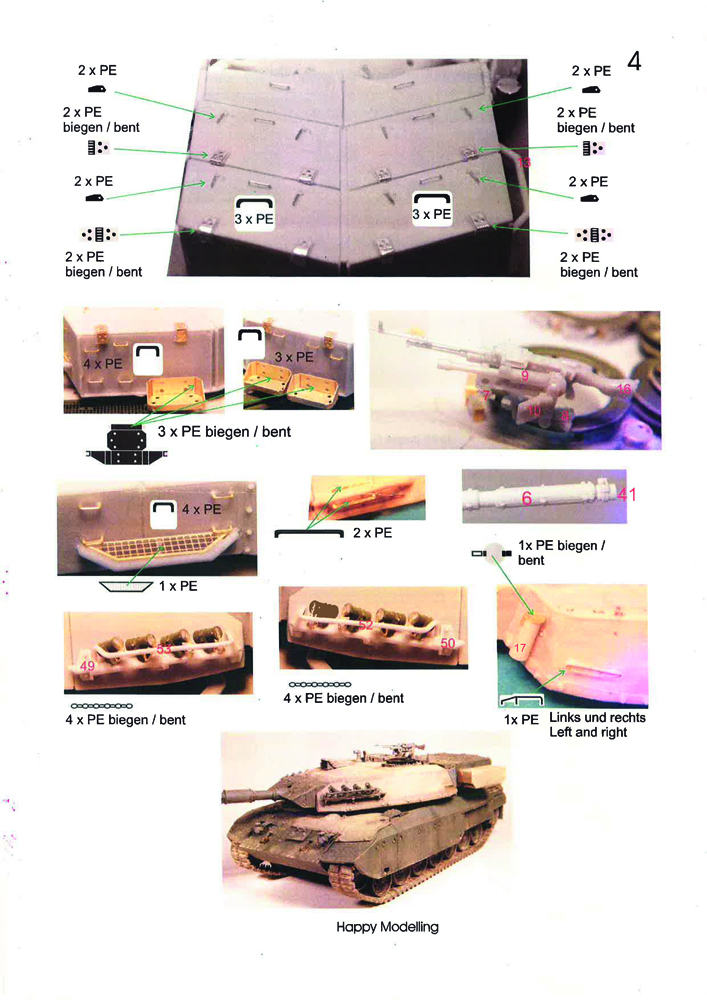
Now we have two problems. The forward triangular panel of the ECM shield follows the line of the turret module it is attached to. In reality, it sticks out at a definite angle - see photo. The cooler unit is supplied in photo-etch but it is too long. It is 29 mm long and it should be closer to 26 mm. Take a look at reference photos to see what you think.
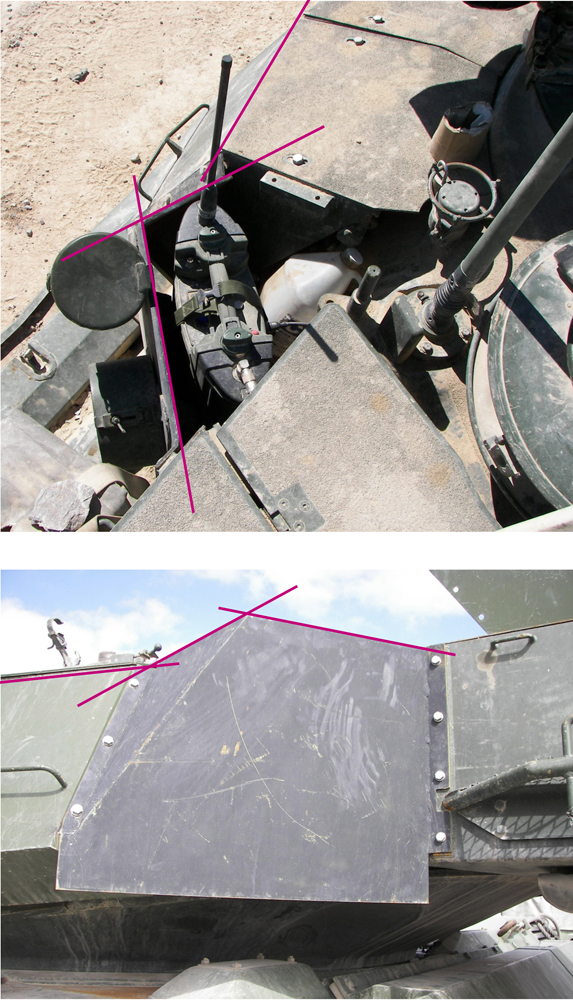
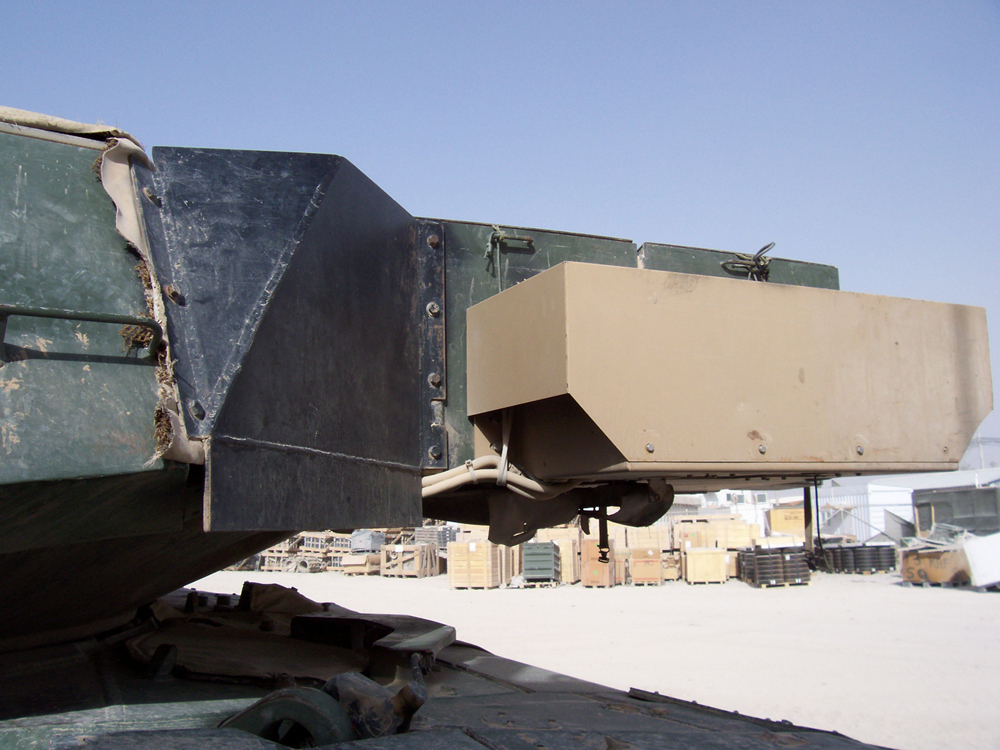
Photos © Anthony Sewards
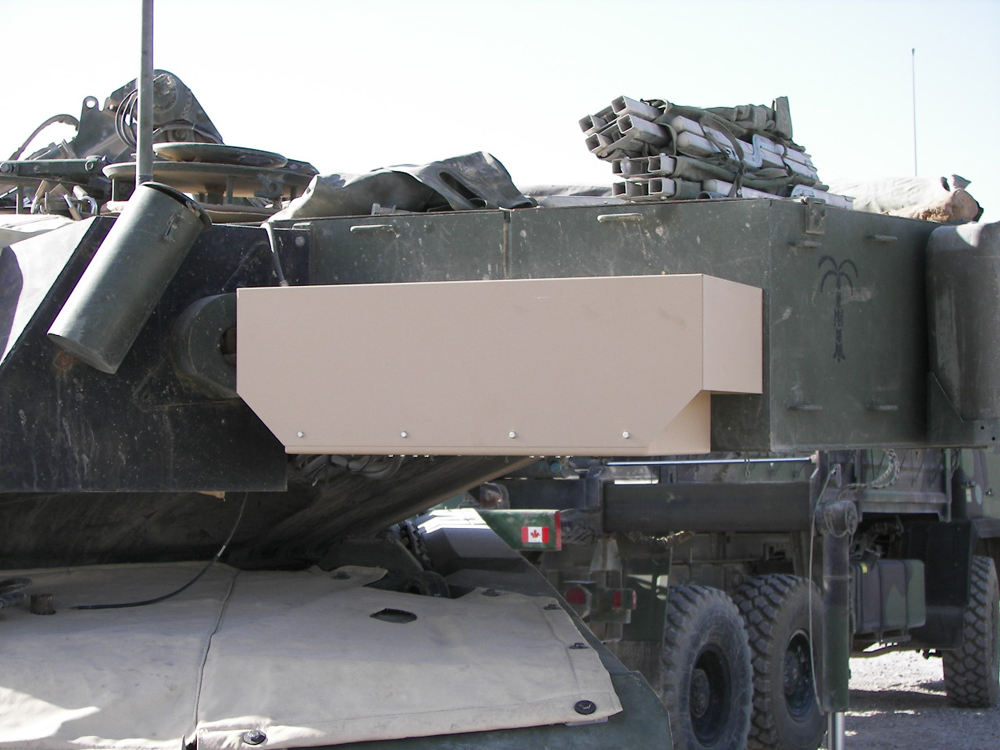
The lids of the turret stow box have nice non-slip moulded on. The (one) luggage rack is a little fiddly as it made up from a simple resin frame, an etch net and two flat etch rails which are better replaced with wire. In fact, there are a few tie downs supplied in flat etch which would be better in wire on the stow box top, rear and sides. Etch hinges, locks and jerrycan holders are also in etch. Unfortunately the leading edge of the turret box is not correct - see photo.
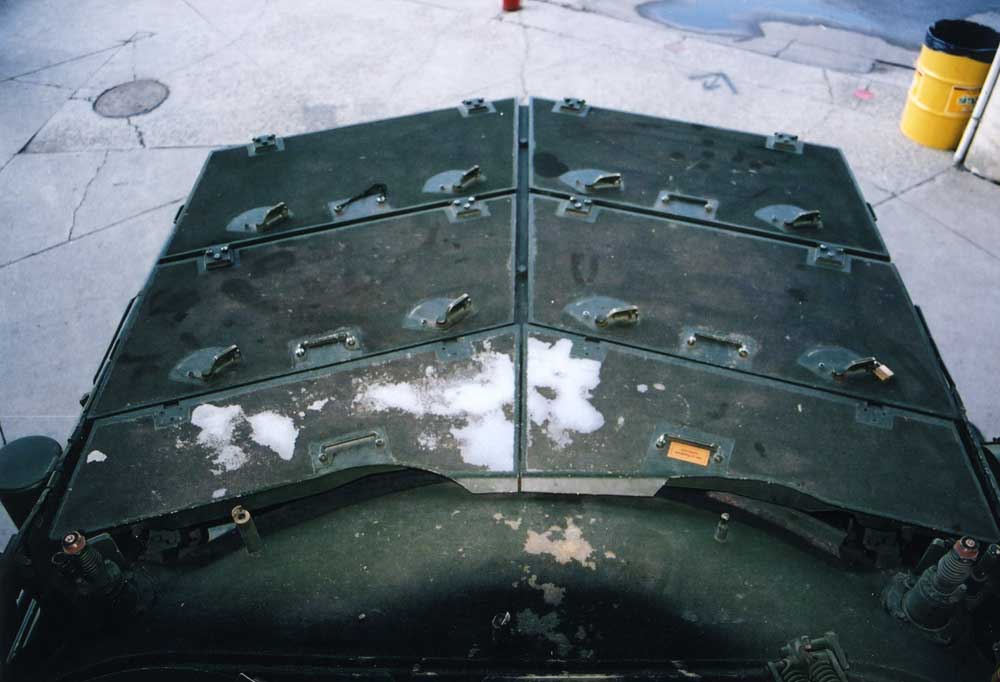
Photo © Dan Hay
No jerrycans or straps are supplied. Again, flat etch is supplied for the grab handles on the side of the turret. The smoke launcher mounts are all resin but the resin brush guards were broken in my example (probably due to the two Atlantic crossings). Etch chains are supplied for the launcher caps. Two antennae bags are supplied which go under the stowage box, but both should be about 15 mm longer. The C6 MG is supplied with the rifle stock, but not with spade grips.
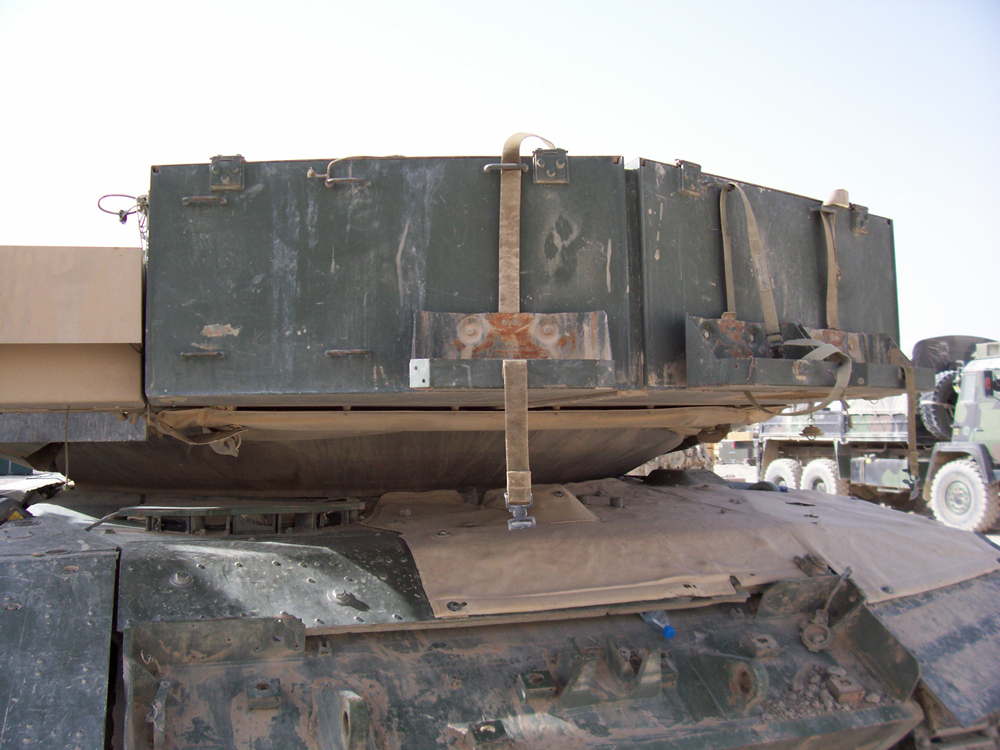
Photo © Anthony Sewards
Note the missing jerry can straps and the length of the antennae bags under the turret bustle bins
Very little. Wiper cable. Headlight lenses. Etch rear deck grilles. Extensions for front tow hooks. Non-slip on turret edges. Small things hardly worth mentioning.
Highs - Very easy solution to placement of MEXAS armour blocks. Super casting quality. Convincing thermal jacket.
Lows - Too much flat photo-etch for tie downs and grab handles. Antennae bags too short. Cooler unit too long. ECM shield has wrong angles. No jerrycans or straps. Leading edge of turret box incorrect.
Verdict - Overall, very nice simply because of it's simplicity.
I have now reviewed three different C2 MEXAS conversions - all approached in different ways by their makers. I haven't done a direct comparison other than mentioning one or two points. I will leave it the reader to read all three reviews and he can make his own mind up. It is not my job to choose for him. As with anything in life, the choice is down to personal preference.
Leopard C2 MEXAS saw a continual modification programme in theatre, and this kit represents the final version before the Leopard 2 started to take over. I would recommend Leopard Fact File LFF03 by Anthony Sewards, Leopard C2 MEXAS in Afghanistan for the complete story of their service in Afghanistan.
It is such a shame that this will largely be overlooked when Takom release their all-plastic kit of the same subject.
Many thanks to Paul Fredenburg of Trackjam for his generosity in supplying the review kit.
Thanks also go to Anthony Sewards and Dan Hay for the use of their photographs.
© Leopard Club
![]() Contact us at leopardfibel@gmail.com
Contact us at leopardfibel@gmail.com