 Catalogue number: 2044
Scale: 1:35
Media: injection moulded plastic, photo-etch
Reviewed by: Michael Shackleton
The sample model was kindly supplied by Takom
Following on from Takom's earlier Leopard 1 kits ( C2 MEXAS and 1A5/C2), most people wondered how - or if - they would follow these up. There is interest in engineering vehicles amongst modellers (such as Bergepanzer 2, Dachs or even Biber), but the plastic model companies don't seem very interested unless armoured vehicles have guns. The logical choice to go for was, therefore, the anti-aircraft version of Leopard 1, the Gepard (German for Cheetah following the wild cat tradition of naming their offensive vehicles).
Takom seem to be on a bit of an anti-aircraft kick at the moment, which is good for us Leopard fans. Takom were the first of three companies to announce Gepard. It is a popular subject all of a sudden with both HobbyBoss and Meng having also announced their own kits.
The story of Gepard is a little complicated, so I will try to keep it down to a few paragraphs.
The only mechanised system available to the Bundeswehr in the 1960s/early 1970s was the fair-weather, daylight only, American M42 armed with a twin 40 mm cannon which dated back to 1953. It was in dire need of replacement with a system that combined surveillance, identification and fire-control using the latest computerised technology.
During the 1960s, the German Ministry of Defence stipulated that the surveillance and identification equipments were to be installed in one vehicle, with fire-control and guns mounted in a second vehicle. The overall concept was seen as a formation of battle groups composed of one command/surveillance tank leading and directing a group of anti-aircraft artillery tanks. This concept was studied by Rheinmetall in conjunction with AEG-Telefunken.
In competition to this battle group concept, a Swiss industrial consortium (Oerlikon-Contraves and Siemens-Albis, headed by Contraves) presented their twin 35 mm anti-aircraft concept. As soon as the Leopard chassis was released for anti-aircraft development, Oerlikon-Contraves investigated the possibilities of a fully autonomous (fully independent and self-dependent) anti-aircraft tank in which search radar, fire-control system, twin externally mounted guns and sufficient ammunition for approximately fifteen engagements, could all be integrated in one vehicle.
In 1967, a Study Group was set up to work out in detail an anti-aircraft tank battle group concept based upon the Rheinmetall/AEG-Telefunken 30 mm system (which became Matador). When completed, this concept was compared with that of the Oerlikon-Contraves 35 mm system (Gepard), both tactically and technically. First results of this phase of the study clearly indicated the advantages of the Oerlikon-Contraves autonomous version, so the Rheinmetall solution was abandoned.
In September 1967, Krauss-Maffei were contracted to convert and deliver two Series-0 (Leopard 1 pre-production) chassis to Oerlikon-Contraves who would install their twin 35 mm gun system. These vehicles were given the designated 5 PFZ-A. A third works prototype, based on another Series-0 chassis, was handed over to Oerlikon-Contraves in April 1968 for private testing and development purposes, and manufacturer's tests on this started the month after.
Advances in radar techniques led to the construction of a second-generation system with new or more advanced radars. The proven technical systems of the first generation anti-aircraft vehicles were retained, however. This modification of the radar installation resulted in improved surveillance and tracking of low-flying aircraft, in addition to a significant reduction in reaction time. The second generation of prototypes were designated 5 PFZ-B and four new chassis were built. Changes included an extension to the rear hull to carry six batteries providing better access for maintenance and freeing interior space for fire system electronics.
A pre-production series of twelve vehicles (5 PFZ-B2) then followed at the end of 1970, which saw the introduction of the infamous wheel spacing (the hull was lengthened by 80 mm with the turret ring moved back 20 mm for installation of sound proofing between the driver and the APU compartment).
The first production vehicle was handed over to the Bundeswehr on 16 December 1976, the last on 29 October 1980. 420 Gepards were delivered in two types. 195 vehicles (known by the factory name Gepard B2), were followed by 225 Gepard B2L with a Siemens laser rangefinder on top of the tracking radar. These were collectively designated by the Bundeswehr as Flakpanzer 1 Gepard. At the time of its introduction into service, the Gepard was said to be the most expensive armoured fighting vehicle then in service.
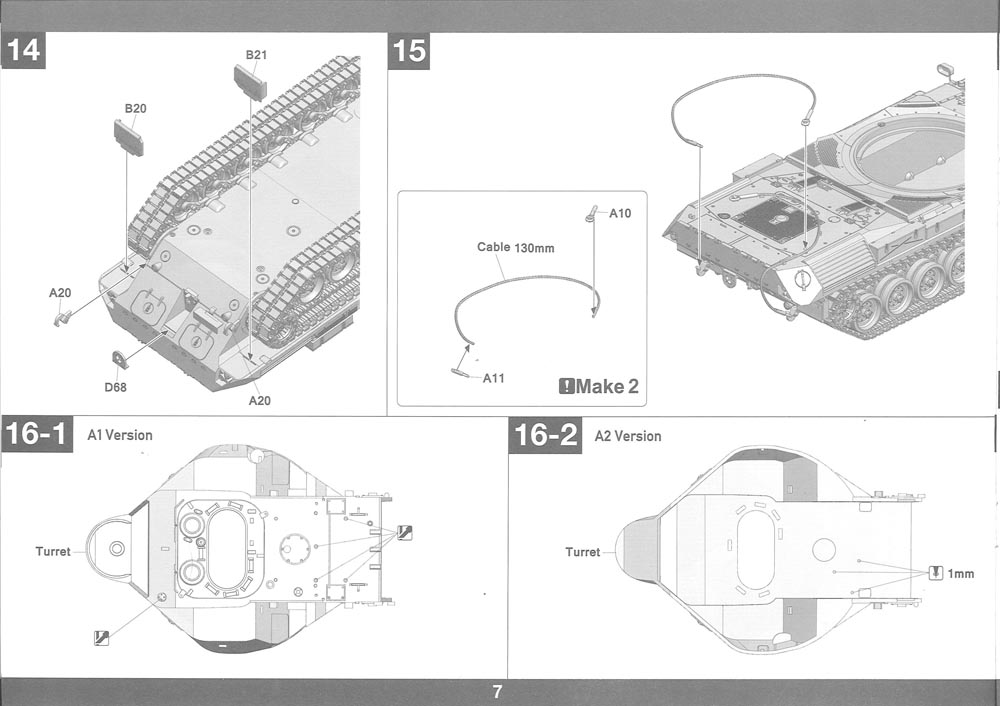
A radio upgrade changed the designation to Flakpanzer 1A1 Gepard or Gepard A1 (as per the earlier version in this kit).
Improvements in firepower come from a new muzzle velocity-measuring device and the introduction of a new FAPDS (Frangible Armour Piercing Discarding Sabot) with a very high muzzle velocity of 1,400 metres per second. New testing equipment was also part of the package and a cooling system for the crew compartment and electronics was carried across the bottom of the turret rear. Following this later upgrade, the vehicle was called Flakpanzer 1A2 Gepard or Gepard A2 (as per the later version in this kit) and the programme involved 147 vehicles. GPS is also part of the new equipment fit with a small receiver embedded in the front turret roof.
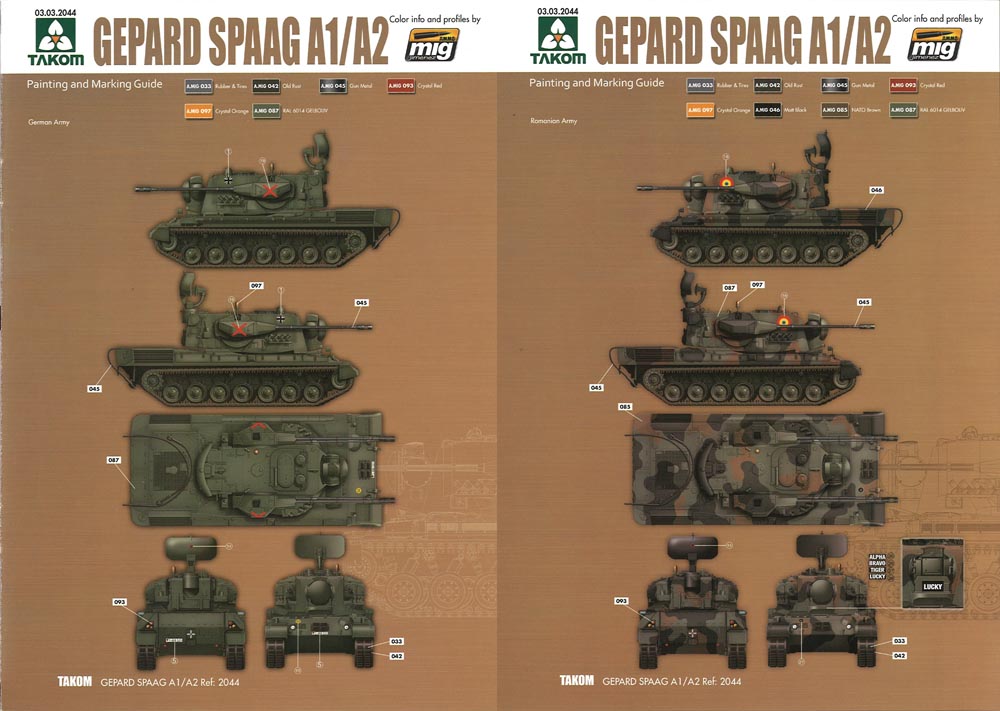
The kit options include decals for German, Belgian, Brazilian and Romanian Gepards, so these are the only ones mentioned here.
Belgium selected the B2 version and deliveries took place between 1977 and 1980 and fifty-five were ordered, one was left unassembled and used for training purposes and twenty-seven were configured as B2LV in readiness for the addition of a laser rangefinder which was never fitted. All have now been withdrawn from service.
At the beginning of 2000, the Romanian Army took delivery of the first of forty-three Gepard B2s from ex-German stocks. They will replace the obsolete Russian-supplied ZSU-57-2. These were not upgraded to the latest standard German standard of that time.
The Brazilian Army acquired 36 Flakpanzer 1A2 Gepard from German stocks with final deliveries in 2015. These fully-modernised Gepards include new C3 (command, control and communications) capabilities, improvement of target engagement with extended combat range, a new fire-control unit, shorter reaction time, and better hit to kill probability.
In the meantime, all Gepards have now been withdrawn from service with a two-year phase-out that ended in 2012. The entire Bundeswehr air defence force was disbanded.
I have not included any mention of Dutch Cheetahs in this review as it is a significantly different machine and a whole story by itself, and it is not covered in this kit.
That took more than a few paragraphs but I hope it gave you a basic background.
Having reviewed the more recent Meng kit has made me see that there are problems with the Takom kit which I had not realised before doing the Meng review. I have therefore updated this Takom review to reflect this. Inevitably, you will be wondering how the Takom and Meng kits compare. I am not going to do a direct comparison. The Meng kit is reviewed here so please read them both and you will be able to make your own informed decisions. Both kits have their own individual qualities and problems, but both will result in excellent models of Gepard.


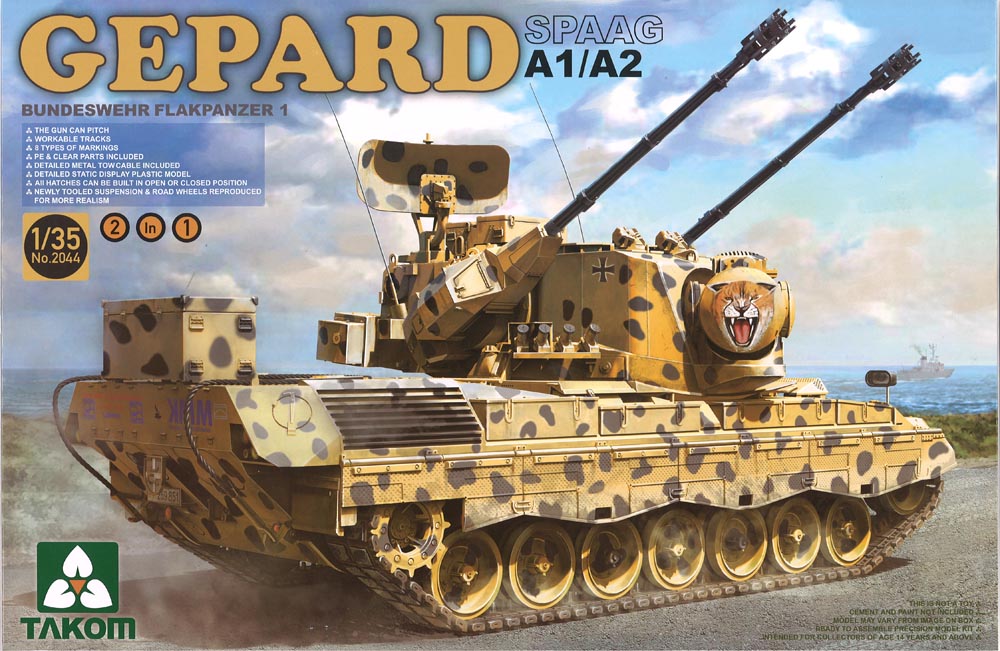
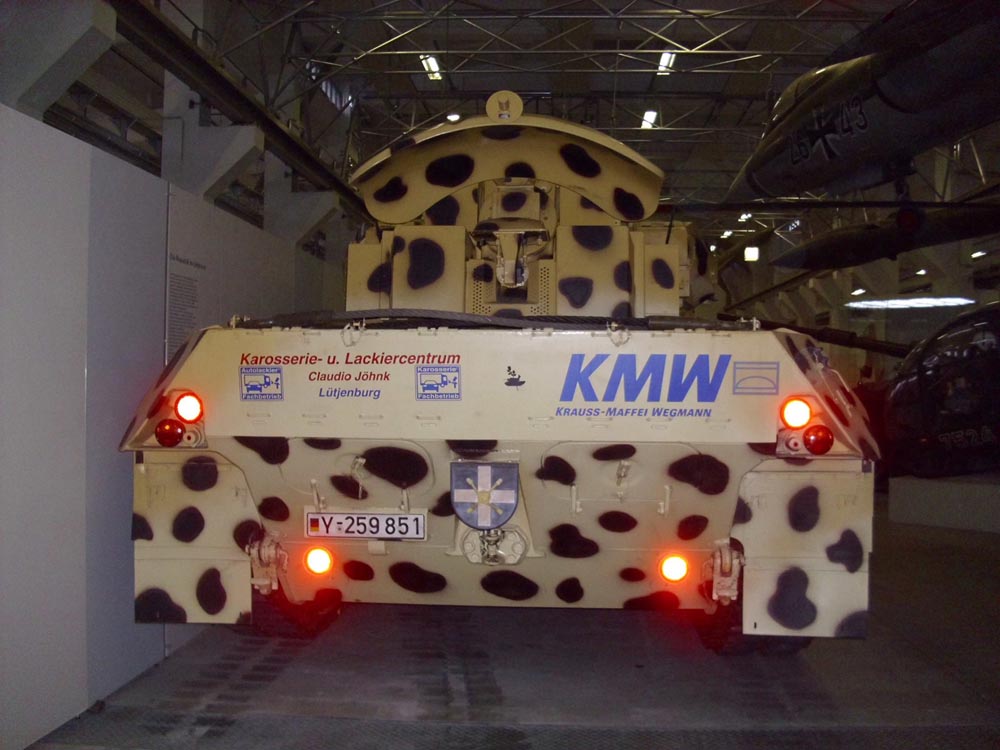
The box top itself carries a striking artwork of a striking vehicle. A Gepard A2 is illustrated in cheetah spots and even wears sideskirts which they never did in normal Bundeswehr service. This one-off vehicle was painted up to celebrate the end of Bundeswehr service in 2012. Striking but non-representative.
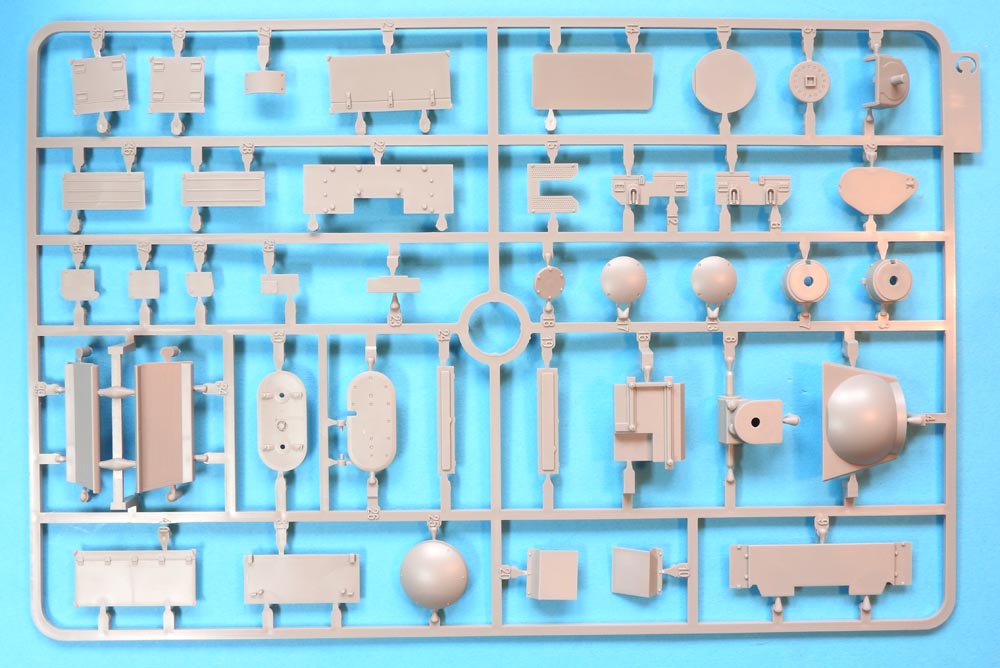
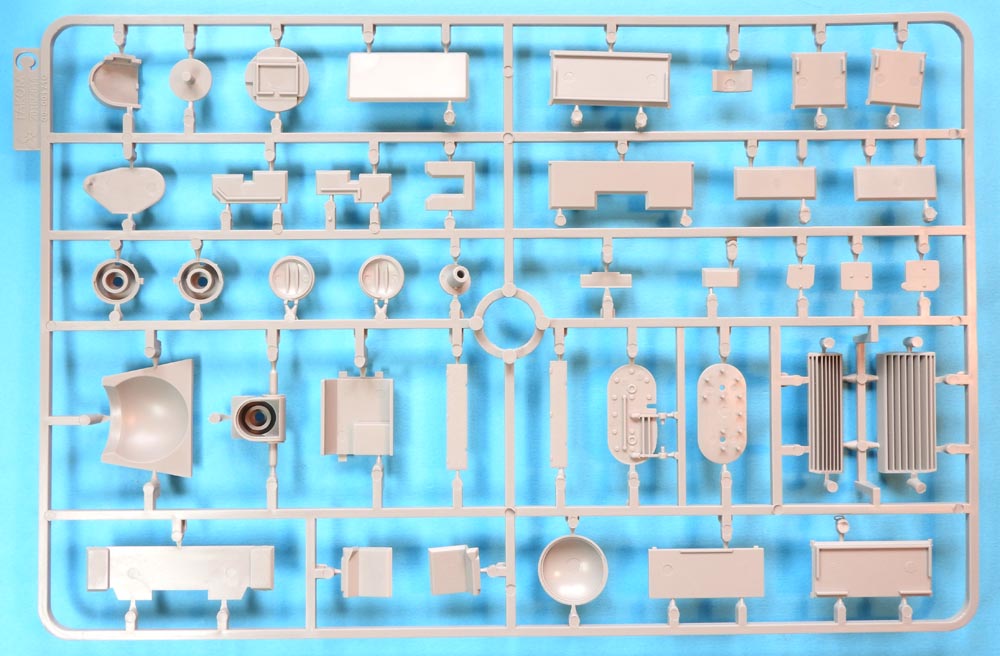
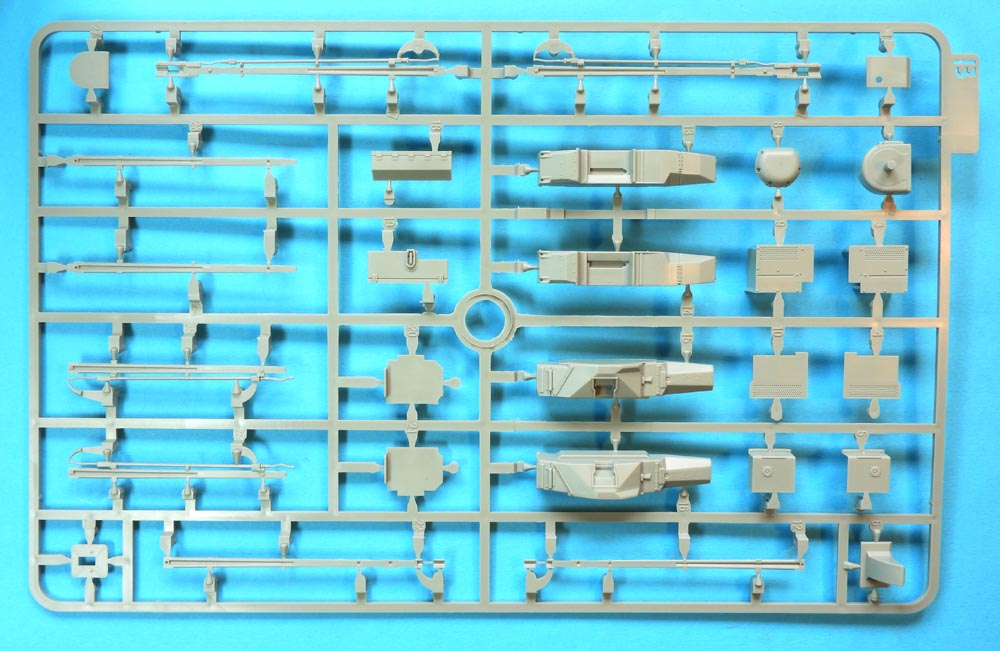
What we have in the box itself has little in common with their previous Leopard kits, apart from the tracks, which is good. Parts count is fairly low which means a simple build (apart from individual link tracks from Orochi. Detail on the parts is very good - sharp and crisp. There are no horrible polycaps so the wheels have detail on both sides - unfortunately for Leopard Workshop! Etch is kept to a minimum which means the APU exhaust grilles on the left-hull side are moulded, for example. Even the tool boxes are moulded on, but with separate lids. Having said that, the moulding is beautiful. No torsion bars thank goodness - a toy-like feature I personally don't like, though many do. Overall, this looks like a very nice kit.
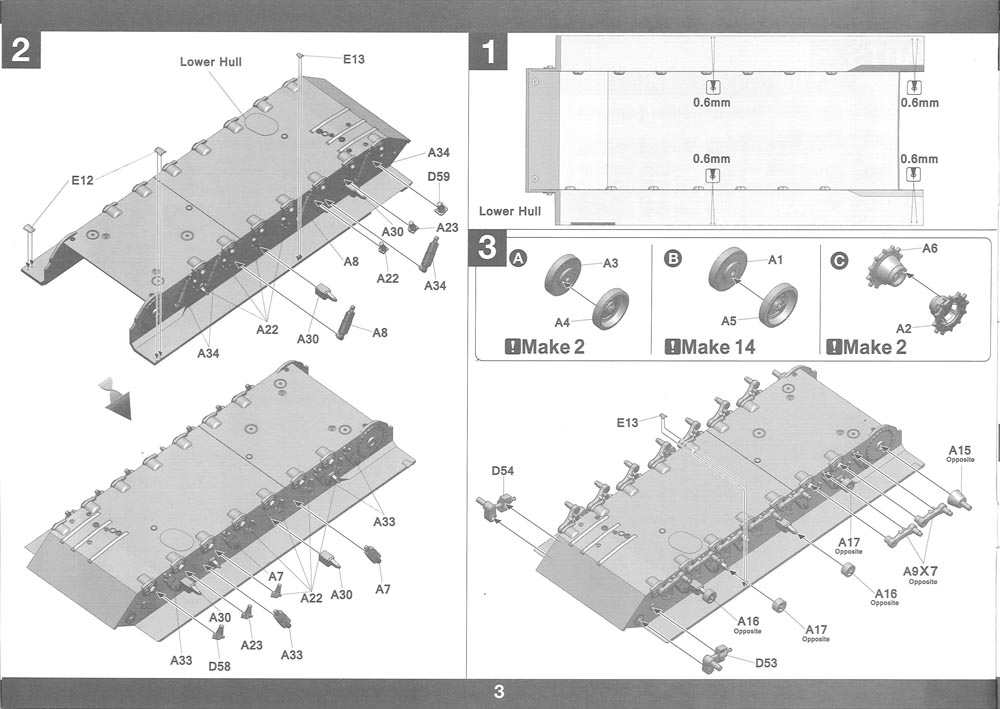
The most-often asked question - since this release was announced - is about the wheel spacing. The old Tamiya kit (Heller too) was incorrect in this respect with even spacing between wheels stations, just like Leopard 1. Gepard had an extended hull (80 mm extra between the third and fourth wheel stations) and Takom have got it spot on.
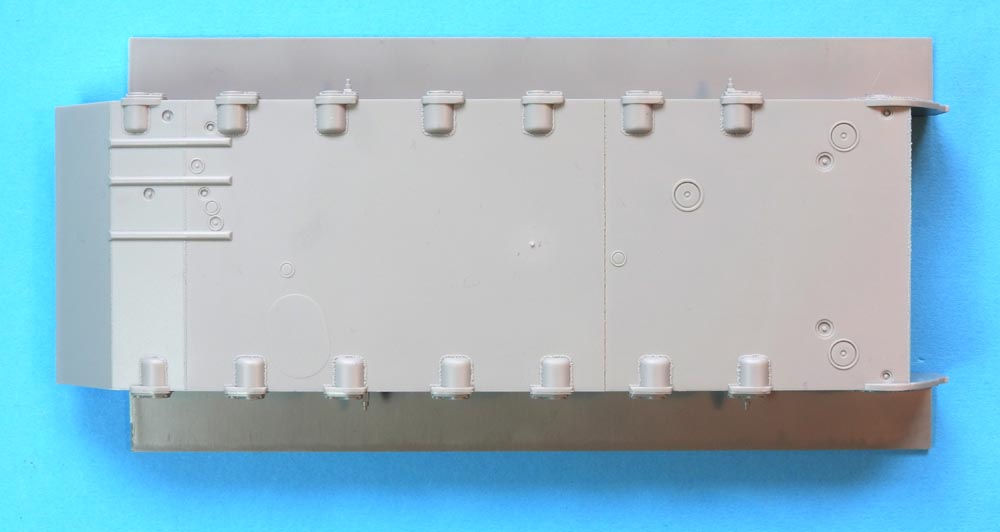
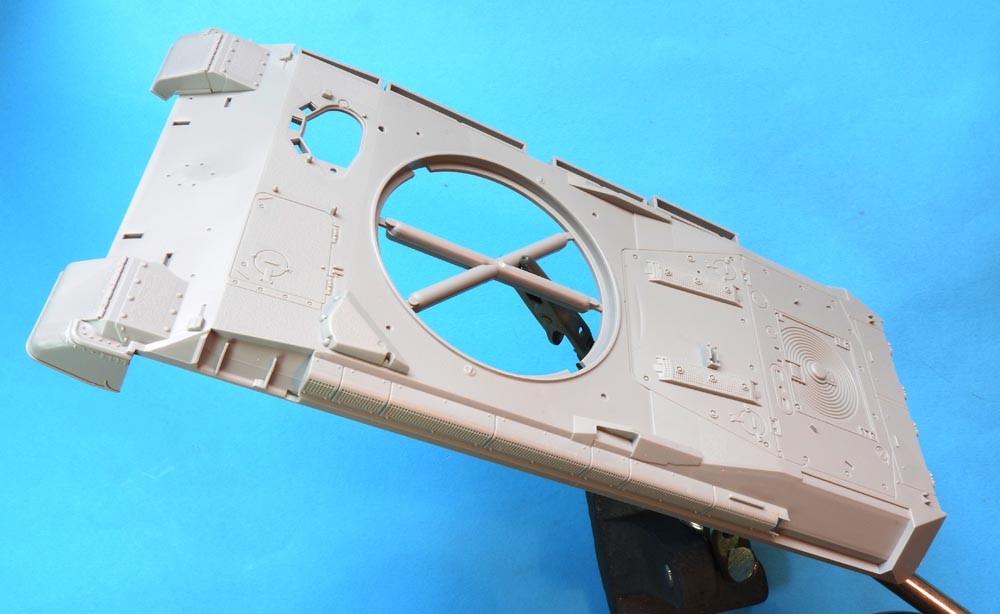
In the floor plate you will see a step between front and rear plates. Leopard 1 - the main battle tank - had thicker armour under the fighting compartment to protect the crew. Unfortunately for Takom, Gepard did not. The turret crew sat much higher up so didn't need the protection. It seems the driver didn't matter! Mind you, no one will notice and I don't suppose many will care!
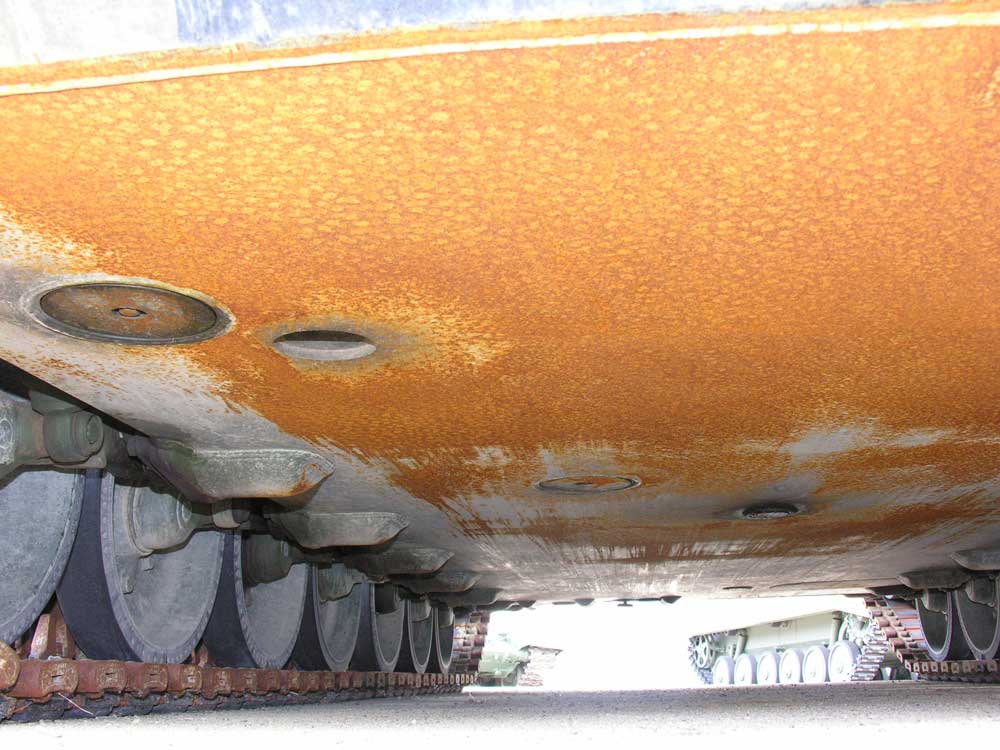
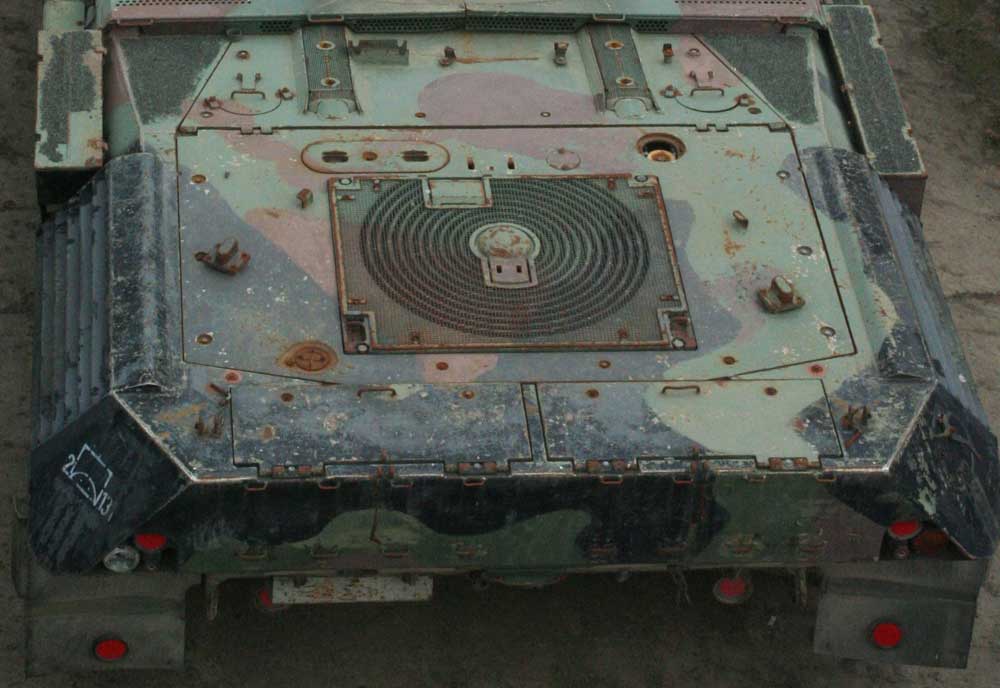
This is the hull floor of the Gepard displayed at Dresden.
Looking from rear to front, the floor is all one level plate.

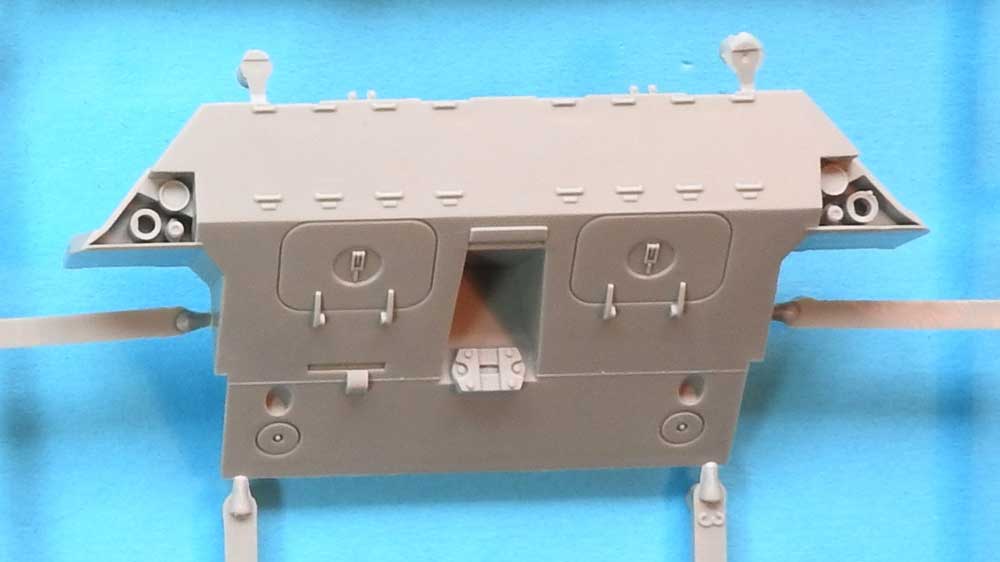
Compared to Leopard 1, the rear hull was extended to provide room for additional batteries. Takom have extended this a little too far, unfortunately. I think you can see, just by eye, that the two hatches at the very rear are too wide (front to rear) compared to the photograph of the real thing below, I think by 2 mm, which is a lot in 1.35 scale. It would be nice if someone has a Gepard nearby to measure the hatches to confirm my fears.
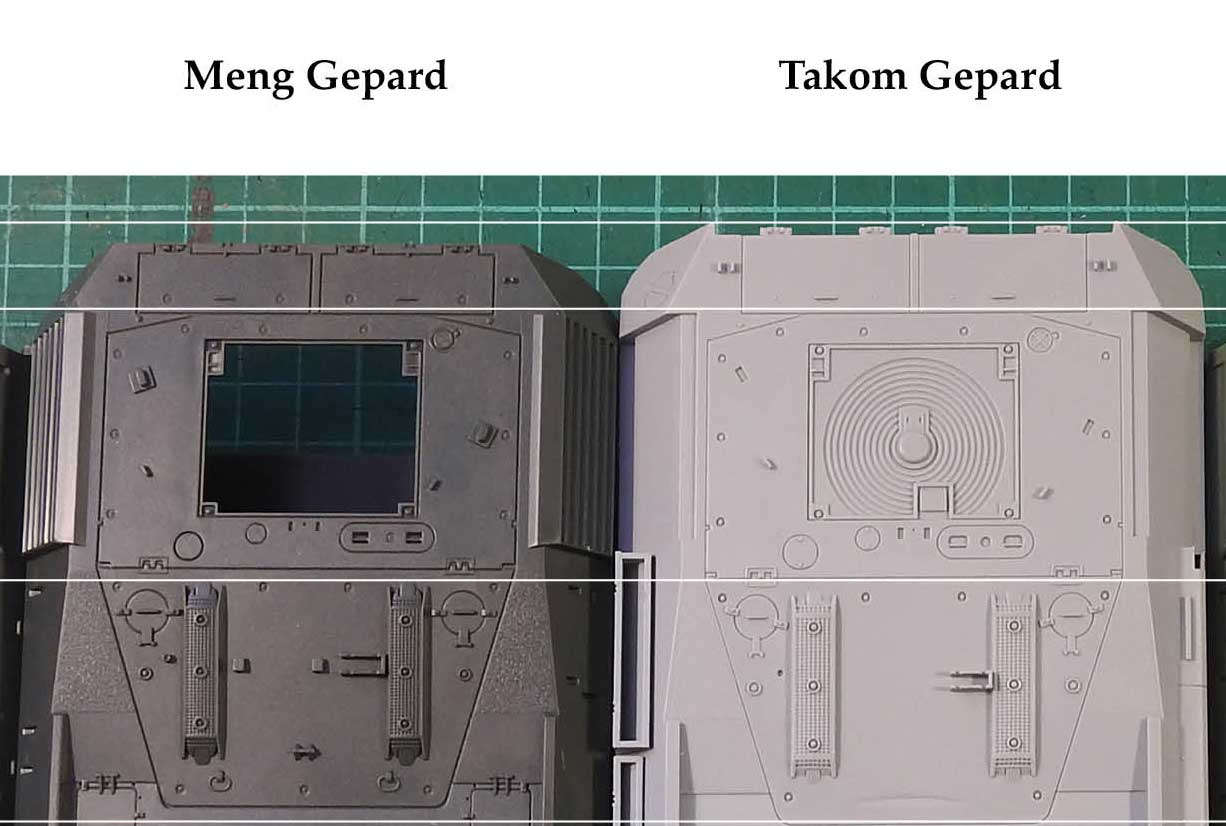
Comparison of the rear ends from Meng and Takom.
The angled clips on the fuel fillers are correct on the Takom hull, not on the Meng hull.
The rectangular air filter covers (bottom of photo) are also missing on the Takom kit, but they are covered by the protective
grille around the rear of the turret.
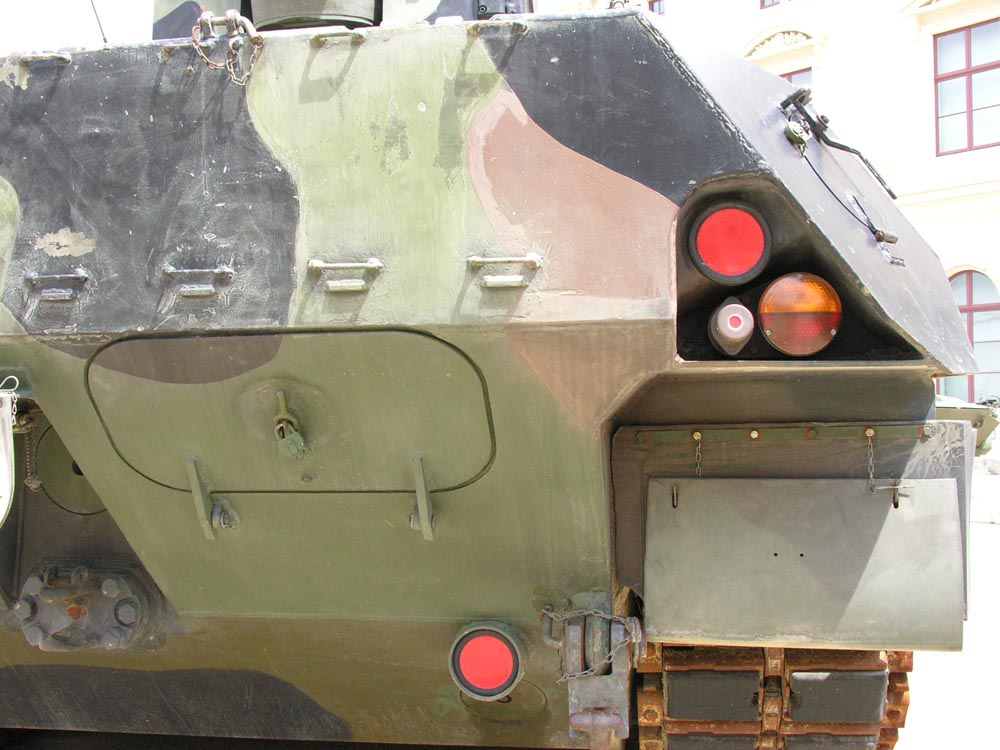
The real hull rear for comparison
Of course, this throws the rear hull plate angles out and the worst things to suffer are the two hatches which look too deep. The tow shackle plate is a little 'off' as well. If you decide to build an A2 with the large toolbox across the rear hull top, these problems will be largely disguised.
Compare the rear end with the two from Meng and Takom - and with each other!
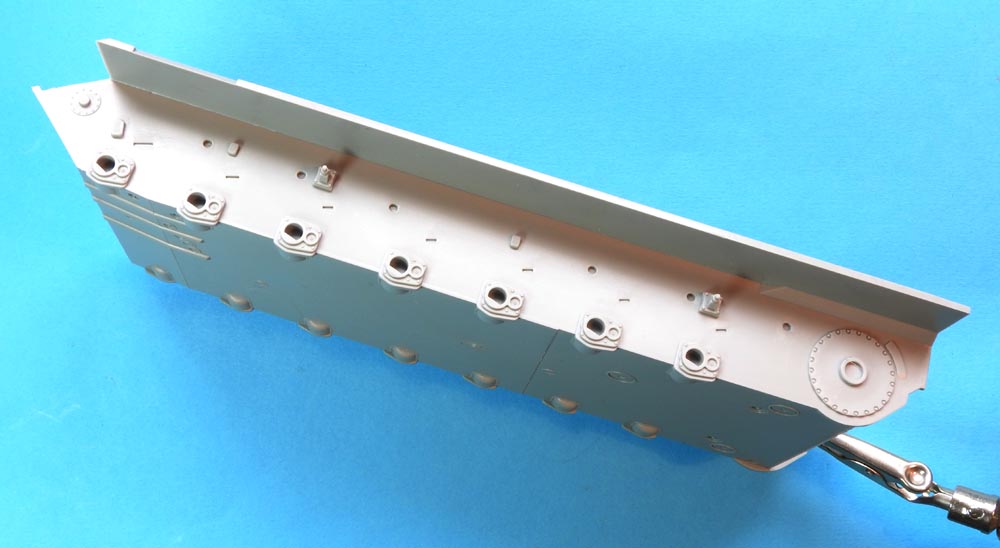
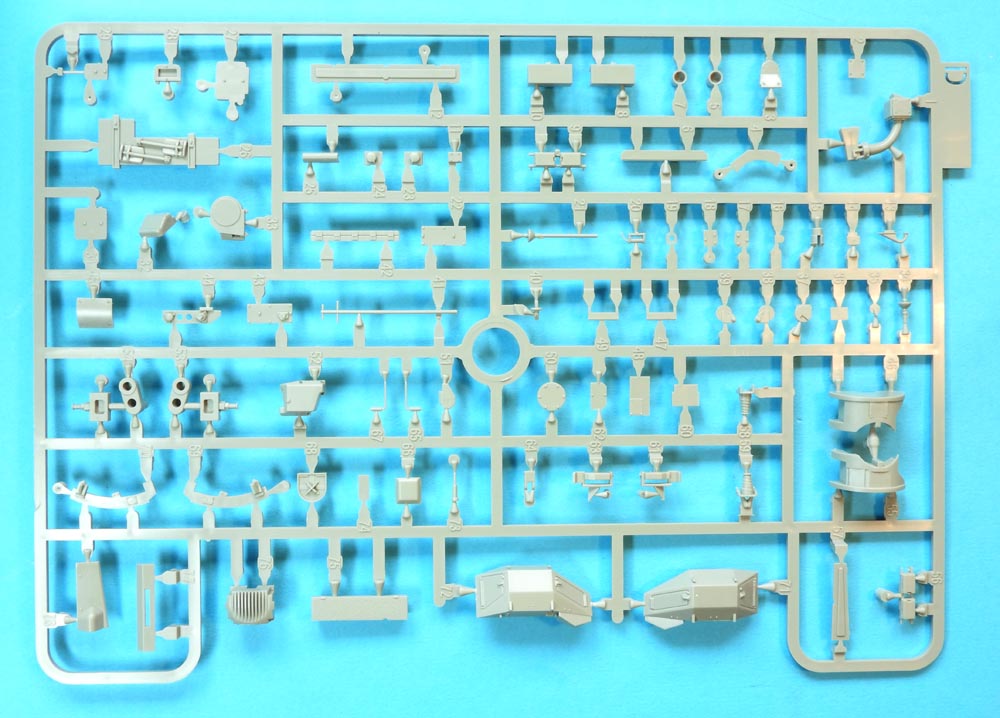
As mentioned, Gepard generally did not wear sideskirts in Bundeswehr service, certainly not on A1s and A2s, so the suspension was on full view. Takom tackled the suspension on their previous Leopard 1s by moulding some of the components directly on the hull side. This is OK for tanks wearing skirts where it is mostly hidden away, but not here. Thankfully, Takom have taken a different route and all of the swing arms (no torsion bars), return roller mounts, bump stops and shock absorbers are separate parts. The swing arms have better detail than their Leopard kits which had none, but could still be better. The same can said about the shock absorbers. Some of these have little vertical arrows moulded on, but some don't. This is fair enough as the same could have happened in reality.
Unfortunately, Takom seem to have copied the design over from their Leopard 1s for the road wheel outer faces which are still not right. The tyres are also still too thick and the spacer between outer and inner wheel is too wide. The wheels do not have any polycaps so there are no mis-shapened rear faces this time. In fact, there is even some bolt detail, but it is still not completely correct. The return rollers have the same depth tyres which they don't in reality. The first and third rollers have the same depth tyres, but much less depth to the metal rims. The sprockets have 8-bolt hubs which is correct for Gepard. Many Leopard 1s were upgraded with 15-bolt hubs but this didn't seem to happen with Gepard - unless someone knows differently.
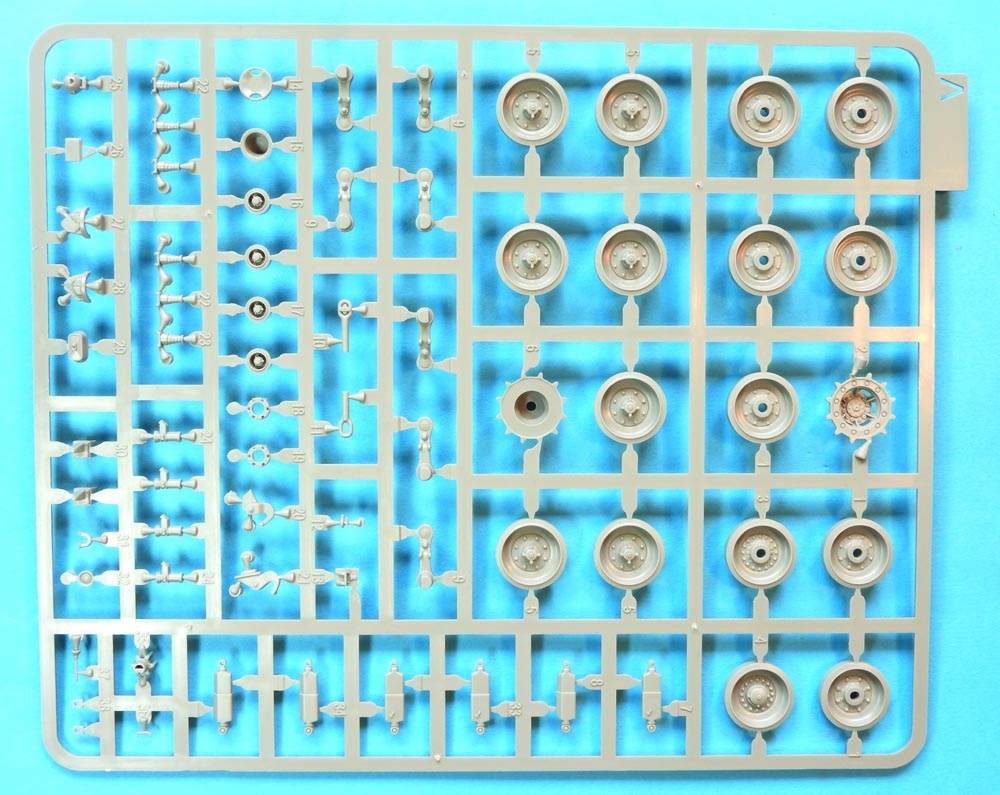
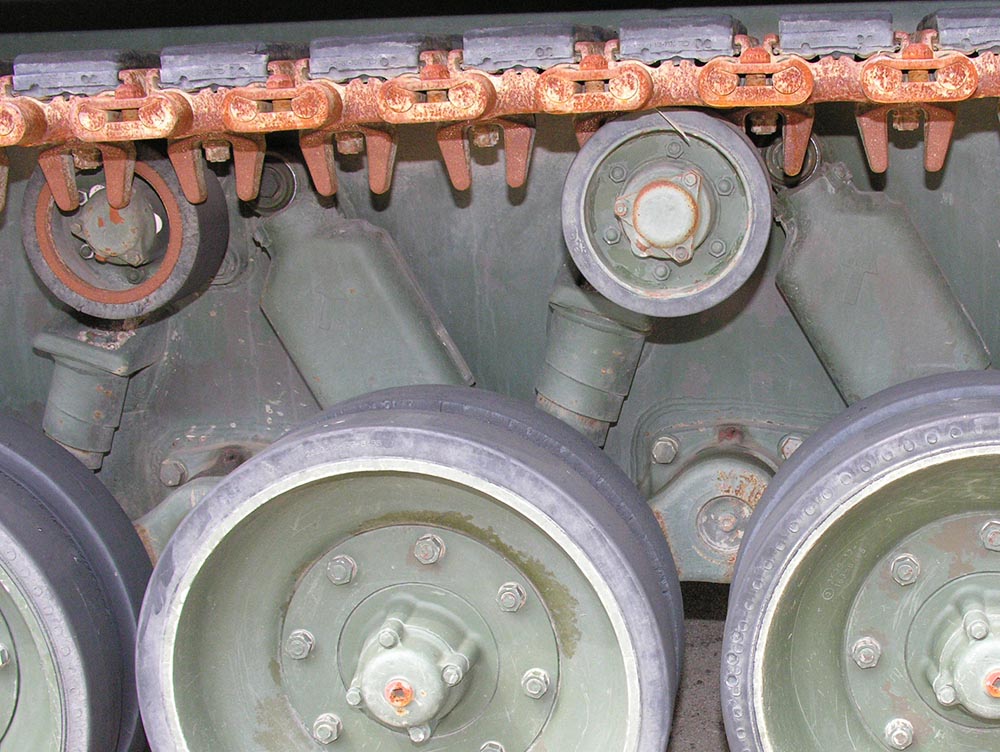
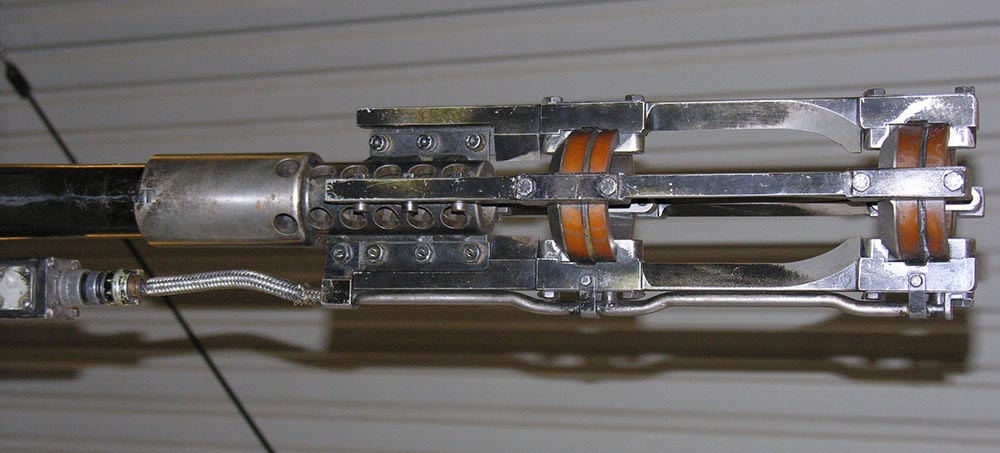
There are two styles of return roller in reality.
The one on the left, behind the guide teeth, has a much thicker metal rim and the hub is recessed inside the wheel.
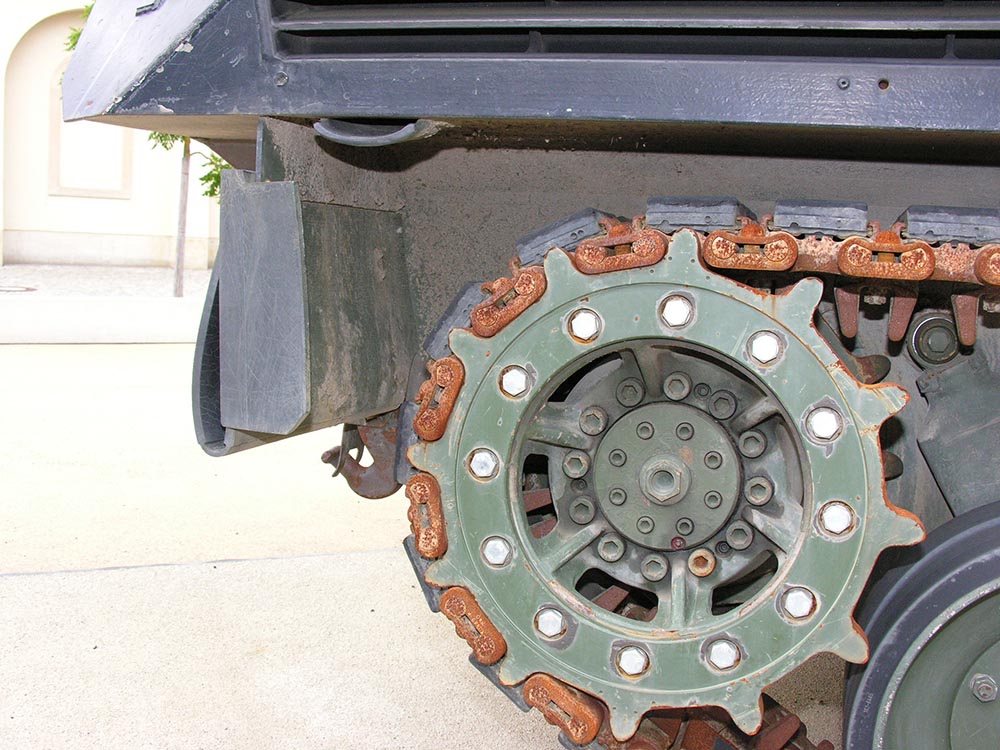
8-bolted hubs on Gepard.
15 bolts were the exception, not the rule.
I know that some will say that I'm trying to sell my own parts. For the accuracy buffs, Leopard Workshop has LW001-1 road wheels and LW010 suspension upgrade corrects these faults if you feel that way inclined. Sorry, this is the worst part of an otherwise good kit.
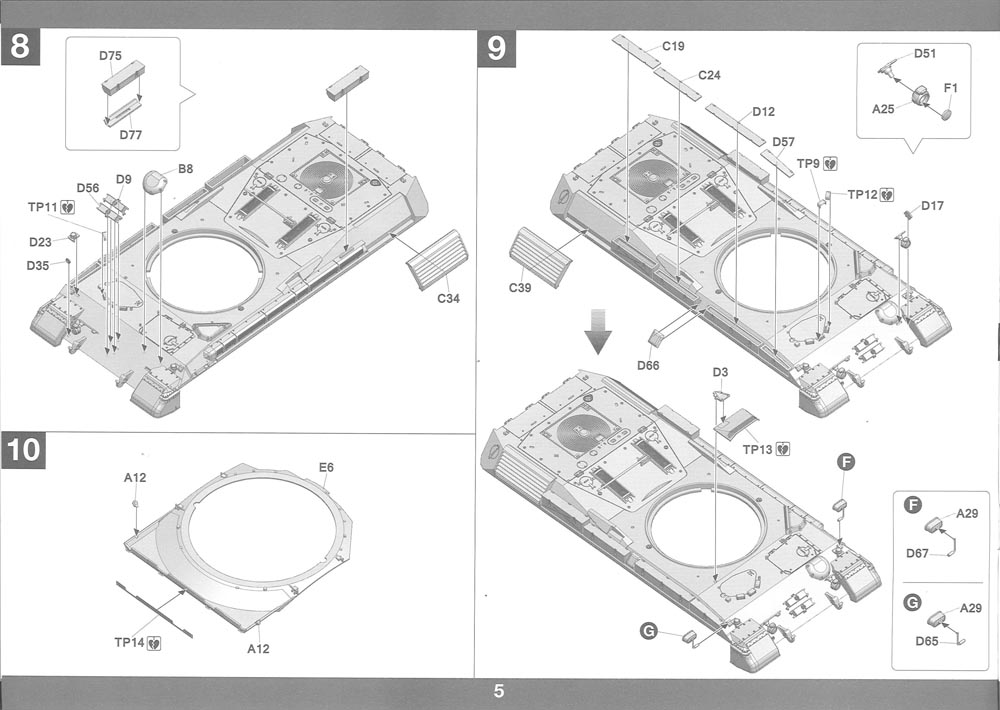
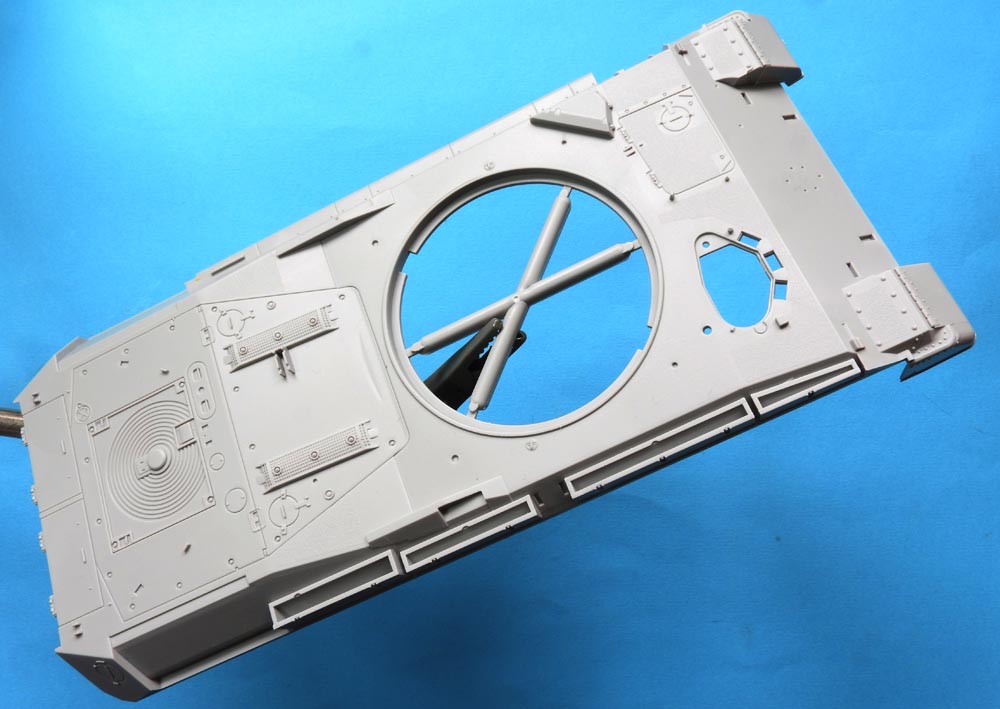
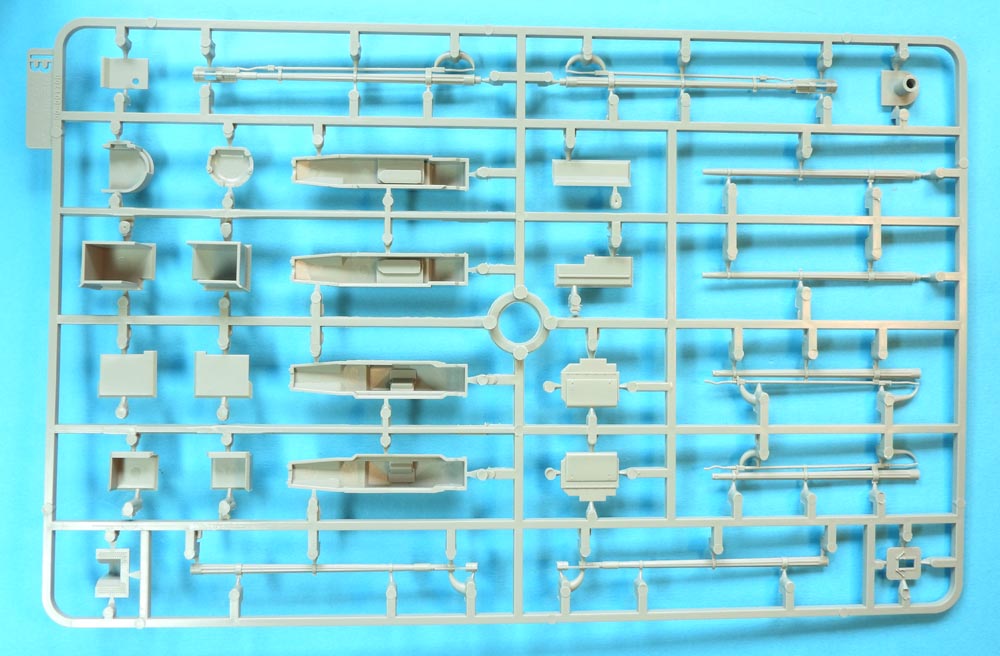
The hull parts are very nicely moulded in conventional upper and lower parts. They fit together perfectly. The lower hull has the Gepard's representative reinforcement strakes under the left front hull (where the APU is housed). The upper hull has the full-width glacis plate and the extended rear end that gives it a completely different appearance to the Leopard 1 hull. Non-slip patches are represented quite nicely. Another difference are the circular inlet rings on the rear decking which were only ever used - apart from on all Gepard's - on Australian AS1, Greek GR1 and Turkish T1 Leopards. As already mentioned, the tool boxes are moulded in place (but with separate lids), as are the front mudguards. Even the grille that covers the APU exhaust pipe down the left side, and the hull grating around the rear of the turret, is moulded in rather than using photo-etch. All of this may lead you to think that this is over-simplification, but it has been so well done that I applaud Takom.
Photo-etch in this kit is kept to a minimum, which is good as far as a lot of modellers are concerned. The etch we do have here is used to top off the aforementioned inlet grille, rear grille on the APU intake, the protective cover over the driver's hatch, deflector plates and grille covers on the turret, and some edging grilles on the rear face of the hull grating. Just the bare necessities, which is fine in this case. Unfortunately, chains are not supplied for the smoke launchers (see LW026).
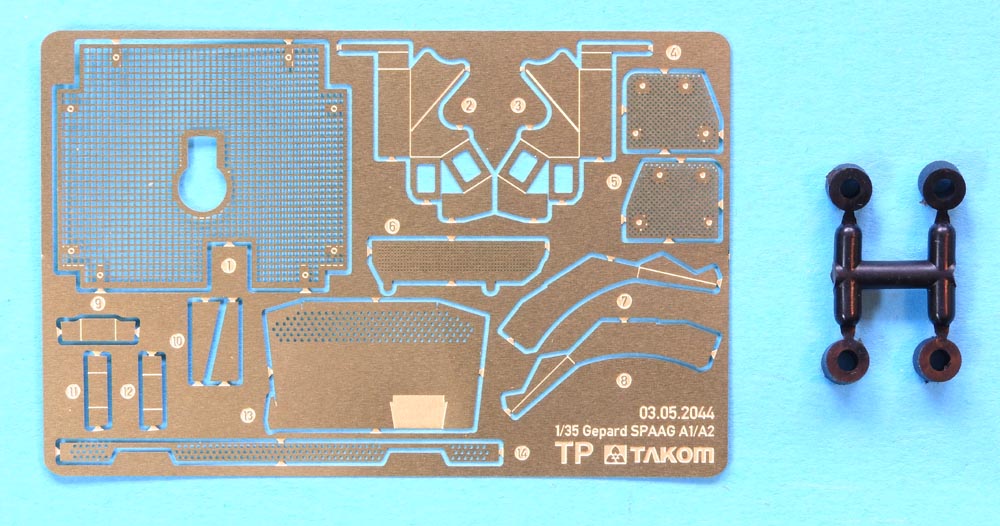
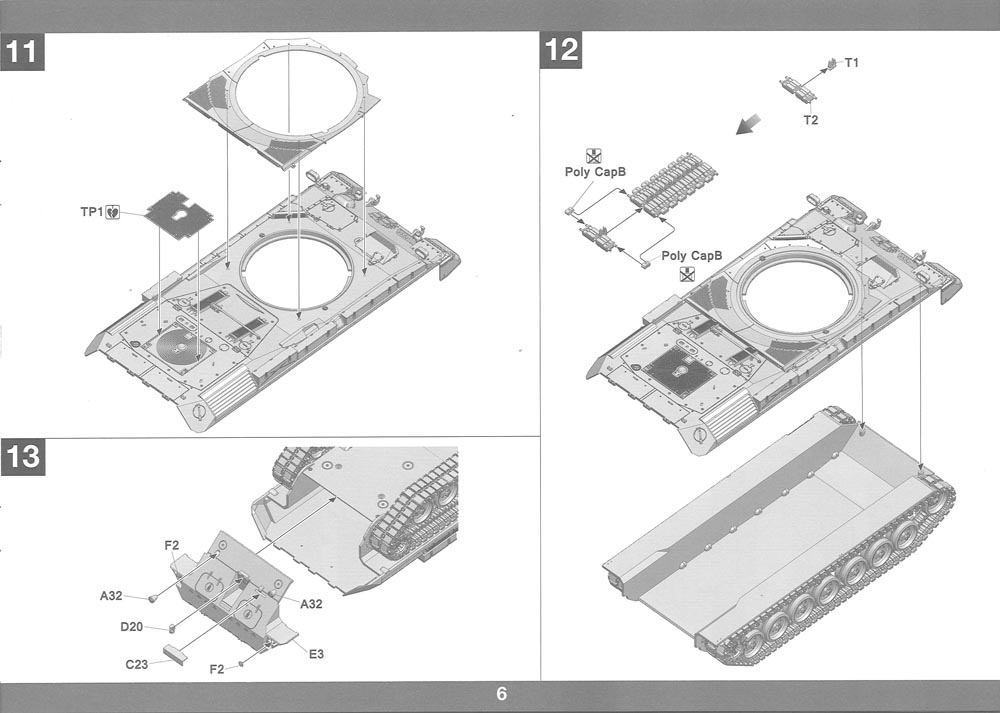
The grilles are slide moulded, so they have nice depth to them, unlike their fairly awful, previous Leopard 1 grilles. Takom seen to have learned from Leopard Workshop here!! If deciding to build the more modern Gepard A2, look out for the call outs to drill two holes from the underside of the hull specifically to mount the rear storage boxes. Gepard has no external tools mounted apart from the sprocket T-bar across the hull rear, so building up the hull top is remarkably simple. Headlights have separate clear lenses, but the T-hooks and eyes at both ends of the hull are still single piece (see LW025).
![]()
;
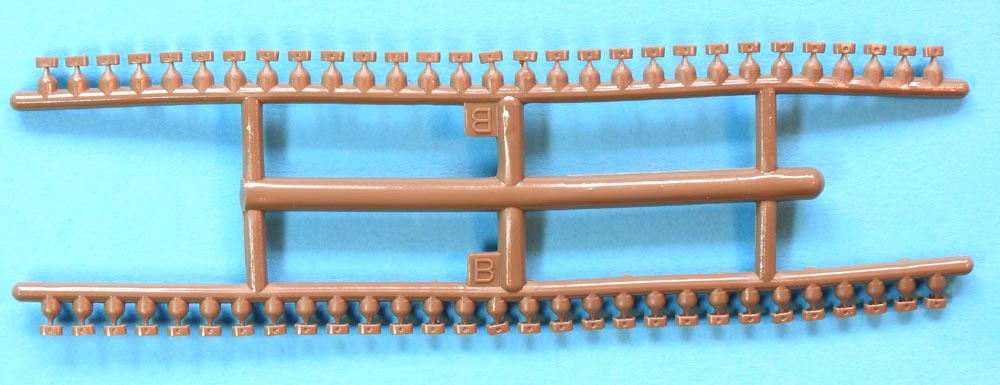
The tracks are the nice Orochi ones already reviewed here, so I won't repeat myself. Twisted cable is supplied for the tow cable (string in the Leopard kits) with separate plastic eyes. A better choice might be to use the Eureka Leopard 1-2 tow cables with resin eyes that fit more neatly than undercut plastic eyes. Also, RMG Resin are about to release some new sets.

Watch out for Gepard A1 and A2 options when you start work on the turret shell. Gepard A2 has a GPS dome on the front turret roof and some mounting points on the rear roof. These details have to be removed if you are building the A1 version. You will also need to drill three holes from the inside of the shell for the A2. This is all clearly called out in the instructions.

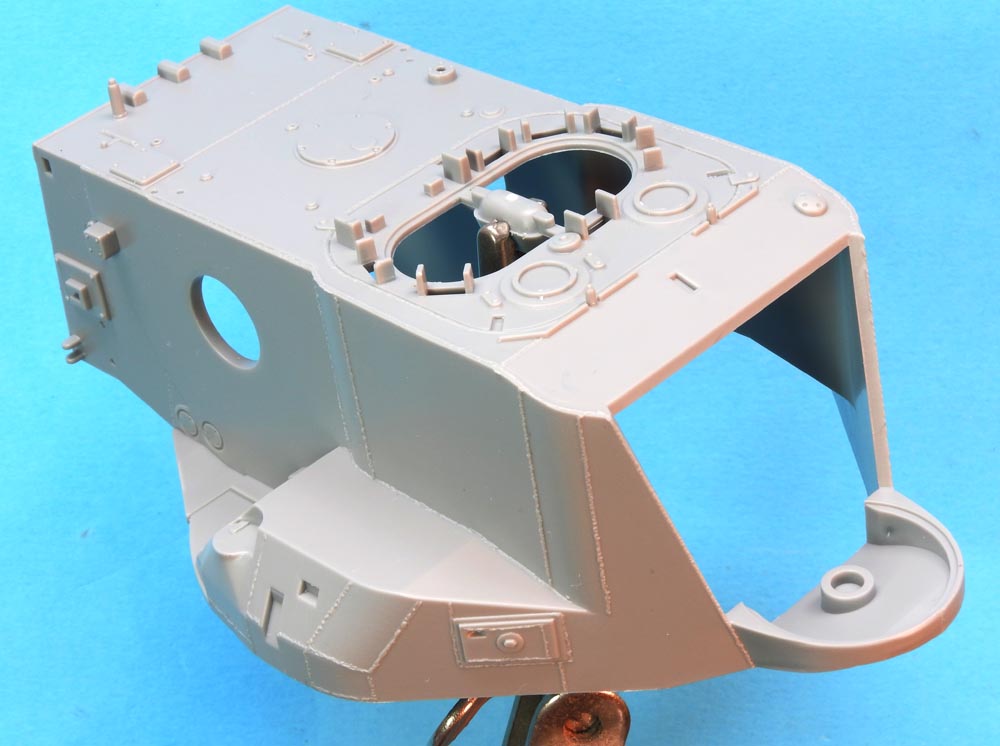

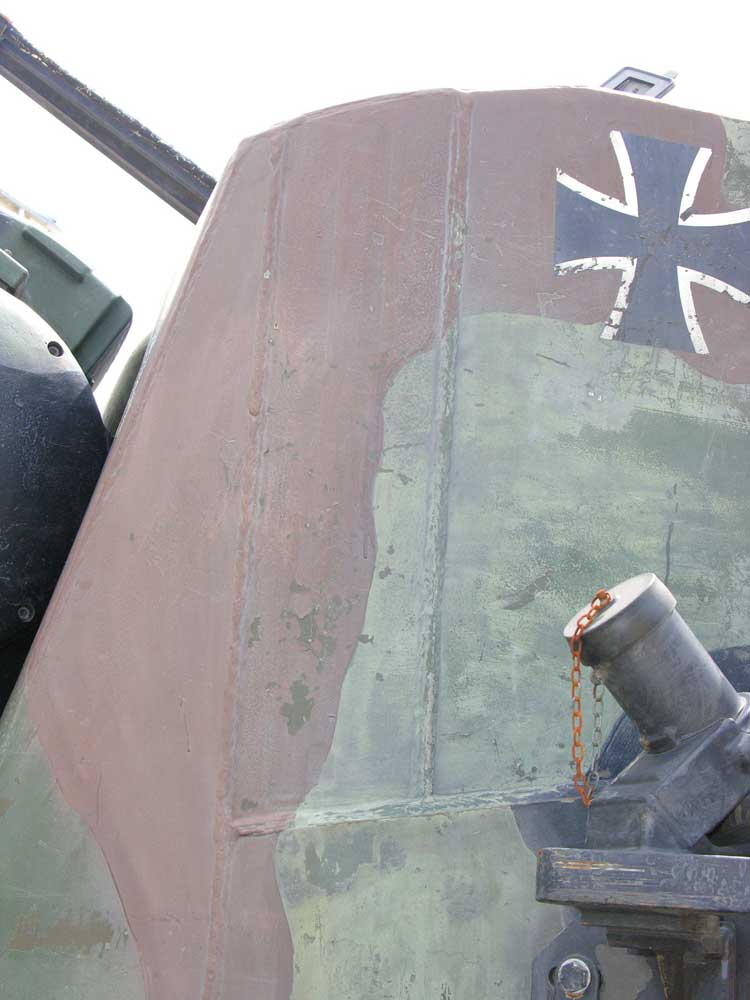
The front turret weld should go all the way to the base.
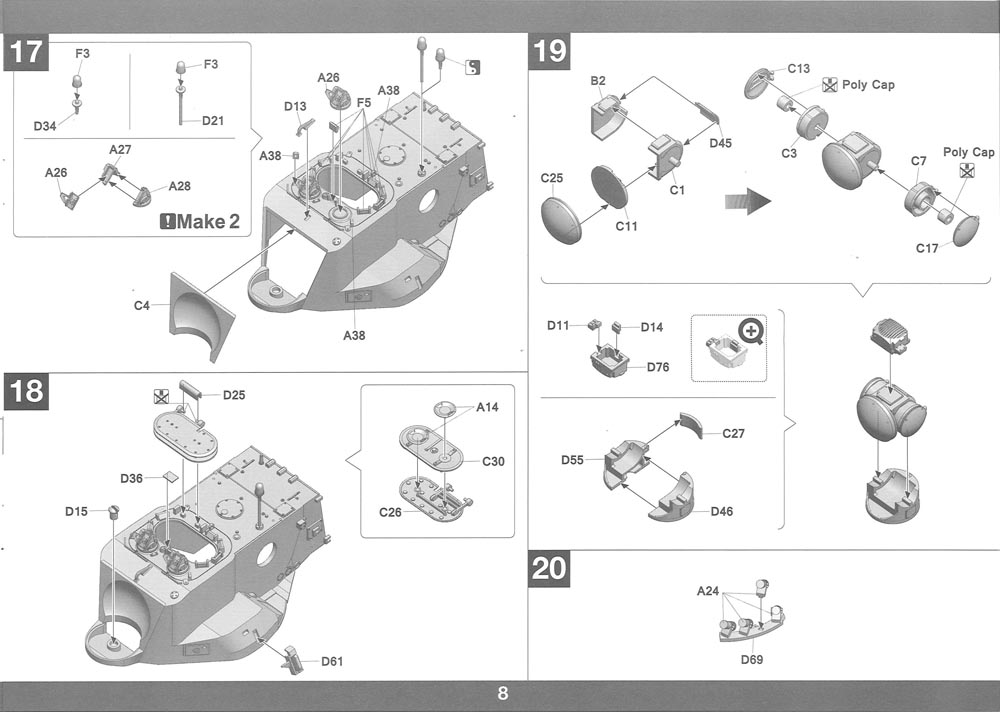
One problem with the choice of decals are the Belgian and Romanian versions. They both used the B2 version (refer to the introduction above) that did NOT have a laser rangefinder (parts D76//11/14) on top of the forward tracking radar. Just leaving this off means an incorrect mounting block shape is left behind on top of parts B2/C1. Shame, as Belgium was the first export customer. However, I do have photos of some Romanian Gepards WITH the rangefinder. It looks like they have been retro-fitted.
The tracking radar has polycaps to keep it mobile vertically and a split peg in the bottom of the turret on which it rotates 360 degrees horizontally. The radar rotates backwards when it is in travel position. I am not sure if you will be able to remove it once it is in place though. Strange they didn't use a polycap for this, too. There are two options for a flashing convoy light on the roof on long or short poles. Check your references. The light itself is clear plastic.
There are some photo-etch plates on the turret sides which look quite complicated to fold. The largest part is a protector over the smoke launchers. When these two guns start spitting out fire, there are a lot of empty cases flying about. Another etch part goes under the gun pods which is designed to deflect spent shells from under the guns, deflecting them rearwards. The gun pods are built simply from just five major parts each plus a few smaller detail parts.
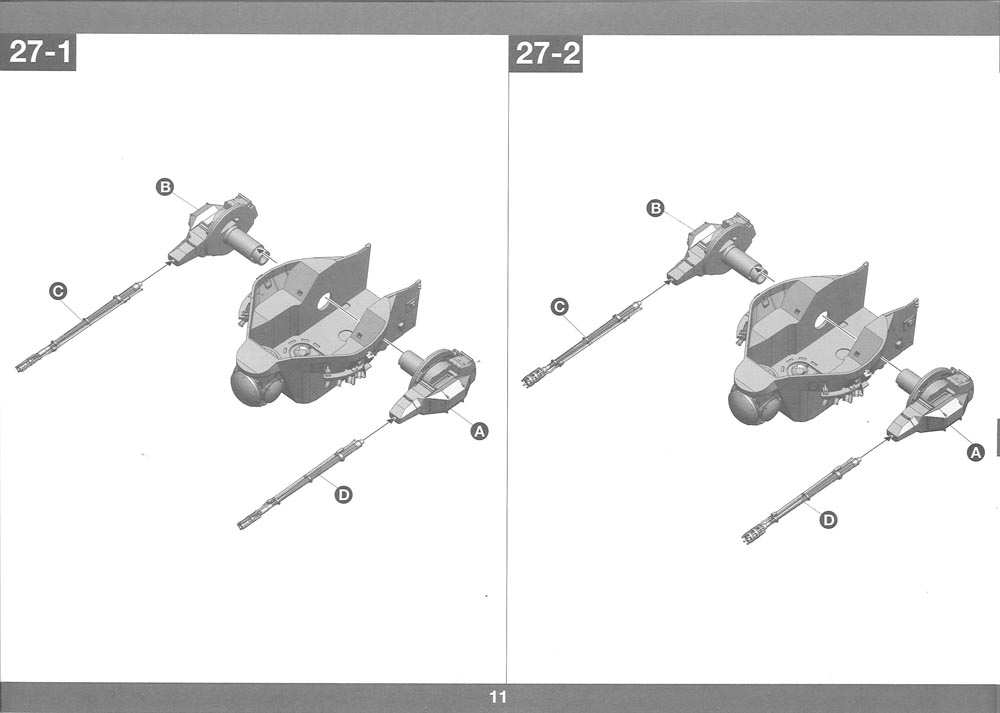
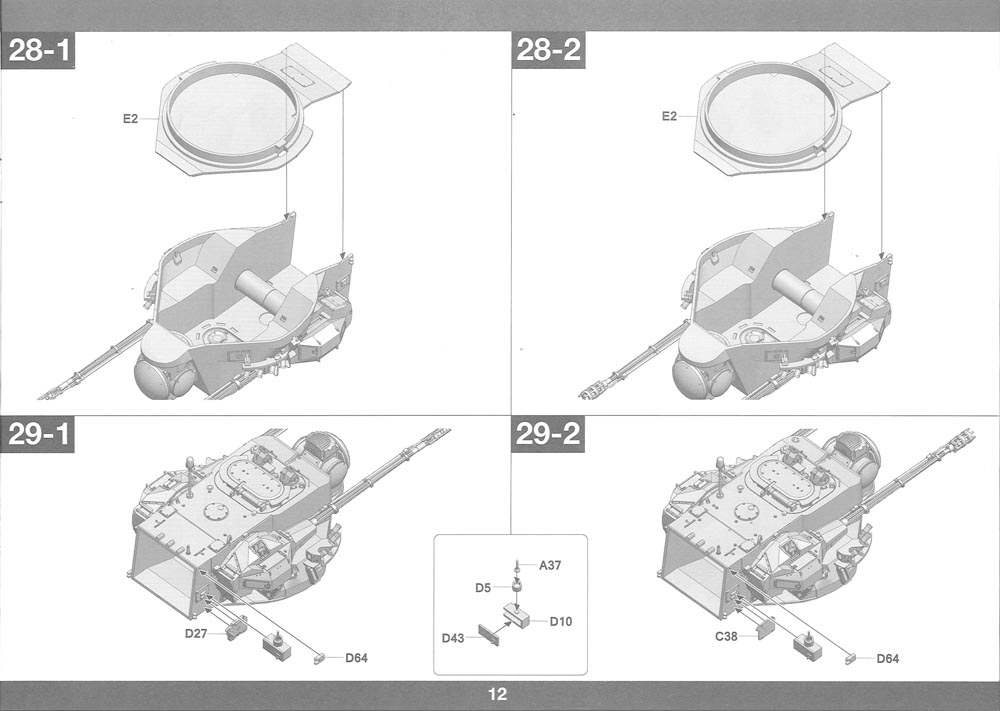
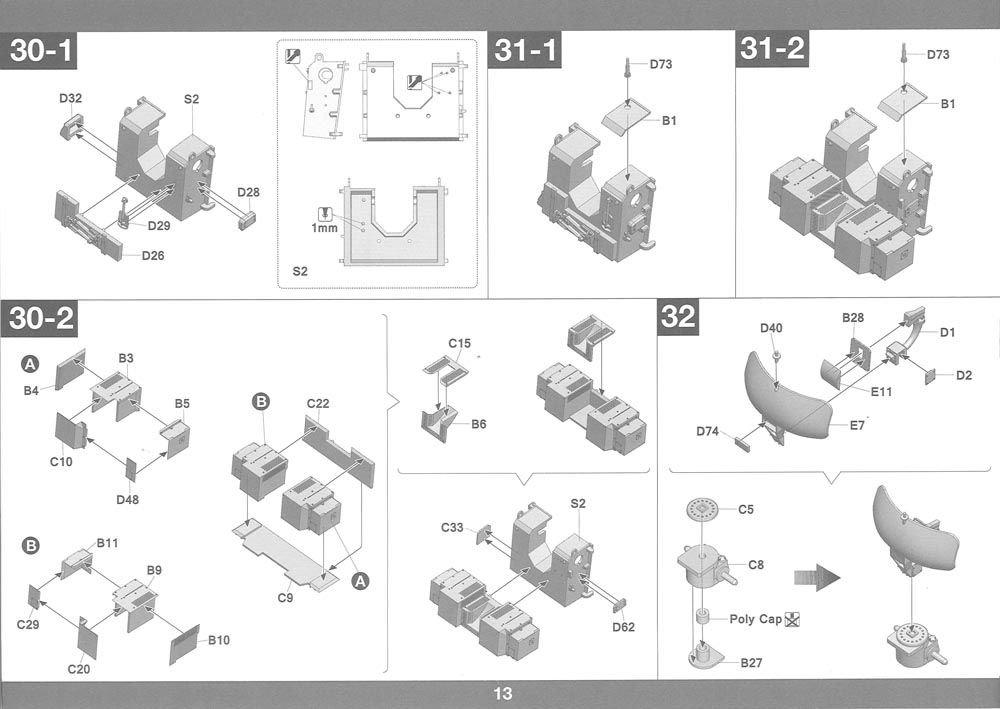
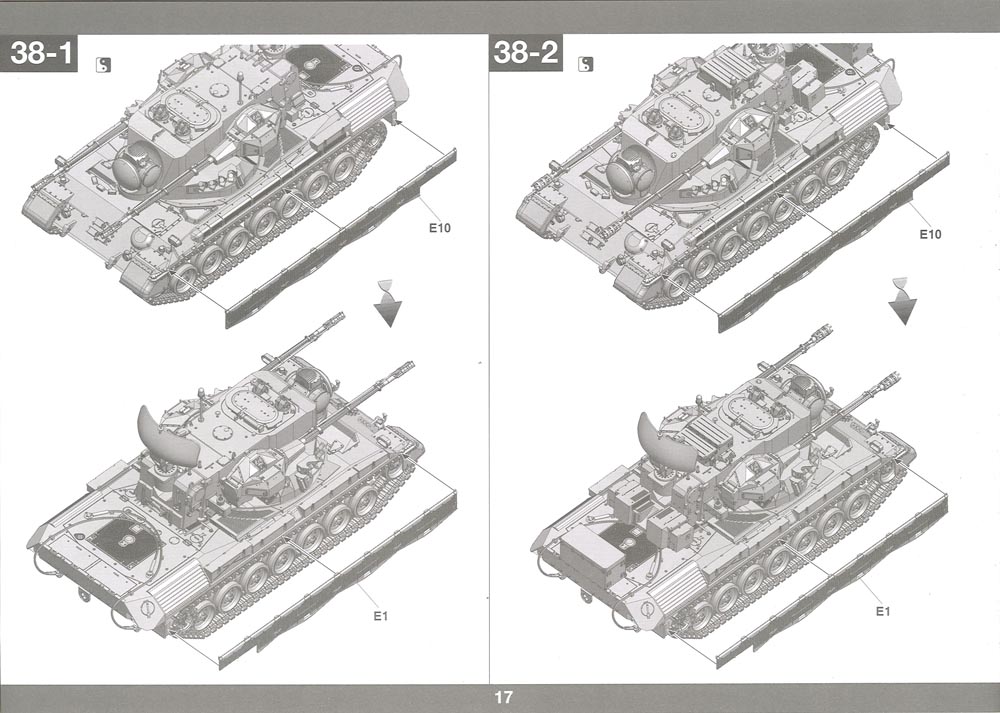
Next we start to get into the real options for the two different versions. The instructions don't really make it clear, but it soon becomes obvious that steps 26-1, 27-1, etc. are for the A1 version and steps 26-2, 27-2, etc. are for the A2 version.
The first option is different guns with different muzzles. The A2 had a velocity-measuring device and this is a lot more complex than the A1 version. The A2 muzzles have three parts each! The gun pods connect with each other inside the turret to keep them both together when they elevate.
The normal operational muzzle from A1 with its four 'fins'.
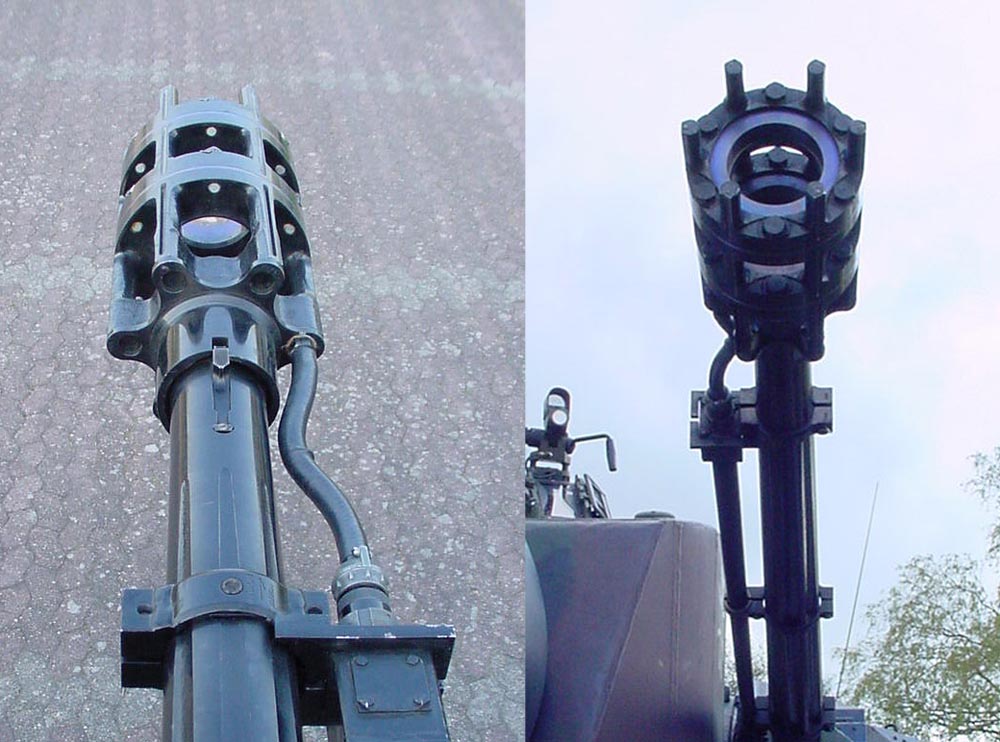
Front and rear views of the A2 muzzle.
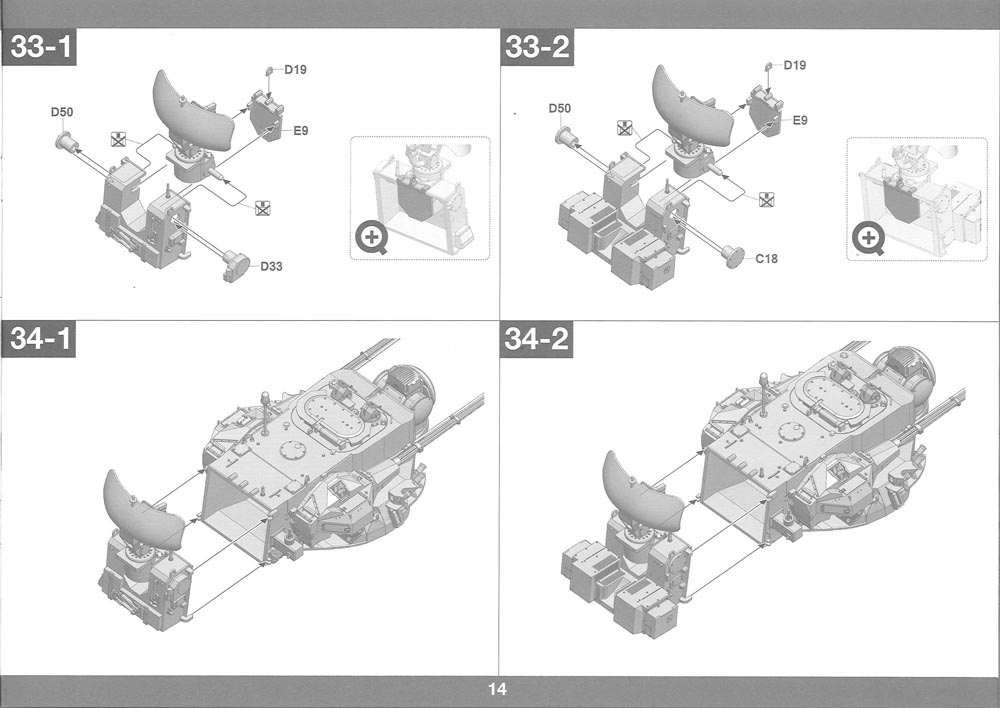
The biggest turret differences come at the rear of the turret. The A1 rear is very simple and is simply finished off with a small set of tools which are moulded in place on an additional rear plate. A2 has a couple of large boxes (cooling systems for the crew compartment and electronics) on a kind of shelf have to be added which makes it look very busy. Thankfully, the large search radar is common to both versions and again this is completely rotatable and can be folded flat into the travel position. Most Gepards (A1 and certainly all A2) would have used SEM 80/90 aerials (LW024).

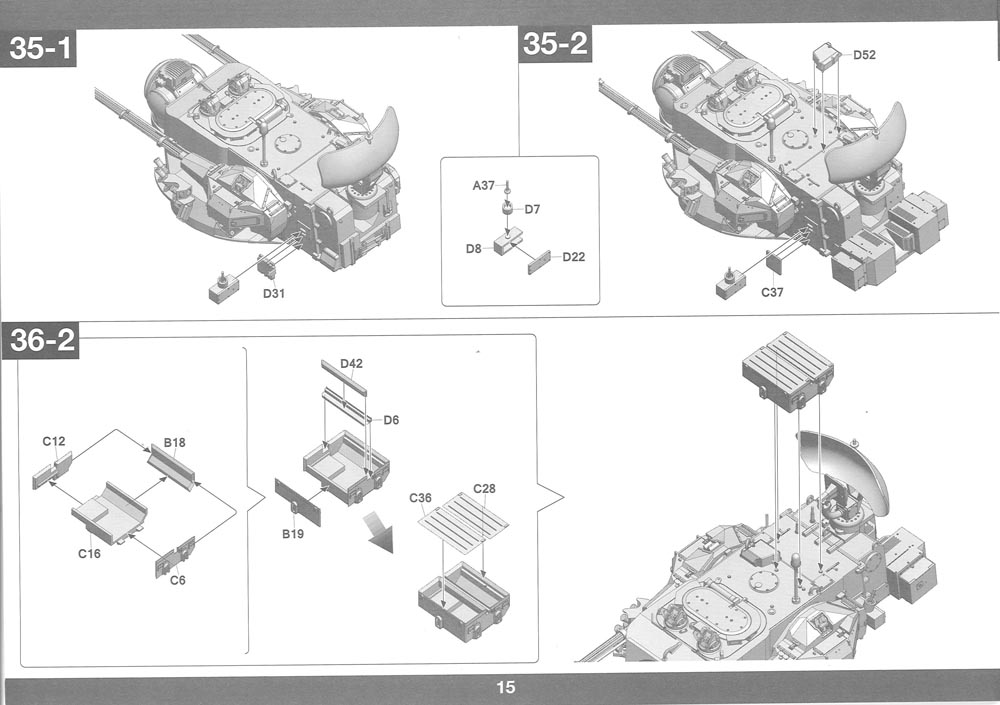
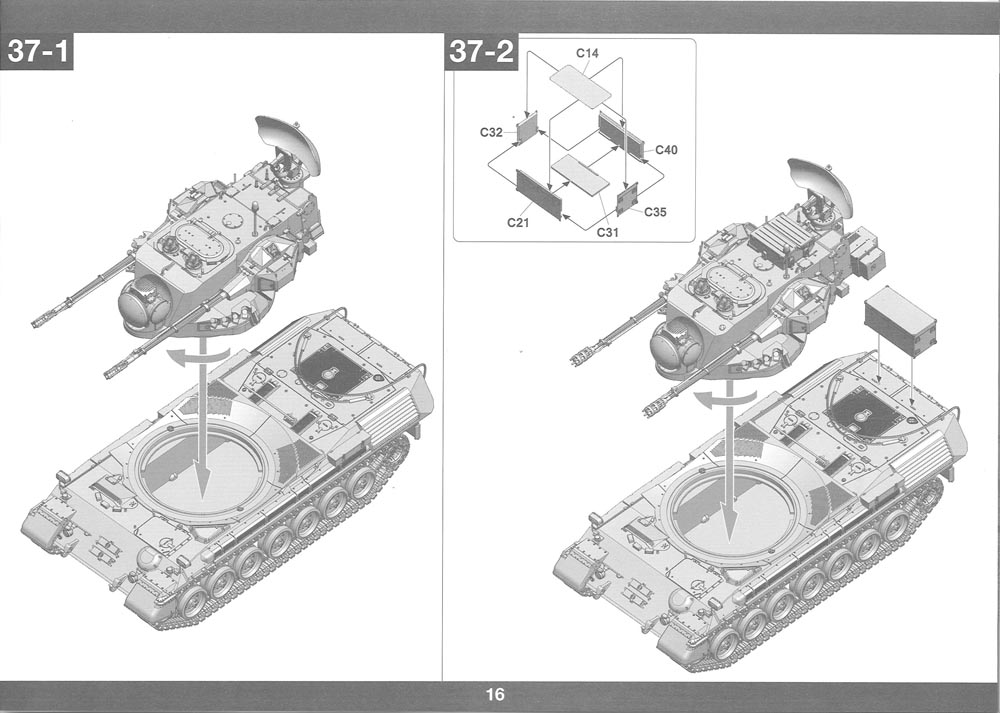
Once the back of the turret is finished, so is the A1 version. The A2 version continues with the addition of a stowage box on the turret roof and another large stow box at the rear of the hull. The final option are the sideskirts, but this is only applicable to the cheetah-spotted vehicle on the box top.

Decal options are:
The incorrectly spelled KMW is likely due to copyright issues with the logo and company name. Cut out the incorrect letters, spin them 180 degress, apply them in the correct position. Done.
There are no unit details or timescale noted for any of these options.
A new Gepard has taken a long time to come around. We had the same situation with Leopard 1 until Meng and then Takom released different versions. These Leopards were a little below par, so what about this Gepard?
It is a very good model. Takom have realised the differences between two of the versions, A1 and A2, but have not included the first version which would have been so easy (although Belgian decals are included for this). Parts count is low which means it looks easy to build, but this does not mean that quality has been compromised. It is very crisply moulded with a lot of superb detail. It is a quantum leap over the old Tamiya kit, though that was actually pretty good for it's age despite the wheel spacing problem.
The biggest problem is the suspension/running gear which still has problems, though most might think I am being too picky. Also, the rear hull extension is a cause for concern.
I was hoping for great things from this kit - and it is a great kit. It will build into an impressive, well-detailed model. It is what Gepard fans have been waiting for, for a long time now. I certainly give it a good thumbs up.
© Leopard Club
![]() Contact us at leopardfibel@gmail.com
Contact us at leopardfibel@gmail.com