Reference 4629
Scale 1:35
Media: injection moulded plastic, photo-etch, polycaps, wire cable
Reviewed by Michel Shackleton


Review sample kindly supplied by Modellbau-Koenig, Germany.
When I first saw this announced by Tiger Model, my first reaction was why? Another announcement quickly came from HobbyBoss that they were also releasing the exact same thing. Again - why? There are far more interesting Leopard 2s actually in service with countries like Singapore and Indonesia, so why did they choose to model a one-off demonstrator machine? A lot of people seemed to think the same.
However, as time passed and the original 'why?' question subsided, I was finding that I was quite excited by this release. It is, after all, something completely different to the 2A4 it is based on, and an incredibly futuristic looking beast.
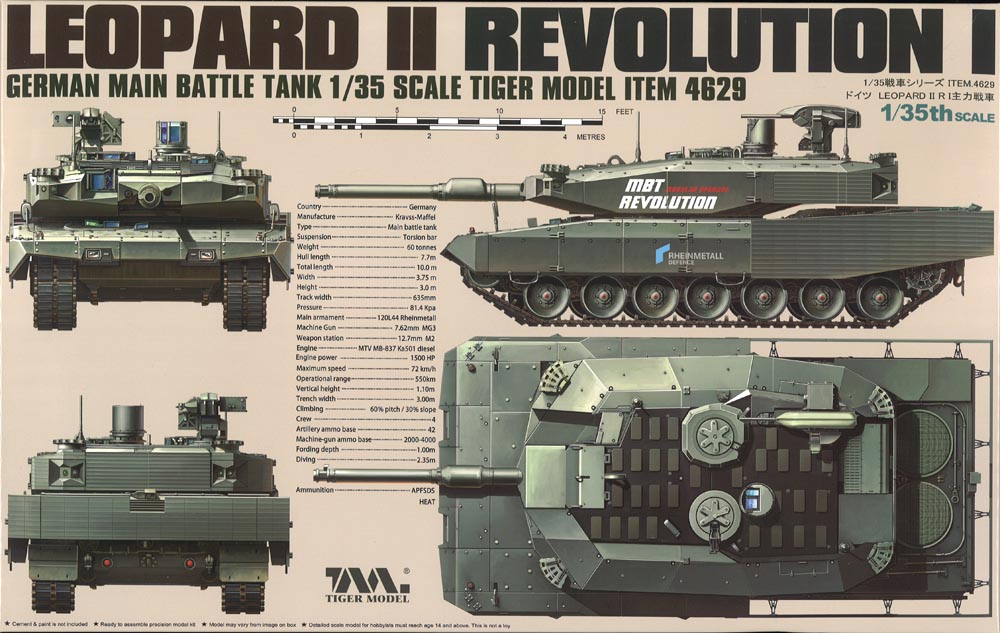
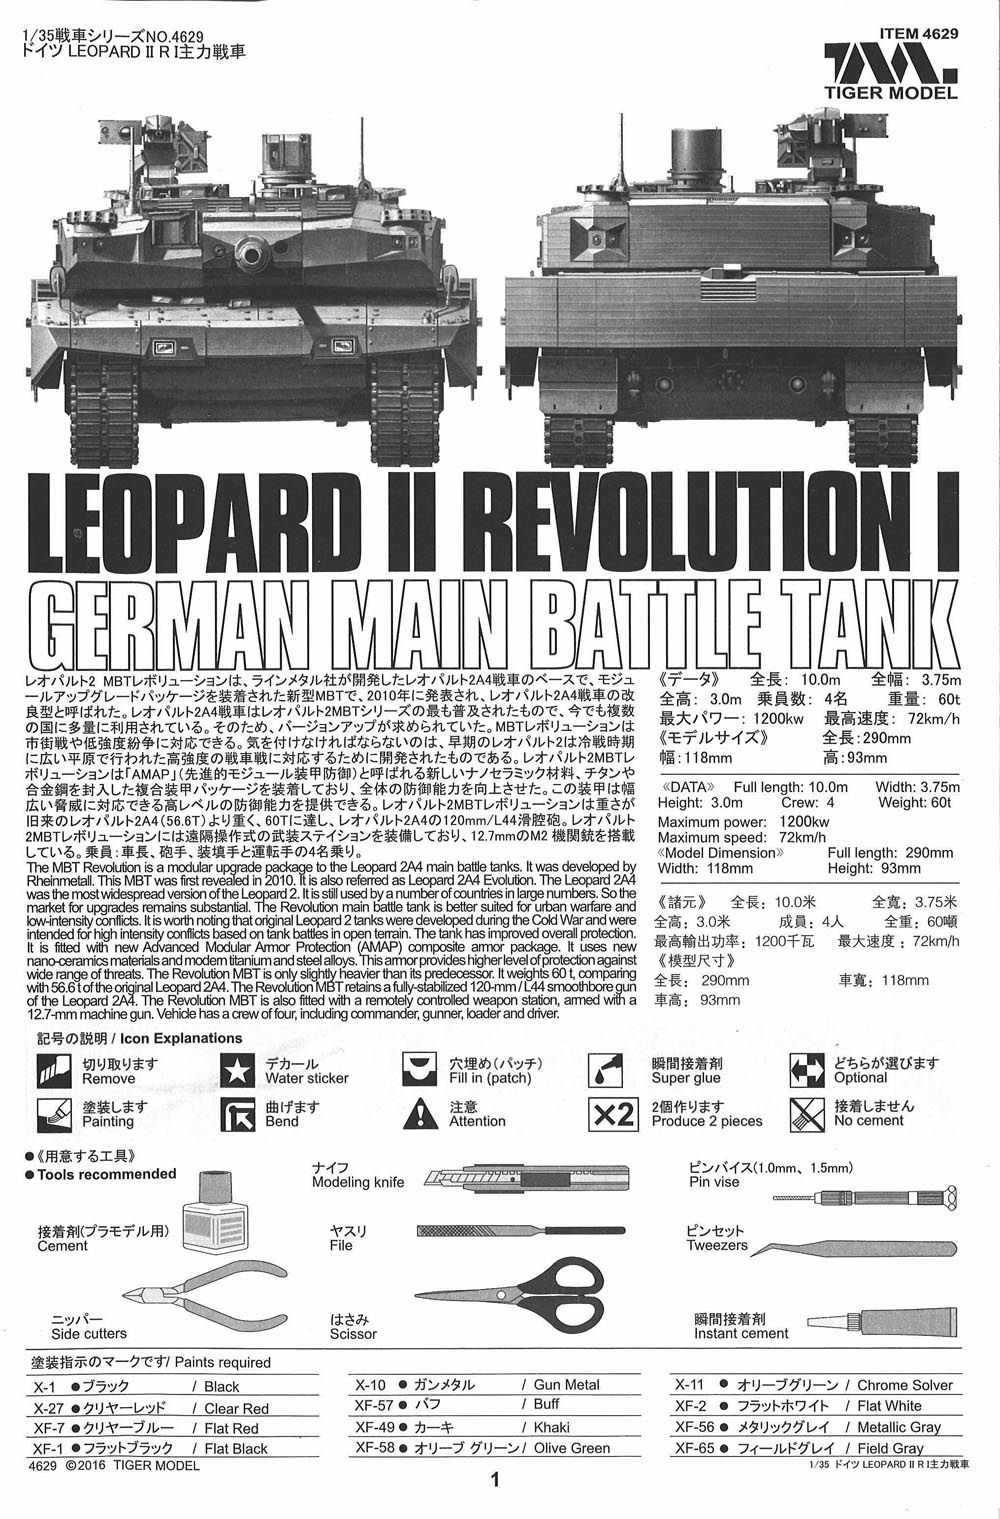
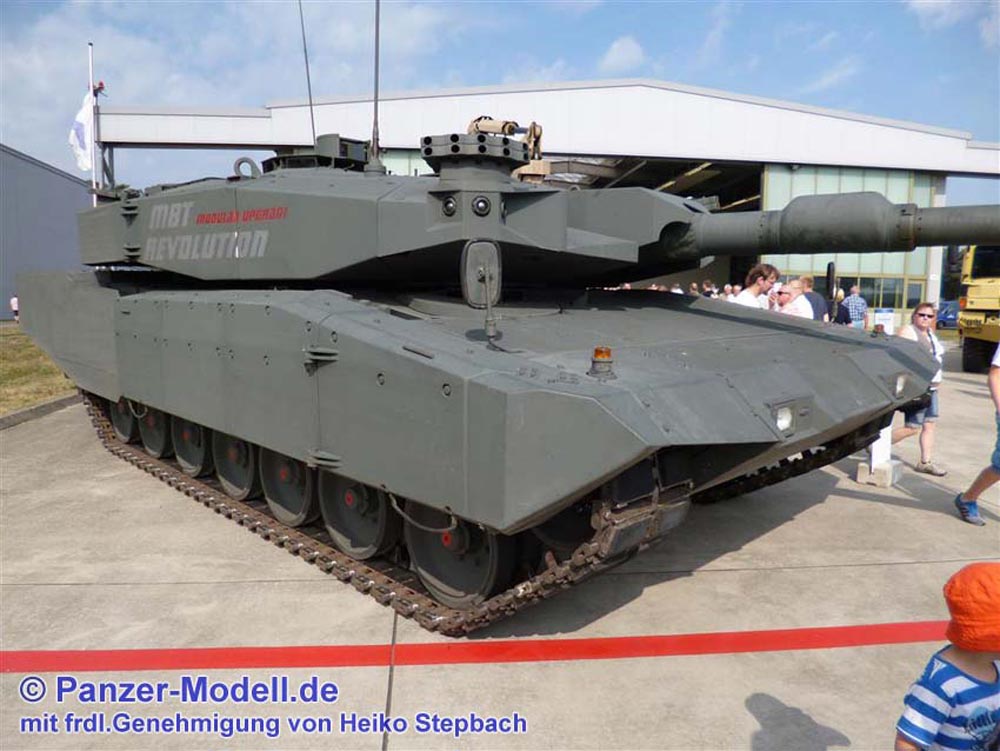
Revolution is a modular upgrade package for the Leopard 2A4 developed independently by Rheinmetall Defence AG. It was first revealed at Eurosatory 2010. This is strictly a one-off demonstration tank that has never been put into production and therefore never seen service.
It is equipped with Advanced Armor Protection (AMAP) Composite Armour. It attaches to the original vertical armour and lends the tank an unmistakably aggressive, and totally different look. According to the manufacturer, ceramic nano-materials, including titanium and steel alloys, were used in the AMAP construction.
The AMAP armour can be customised according to a specific missions and customers. The additional armour is also modular so that individually damaged parts can be replaced in the field.
The Rheinmetall ROSY defence system also contributes to the MBTs protection. These devices on the four corners of the turret roof effectively replaces the more conventional smoke grenade launchers more normally seen on the sides of the turret. When the tank is detected by an incoming laser beam, the system instantly fires grenades over the tank's arc. Within 0.6 seconds, a thick smoke screen is formed around the tank. Ideal against lasers or infrared-guided anti-tank missiles, it also provides a dynamic wall of smoke/obscurant which provides moving vehicles with lasting protection from multiple attacks - apparently.
The Revolution MBT retains the 120mm L44 cannon from the 2A4. In addition to a 7.62 mm coaxial machine gun, the tank can also be equipped with a remote-controlled weapon station - either a 12.7 mm machine gun or a 40 mm grenade launcher can be fitted.
It also retains the MTU MB-837 Ka501 turbocharged diesel engine, developing 1,500 horsepower. The demonstrator is fitted with an auxiliary power unit of 17 kW that powers all systems when the main engine is turned off. This brings an efficient air-conditioning, better ventilation and thermal insulation of the tank.
The tank uses the C4I (Command, Control, Communications, Computers and Information) control system that integrates all systems into one inter-connected network. C4I processes information from a wide range of reconnaissance devices, GPS, fire control systems, or information from friendly units. An example of a C4I system is, for example, a moving map display where blue symbols show friendly units, red the enemy, range of their own/enemy weapons, etc. C4I in the Revolution also uses so-called 'enhanced reality' when objects on the television screen are attributed to computer symbols and information.
The 360° observation periscope for the commander, now with a larger pitch (70°), is completely new. Greater observation angles allow the commander to observe situations in a city where enemy fighters often move on the upper floors of buildings.
If you want to read more about the real concept, go to Rheinmetall's website.
Wow!! On opening the box I couldn't believe what I was seeing. It just looks incredible when you first see it. When you delve deeper and find there are not that many sprues (apart from the tracks), you wonder if this will really build into the super model it seems to be.
I have never had a Tiger Model model in my hands before. The company is relatively new but have quickly established a reputation for good quality products. There is a real 'Tamiya' feel about this kit, even down to the instructions booklet which is clear and concise, easy to follow. The fit of the incredibly well-detailed hull top and bottom is first class, and the same comments apply to the main turret halves. One bonus is that this is one slat-armoured tank model where you don't have to worry about the slats.
First impressions are that this is one of the best Leopard 2 models out there.
If you are hoping that under all of the uparmour blocks there is a nice basic Leopard 2A4, you are going to be disappointed. Tiger have kept the design of this kit simple which will make for a relatively quick build. What they have done is included all of the armour blocks on the hull - and also on the turret - so they have given us huge mouldings with everything already in place.
The downside of this is that this kit can ONLY be made as the Revolution. It is going to be virtually impossible to kit-bash this into any other uparmoured Leopard 2 version. As already mentioned, there are similar systems actually in service out there, notably the Singapore Leopard 2SG, but the turret blocks in particular are a lot different, and the hull armour is similar, but not identical. The 2SG also has a Danish 2A5DK-style APU and you will have to build the exposed slat armour. The Indonesian 2RI is totally different again.
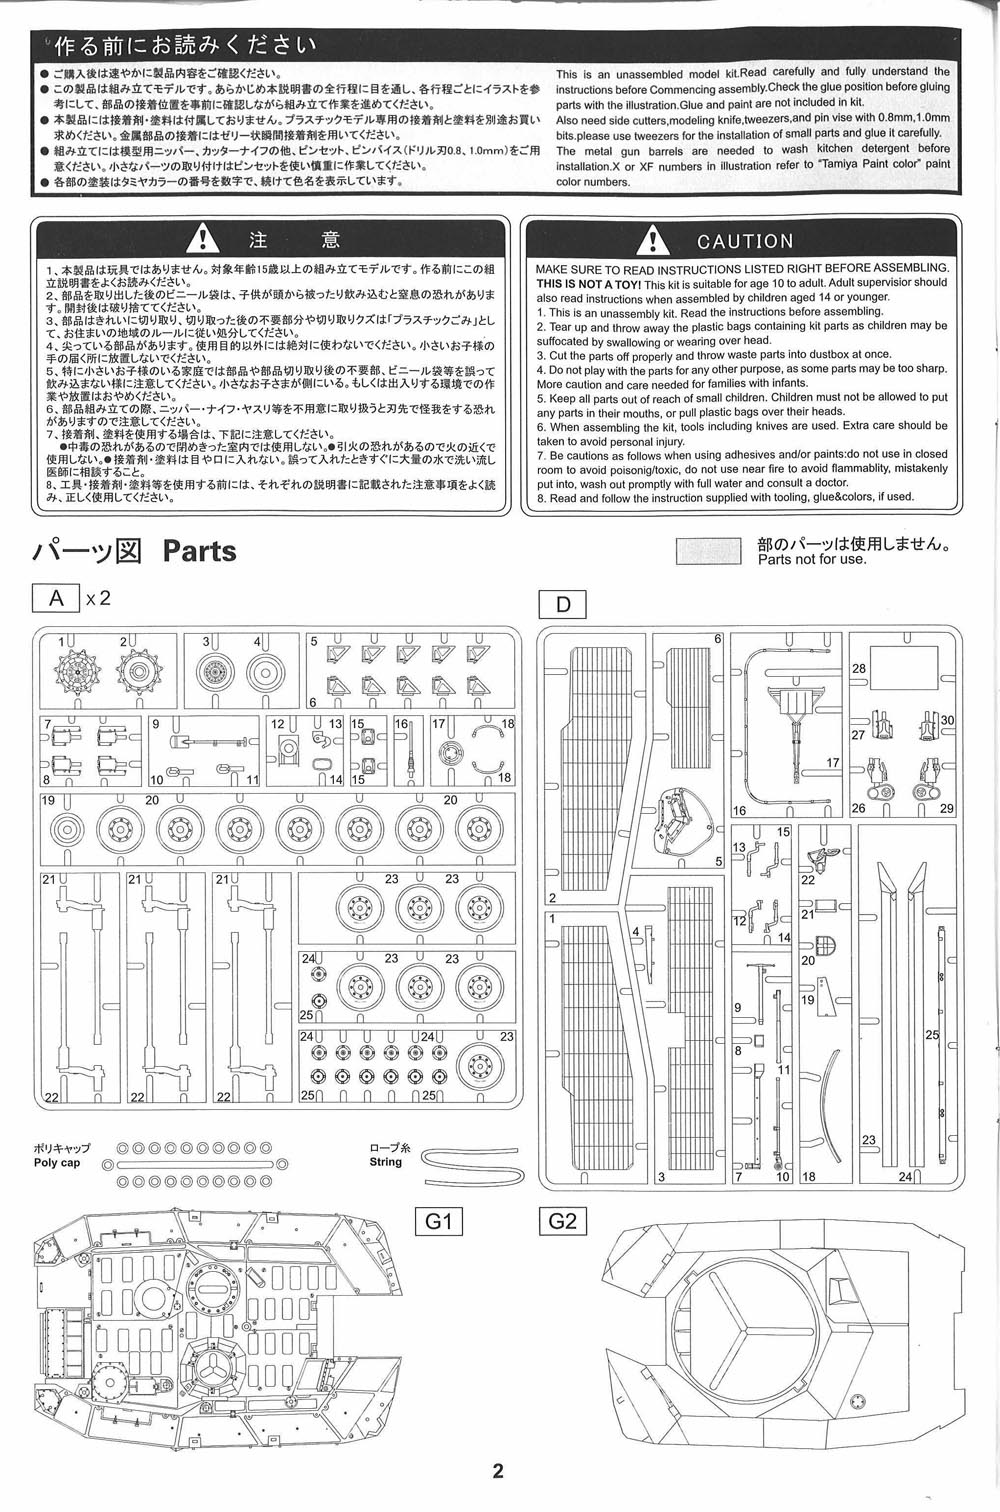


Let us look at the sprues first.
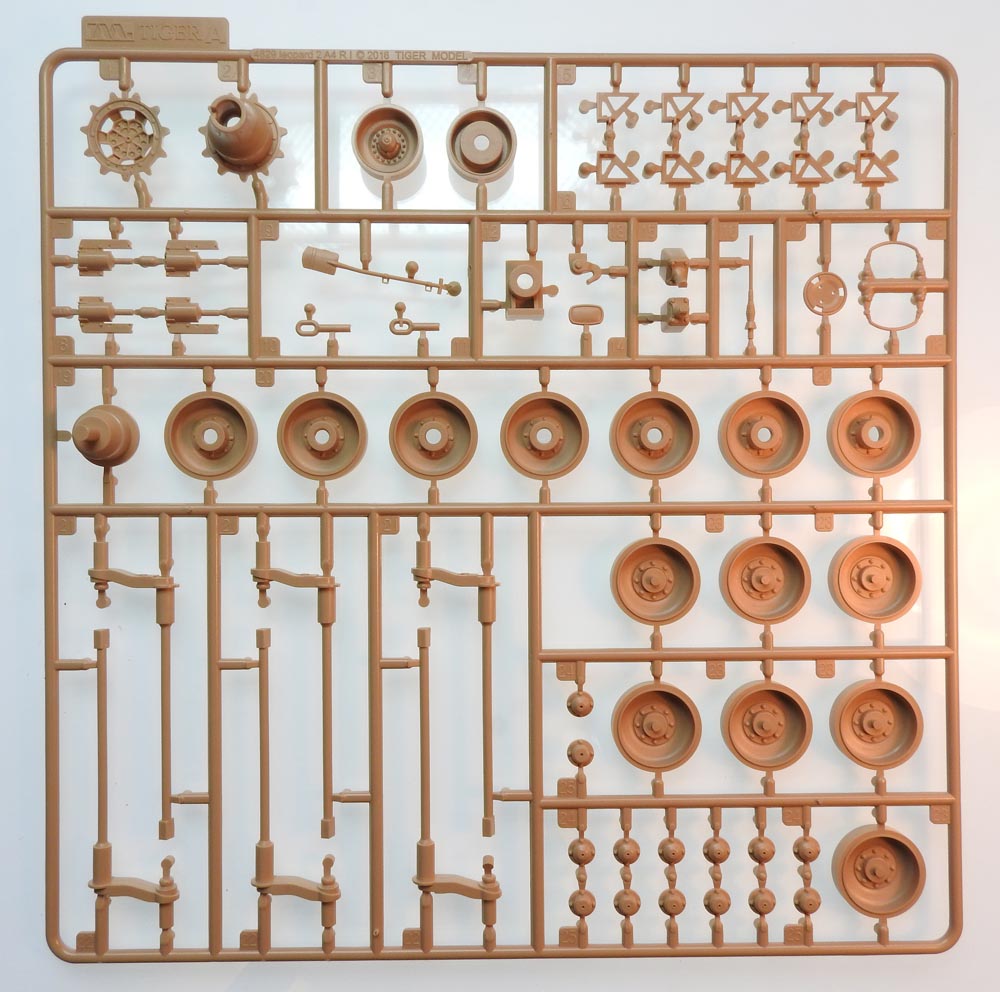
Sprue A - Running gear, main torsion bars, and slat armour mounts.

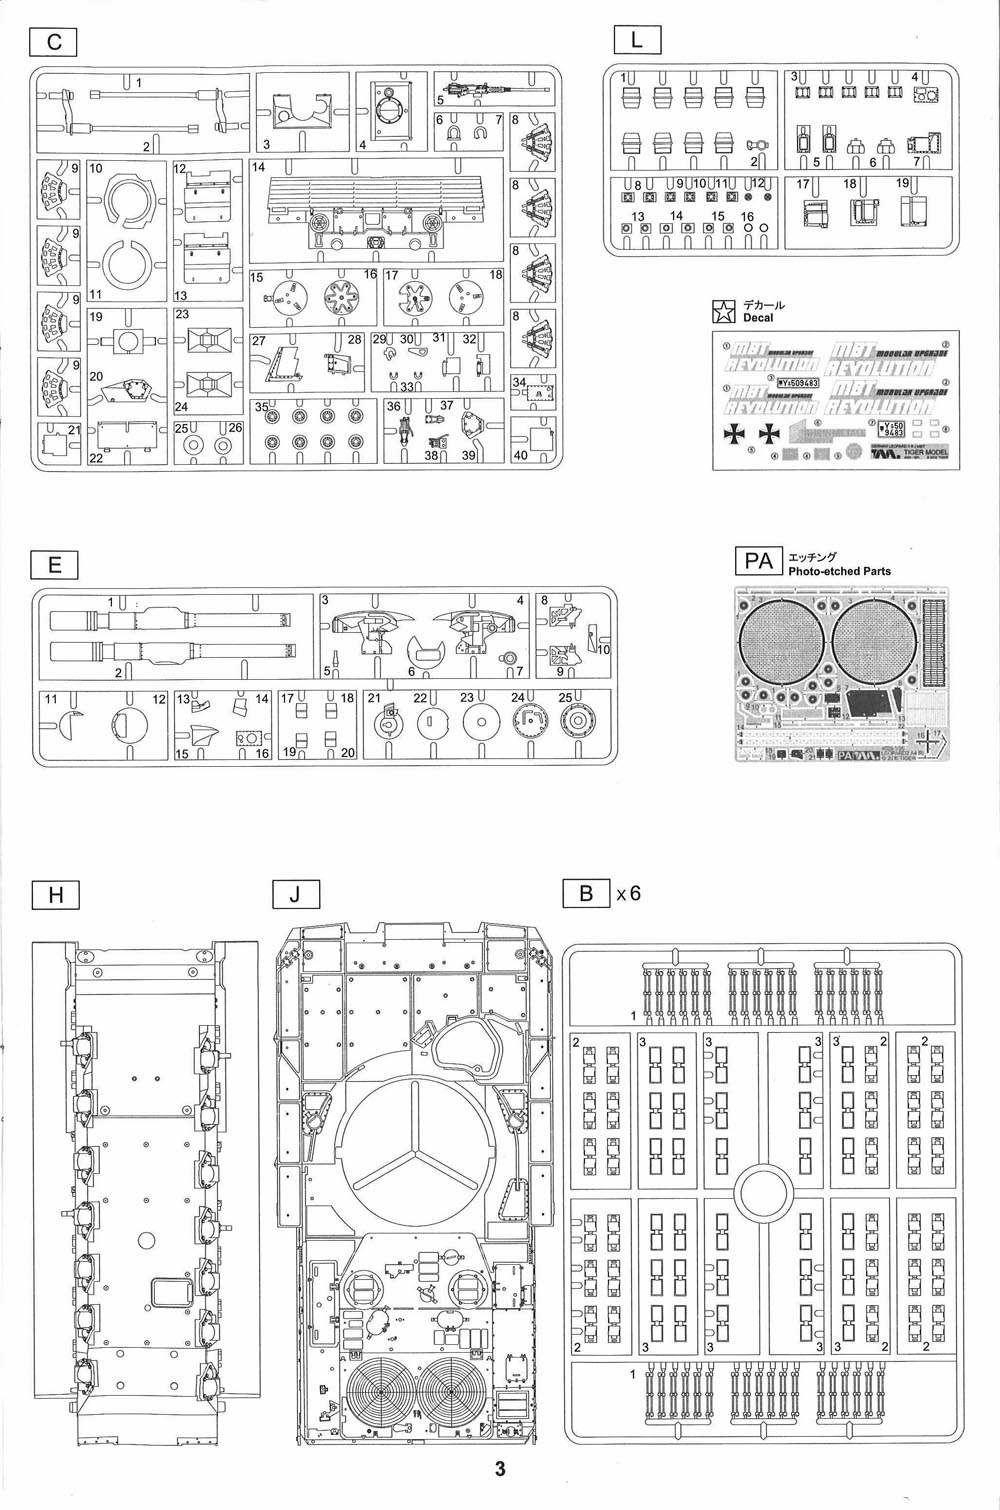
Sprue B - Individual track links each made of three parts.
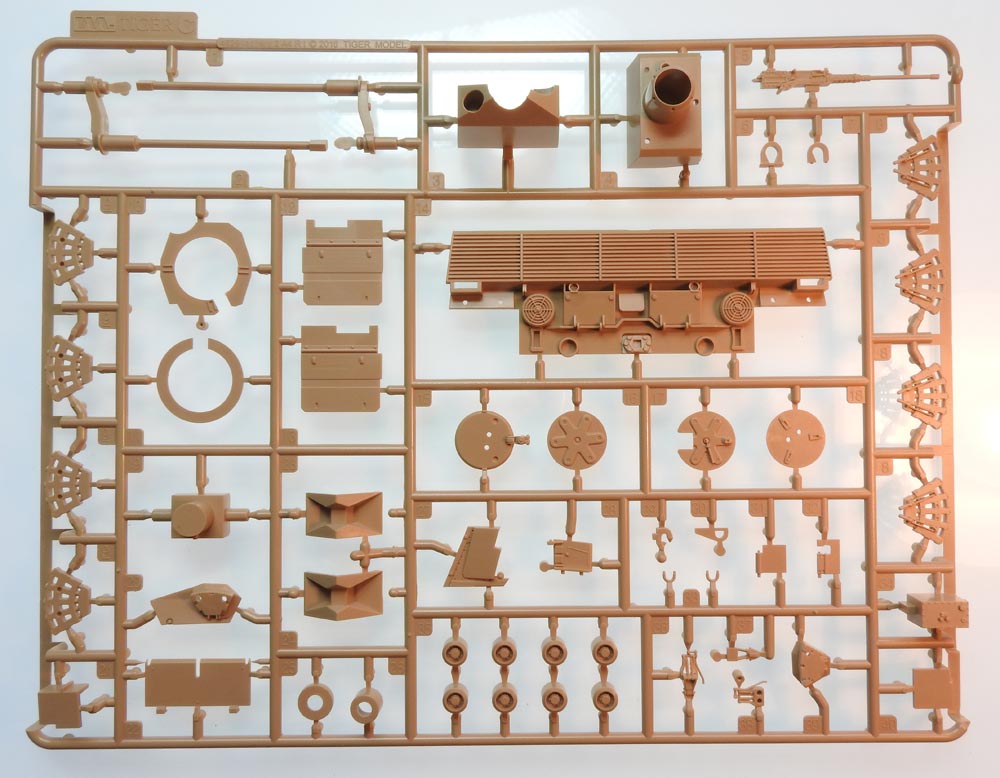
Sprue C - Mostly turret details such as the ROSY system and hatches, but also return rollers, rear hull and front torsion bars.
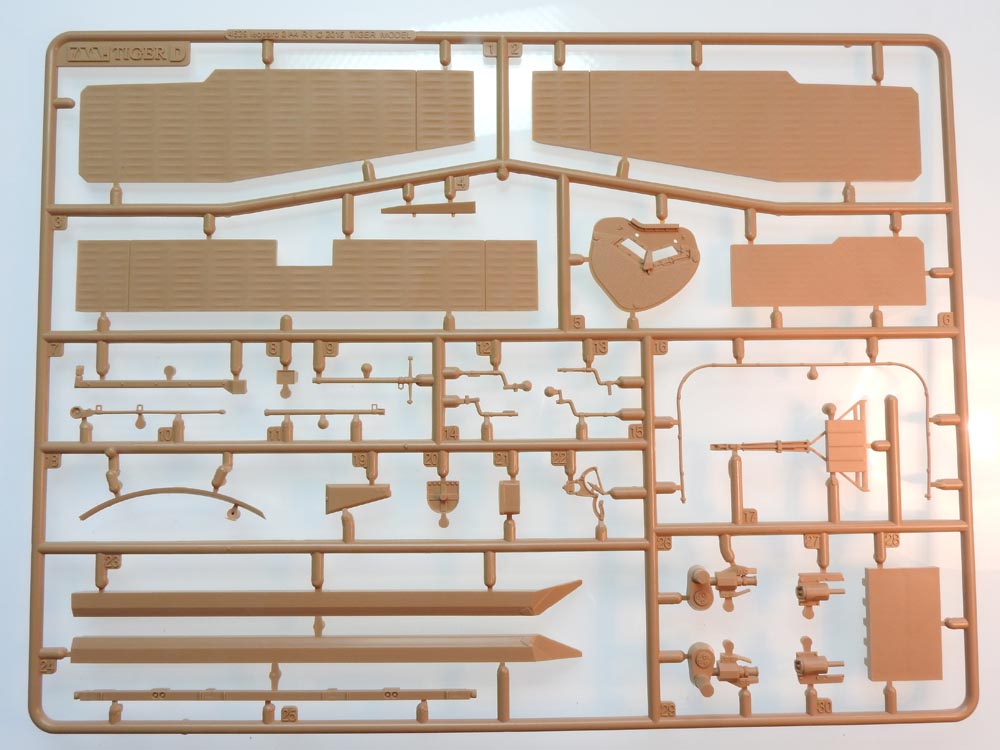
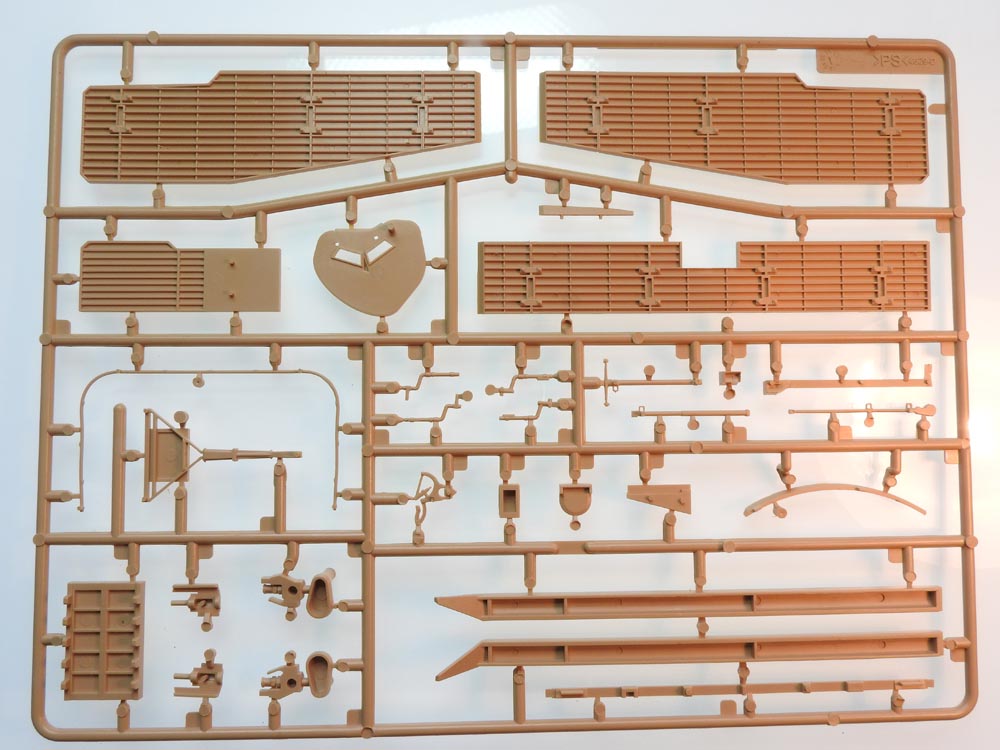
Sprue D - The slat armour (which is covered on the outside, in reality, by a sheet of material), driver's hatch, idler adjusters, tools.
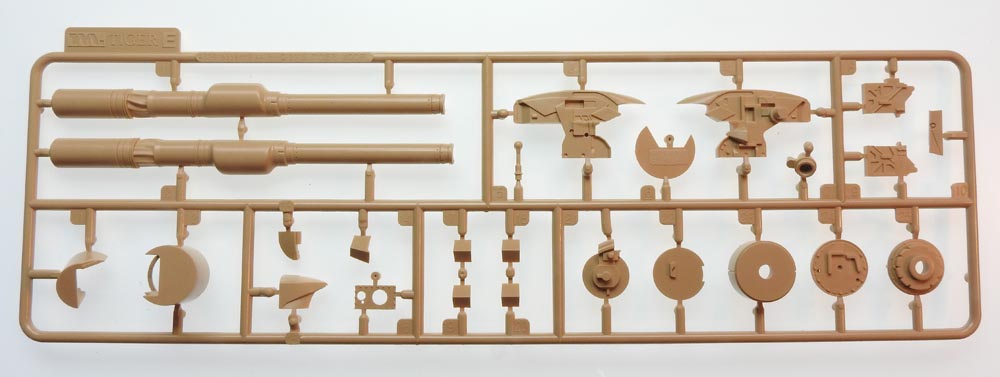
Sprue E - Main gun (split in 2 halves), turret top remote weapon system (RWS).

Sprue G1 - Turret top and Sprue G2 - Turret base
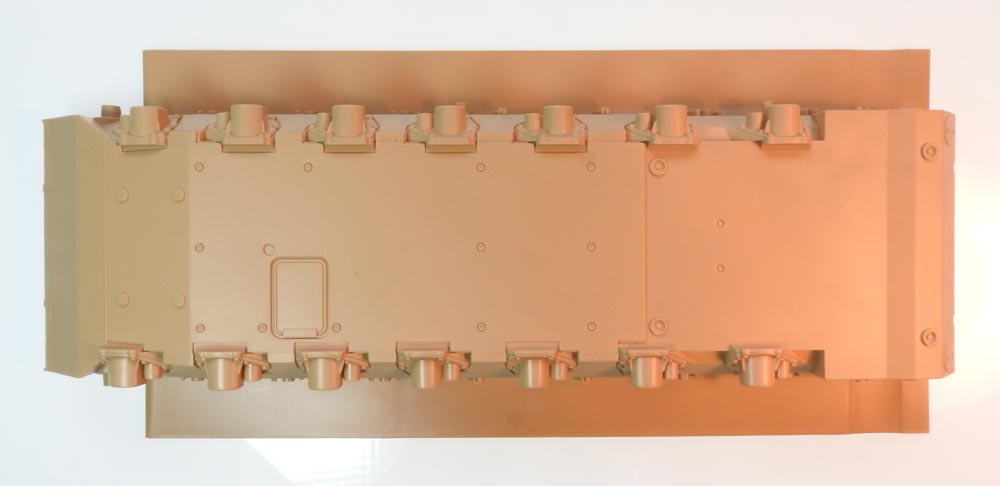
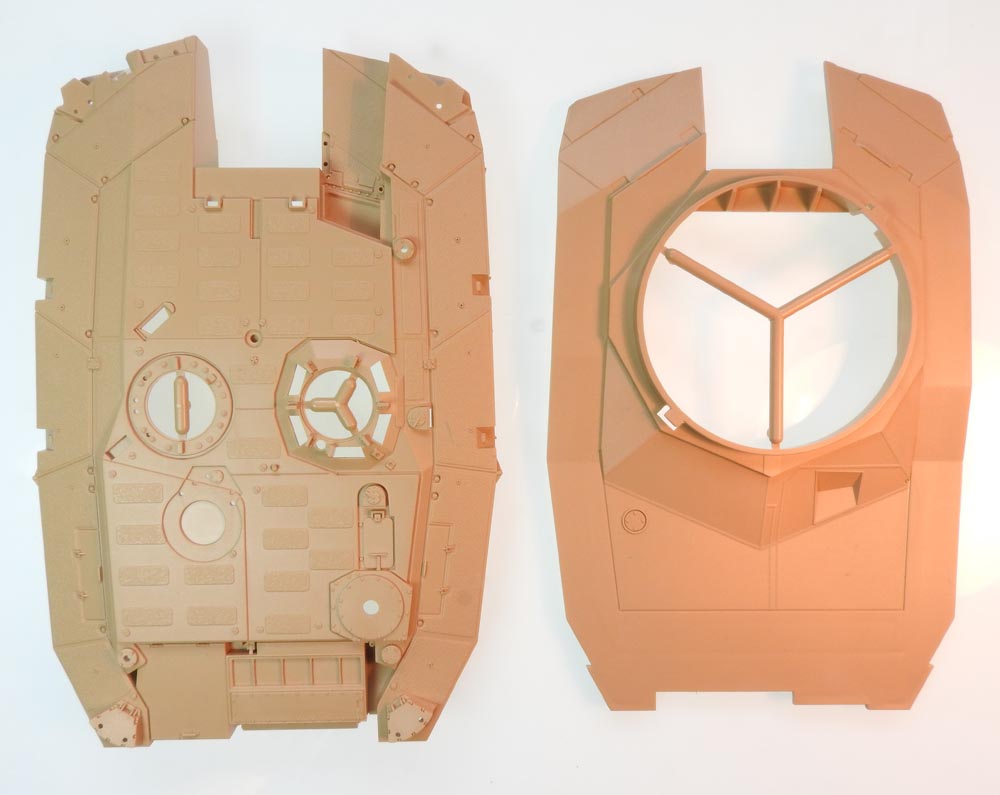
Sprue H - Hull bottom
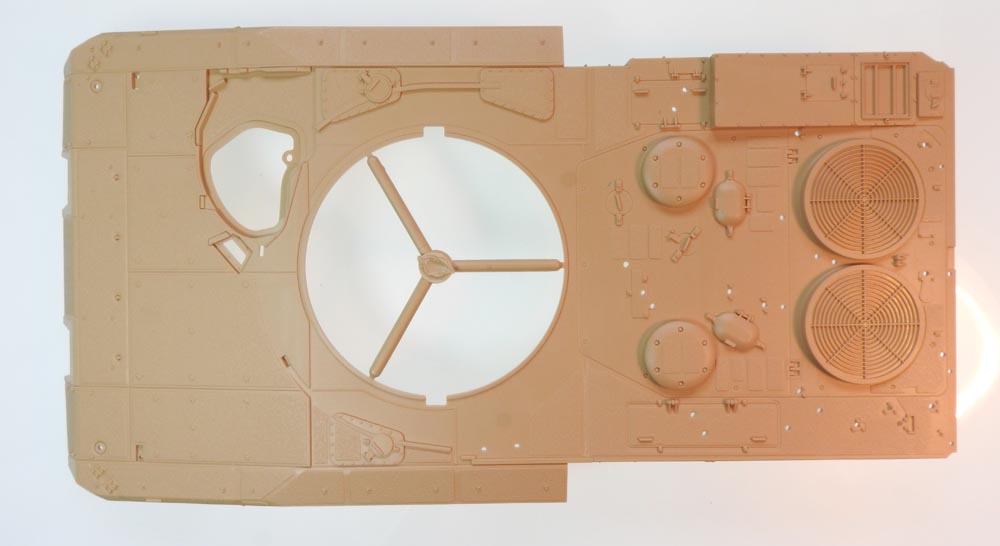
Sprue J - hull top
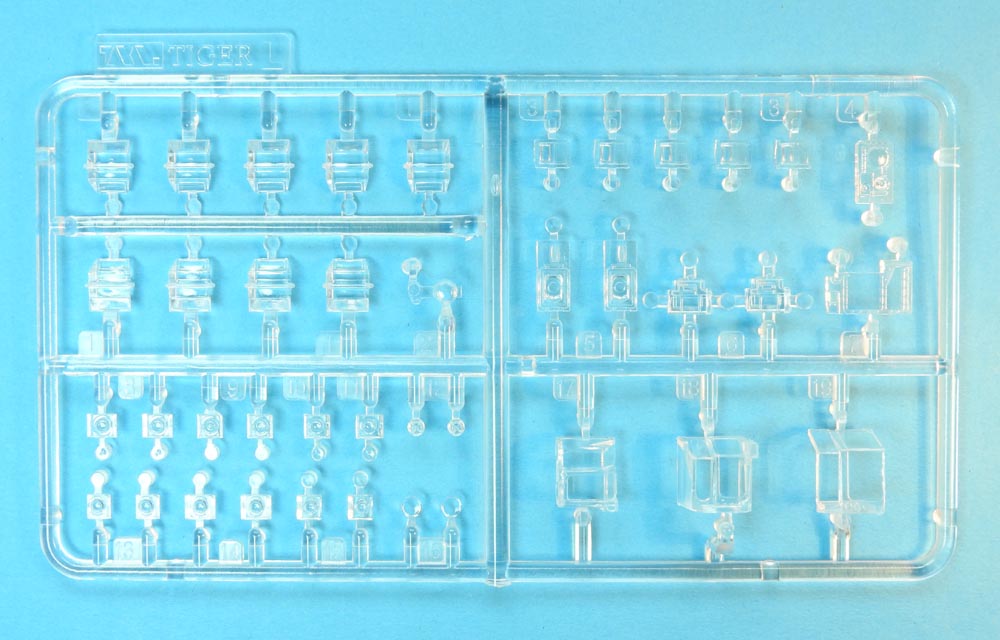
Sprue L - Transparent parts for headlights, sight windows, periscopes.
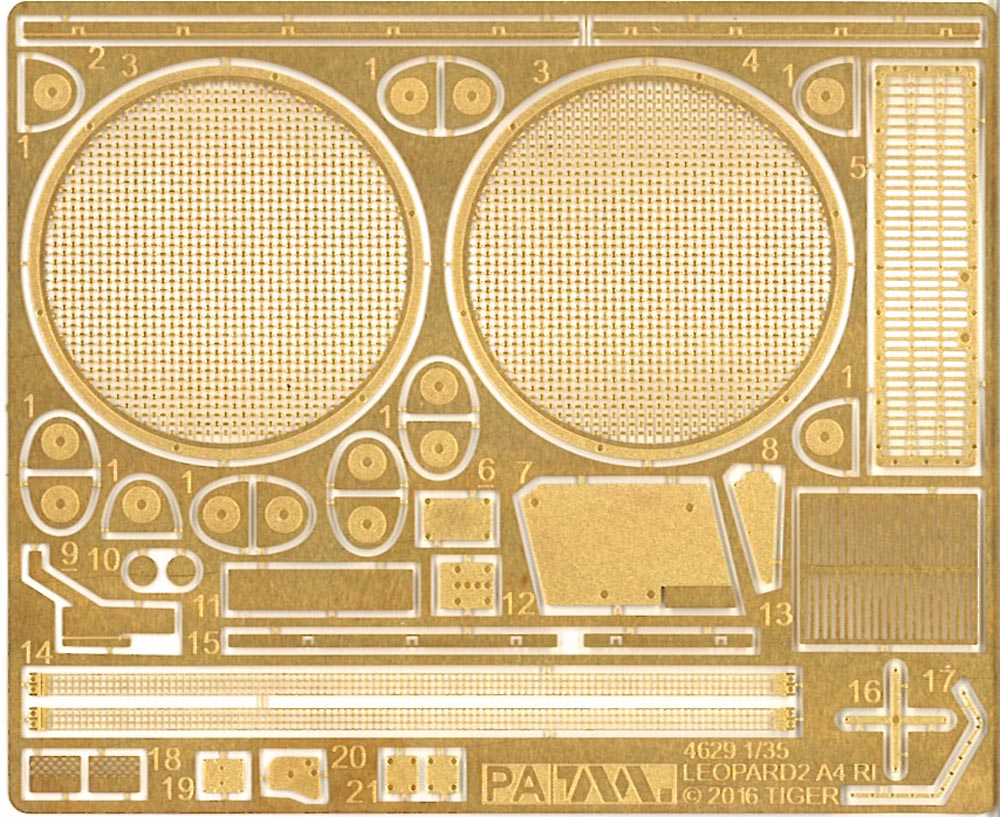
PA etch fret - Rear deck cooling grilles, air intake grilles, swing arm detailing, grilles for APU and air-conditioner, various detailing parts.
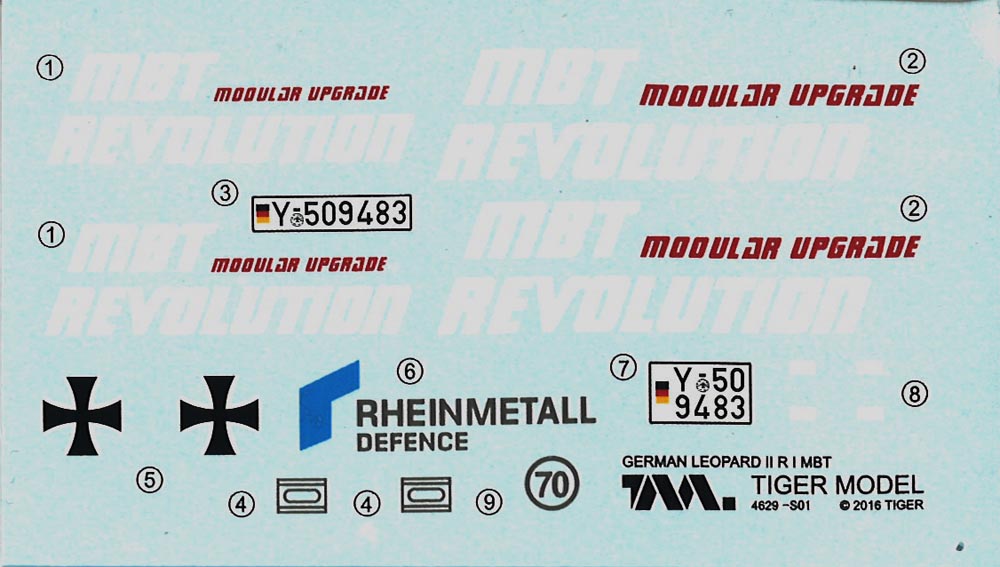
Decals for the Jakarta Indodefence show 2012 and hypothetical German schemes.
Plus polycaps and wire for the tow cables.
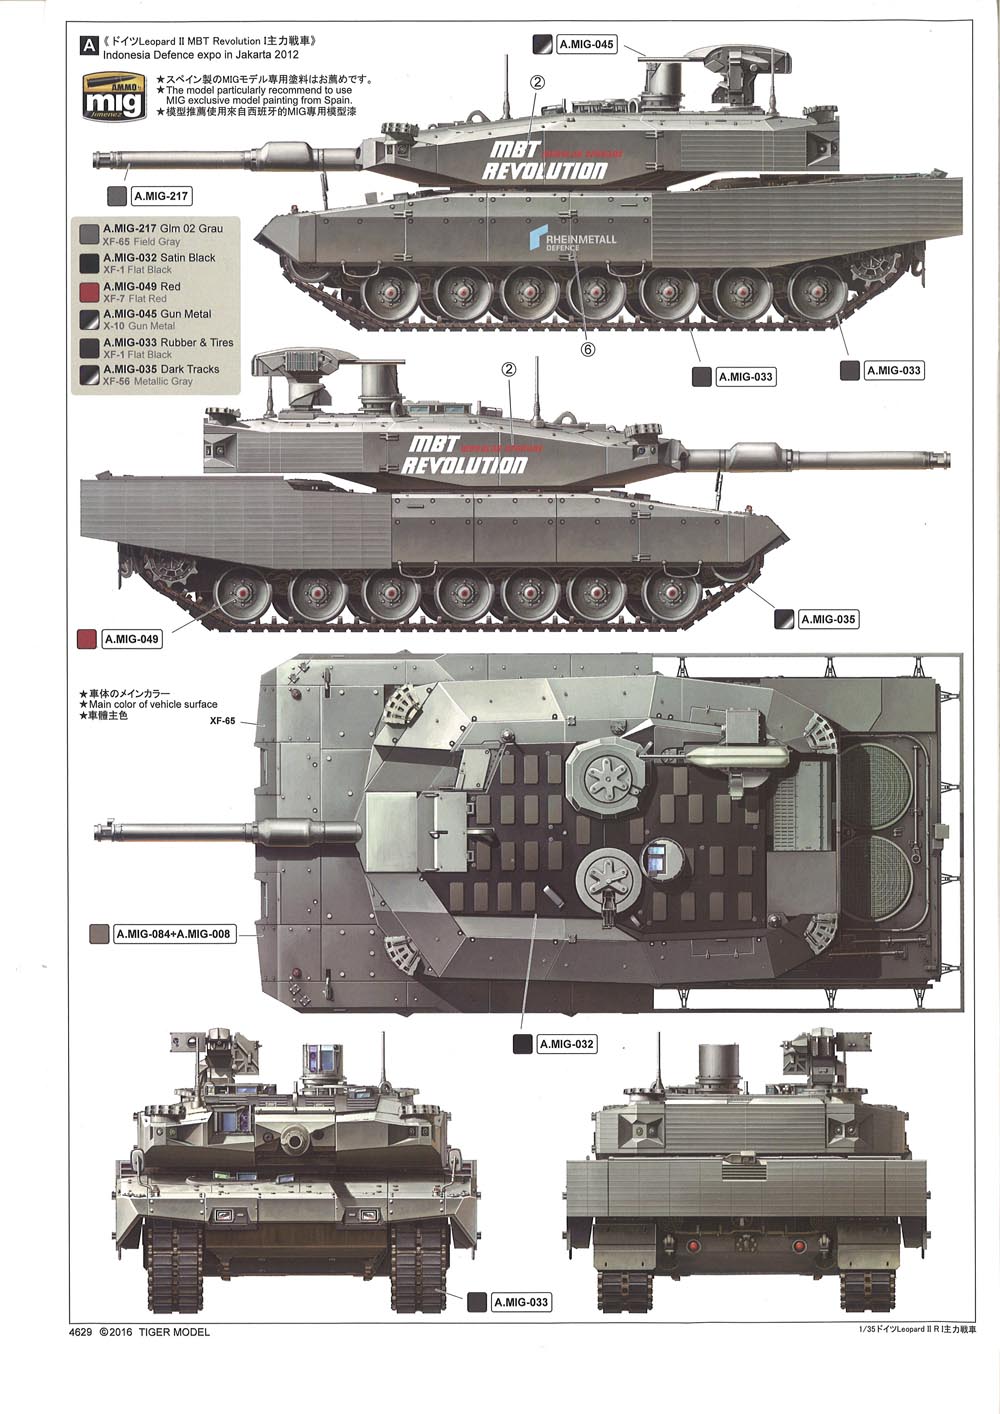
Separate colour profile sheet:

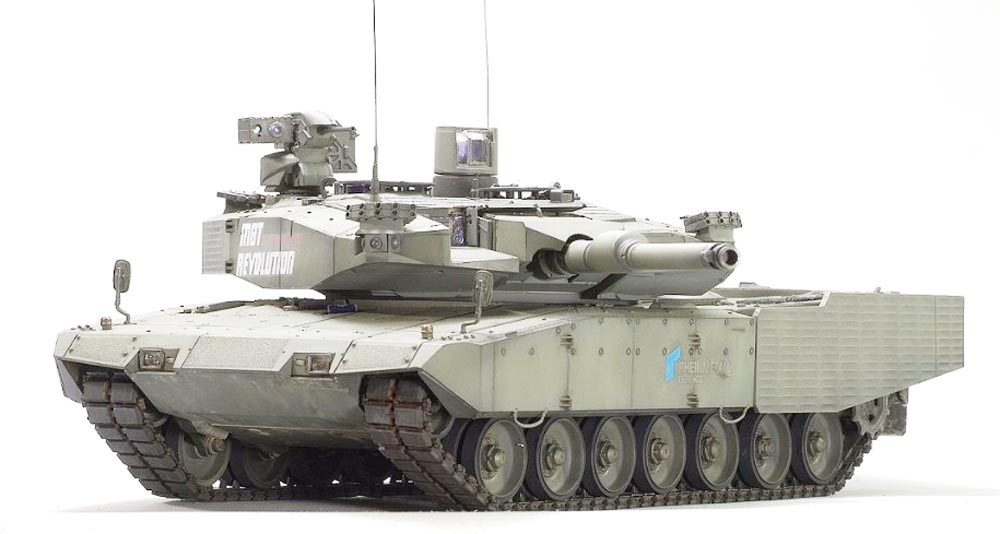
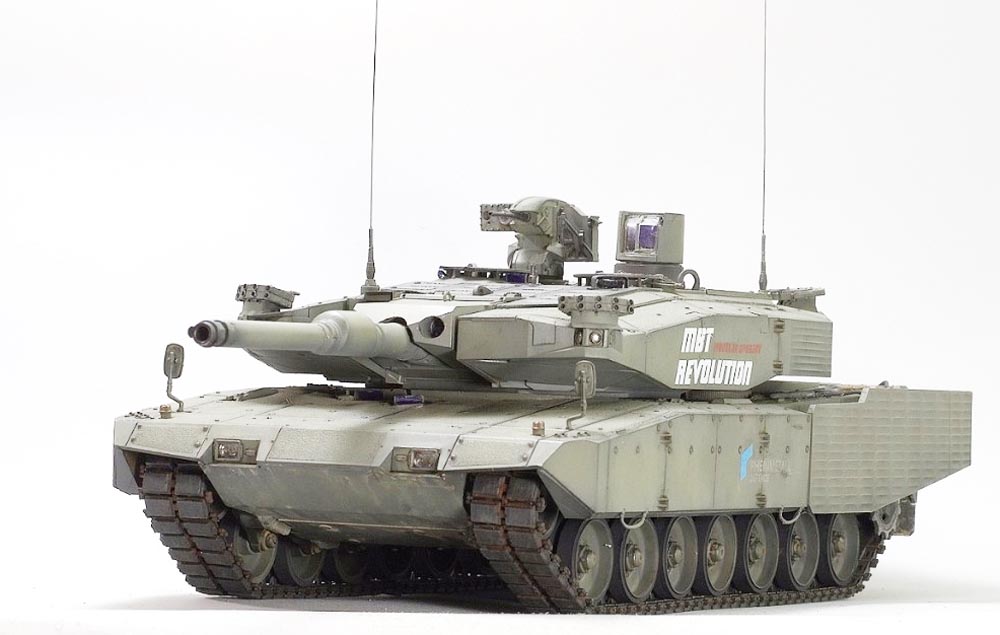
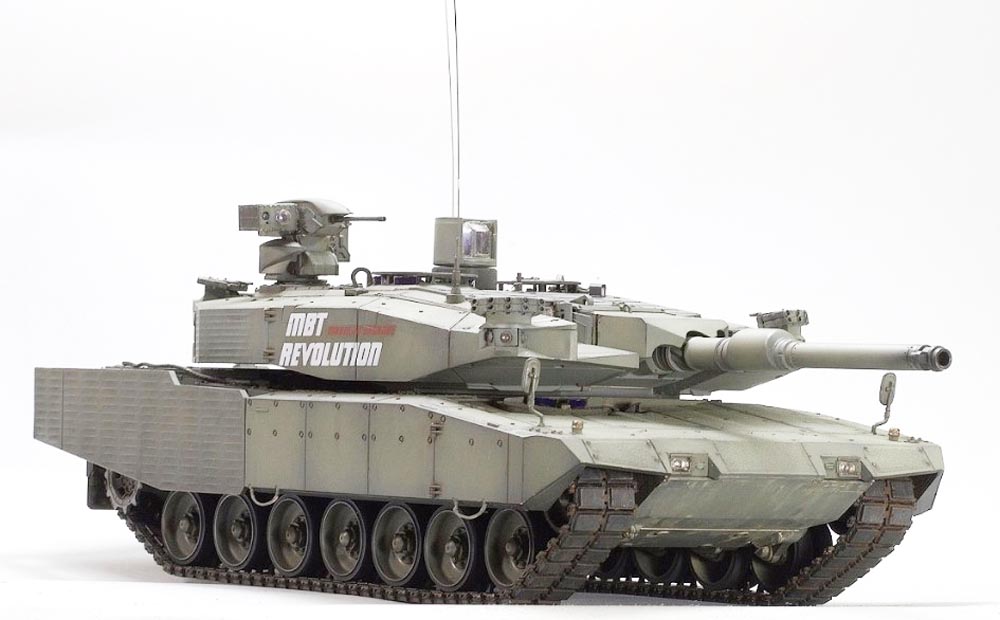
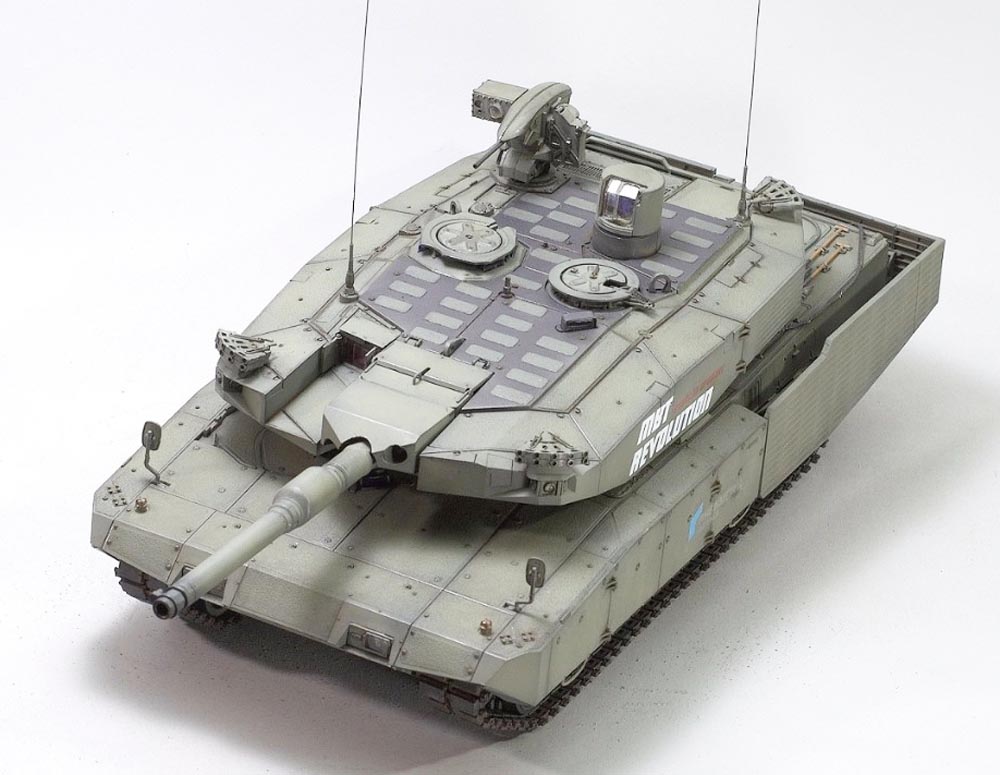

The finished model (courtesy Tiger Model)
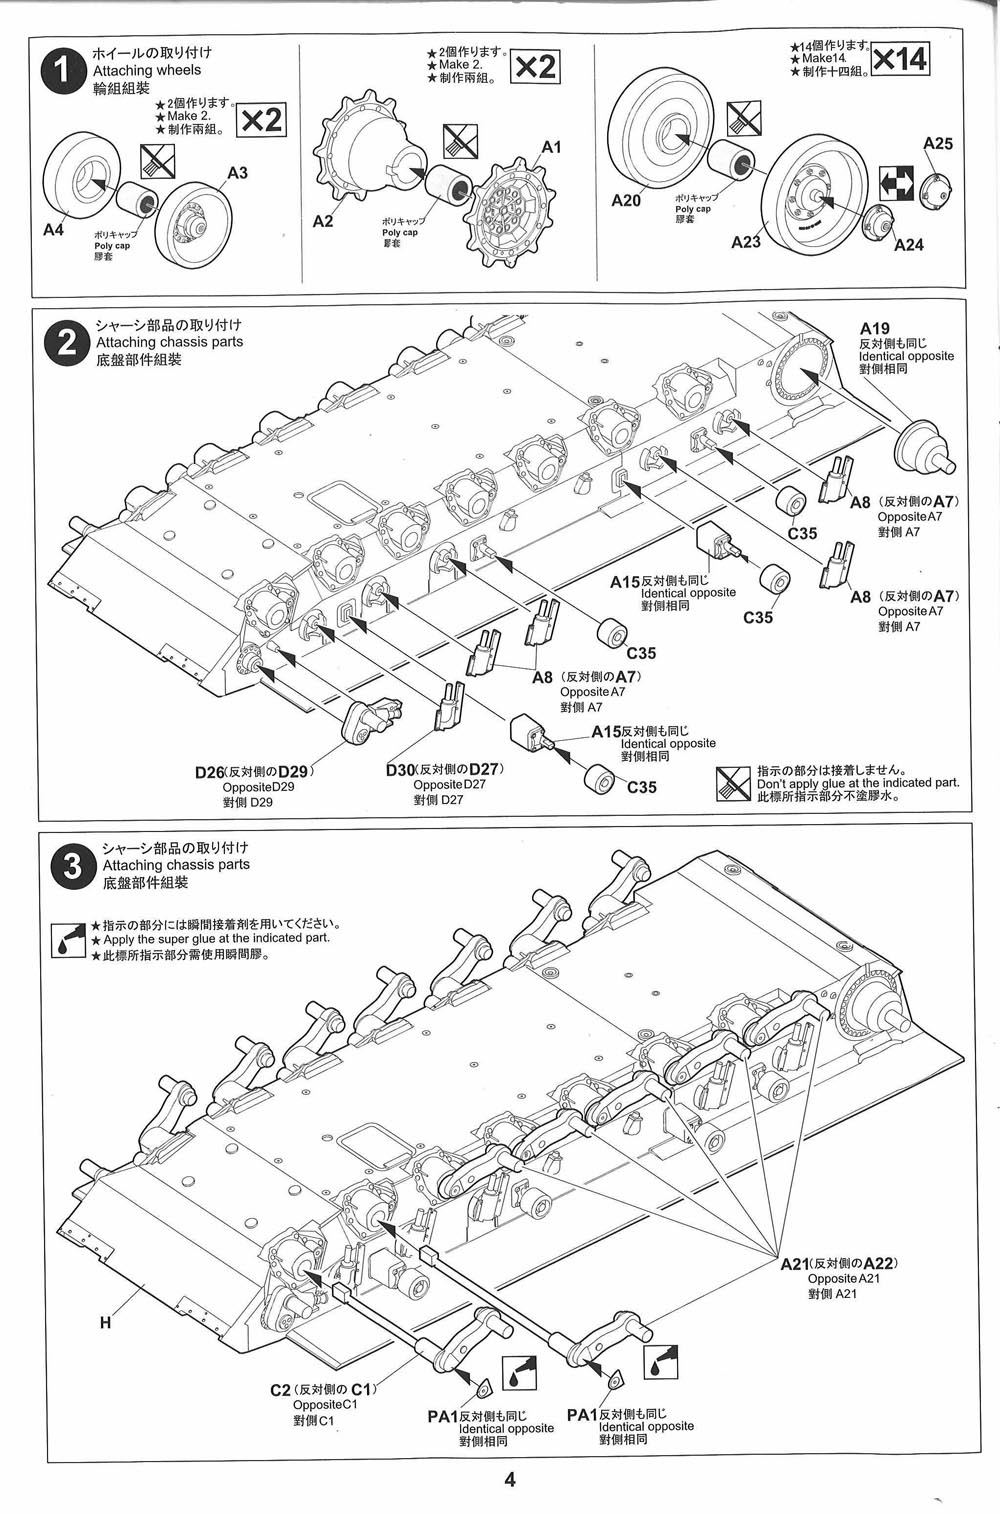
Assembly starts with all the round things - roadwheels, idlers and sprockets, all of which have polycaps trapped inside. Detail on all wheels is very nice. The rear faces have some bolt detail on them, but the use of polycaps means the shape is not totally accurate. The roadwheels have tiny casting numbers moulded on the front faces and there is a choice of different hubs. My guess is that these are the original aluminium(?) hubs (parts A24) or later armoured hubs (parts A25). There is no explanation in the instructions. The difference is barely visible.
The hull bottom itself has a mine belly plate moulded on plus uparmour plates on the sides. Suspension bump stops are also moulded on. Idler mounts, return rollers, sprocket mounts and dampers are added to each hull side. Torsion bars are then slid into pace. Beware that bars C1 and C2 first through the first stations. Don't get them mixed up with the main bars A21 and A22. They are angled differently. A finishing touch is a PE part to represent the torsion bar ends on each swing arm. At his stage it is probably best to paint the lower hull as much of it will be inaccessible once the upper hull (and its armour blocks) is mounted. All wheels can then be slid on thanks to the polycaps.
Now we come to the dreaded tracks. Tiger seem to have worked this out nicely. The system is very similar to the Bronco Leopard 2 tracks - just three parts per link with top, bottom and parallel double pins (with end connectors joining them). What is different is that Tiger provide a jig to make up 5 links at a time. Place the outer shoes face down in the jig. The pins are connected on an intermediary sprue at the correct distance - so DO NOT cut off the individual pins just yet. Cut a group of six from the main sprue and place them in the jig. Then push fit the inner halves (with the guide tooth) onto the bottom. No glue is needed. Cut the sprue from the end connectors and you have five workable links ready to join to the next group five. One thing the instructions do not make totally clear is that each end connector has a bolt on ONE side only. The bolt should face to the outside, the same side as the track pads. Modeller's choice - of course you do not have to build the complete run as the top run is hidden away. One problem noticed here by another build blogger is that the end connectors are too small so they are a very loose fit in between the sprocket teeth. Maybe the Bronco tracks can come to the rescue here?
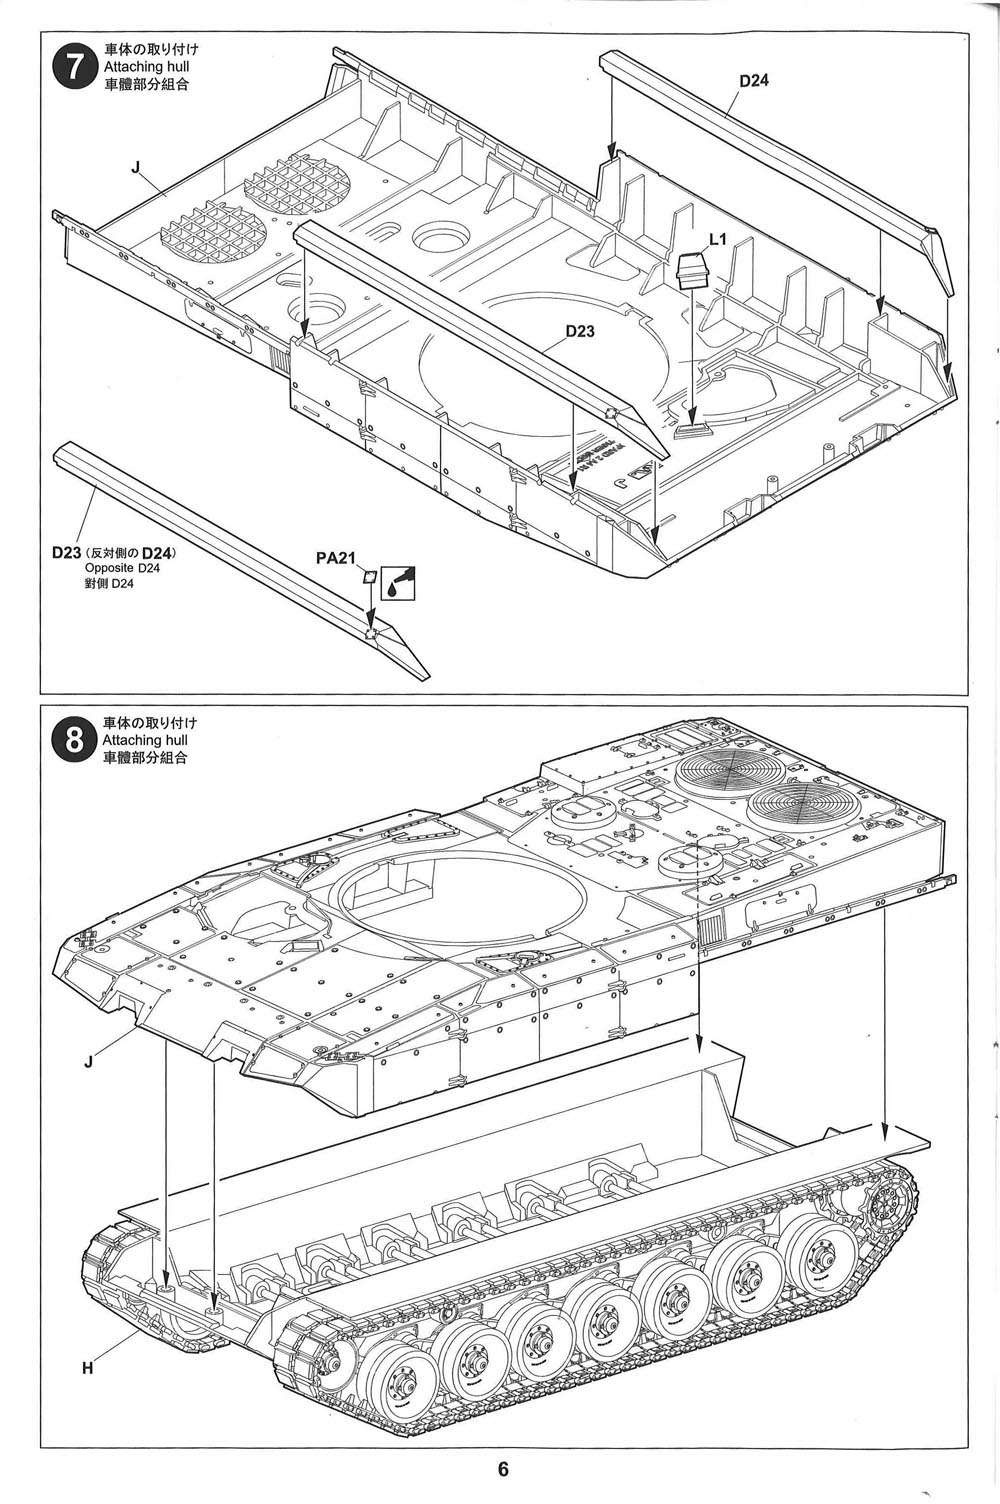
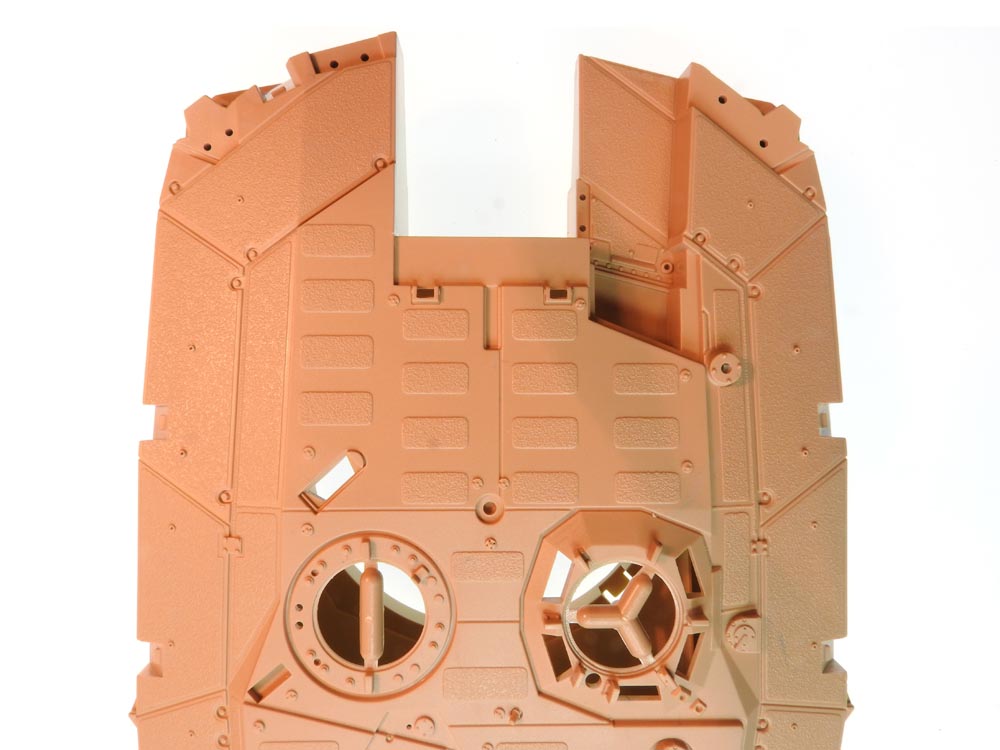
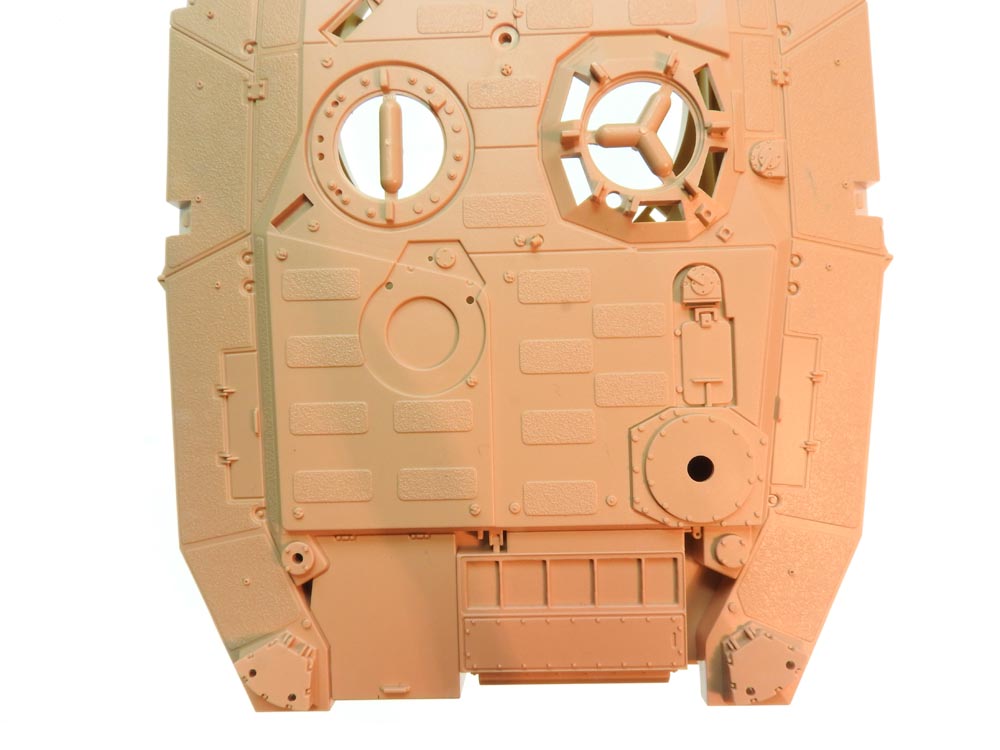
Now attention turns to the upper hull. This is one of the best pieces of injection moulding I have ever seen. The detail is incredible! There are a lot of non-slip patches and they are all done very well. Purists might say they are a little thick, but I think, once painted and under a mat varnish/treated to weathering/washes, they will look perfectly good. Purists will also complain about various grab/hatch handles which are simple rectangular mouldings, but this kit has been designed for ease of build. The more experienced modellers can easily replace the handles with wire - though there 16 of them!!
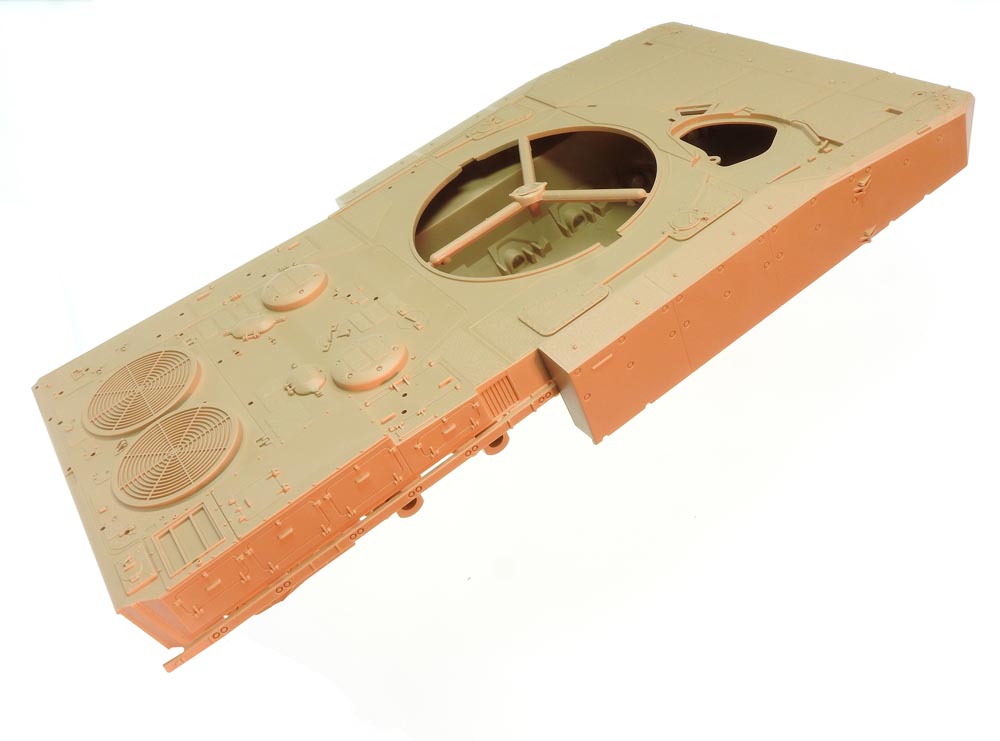
As I have mentioned, all of the armour blocks have been moulded in place. There are a lot of reinforcement ribs inside the hull to keep everything square, so hopefully this is one Leopard 2 hull that will not suffer from sagging hull tops - a common complaint with Leopard 2 hulls with large turrets hitting the hull. However, I would be tempted to add my own deeper strengthener immediately behind the turret ring, just in case. The joining of the two hull halves is very positive. Beware - one driver periscope needs to be added from inside the upper hull before mating top with bottom.
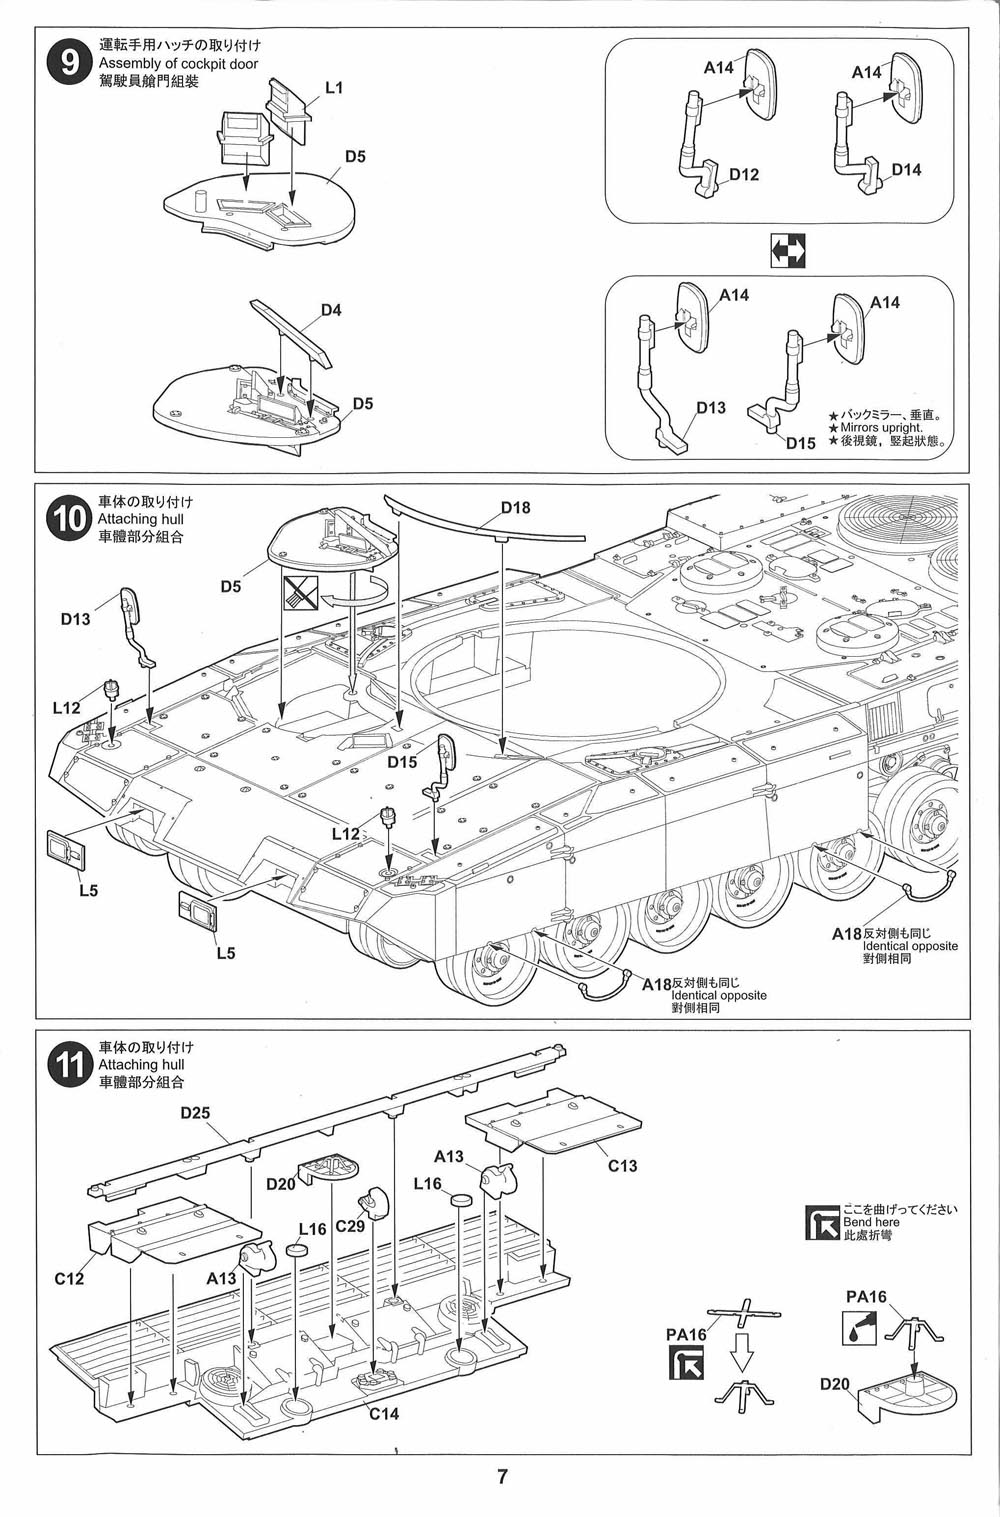
Forward hull detailing can be completed by adding the driver's hatch (with two more clear periscopes), clear headlight lenses, indicators, mirrors (either up or down options included) and footstep cables on the bottom of the side blocks. The delicate cables and mirrors are probably best left off until a later stage.
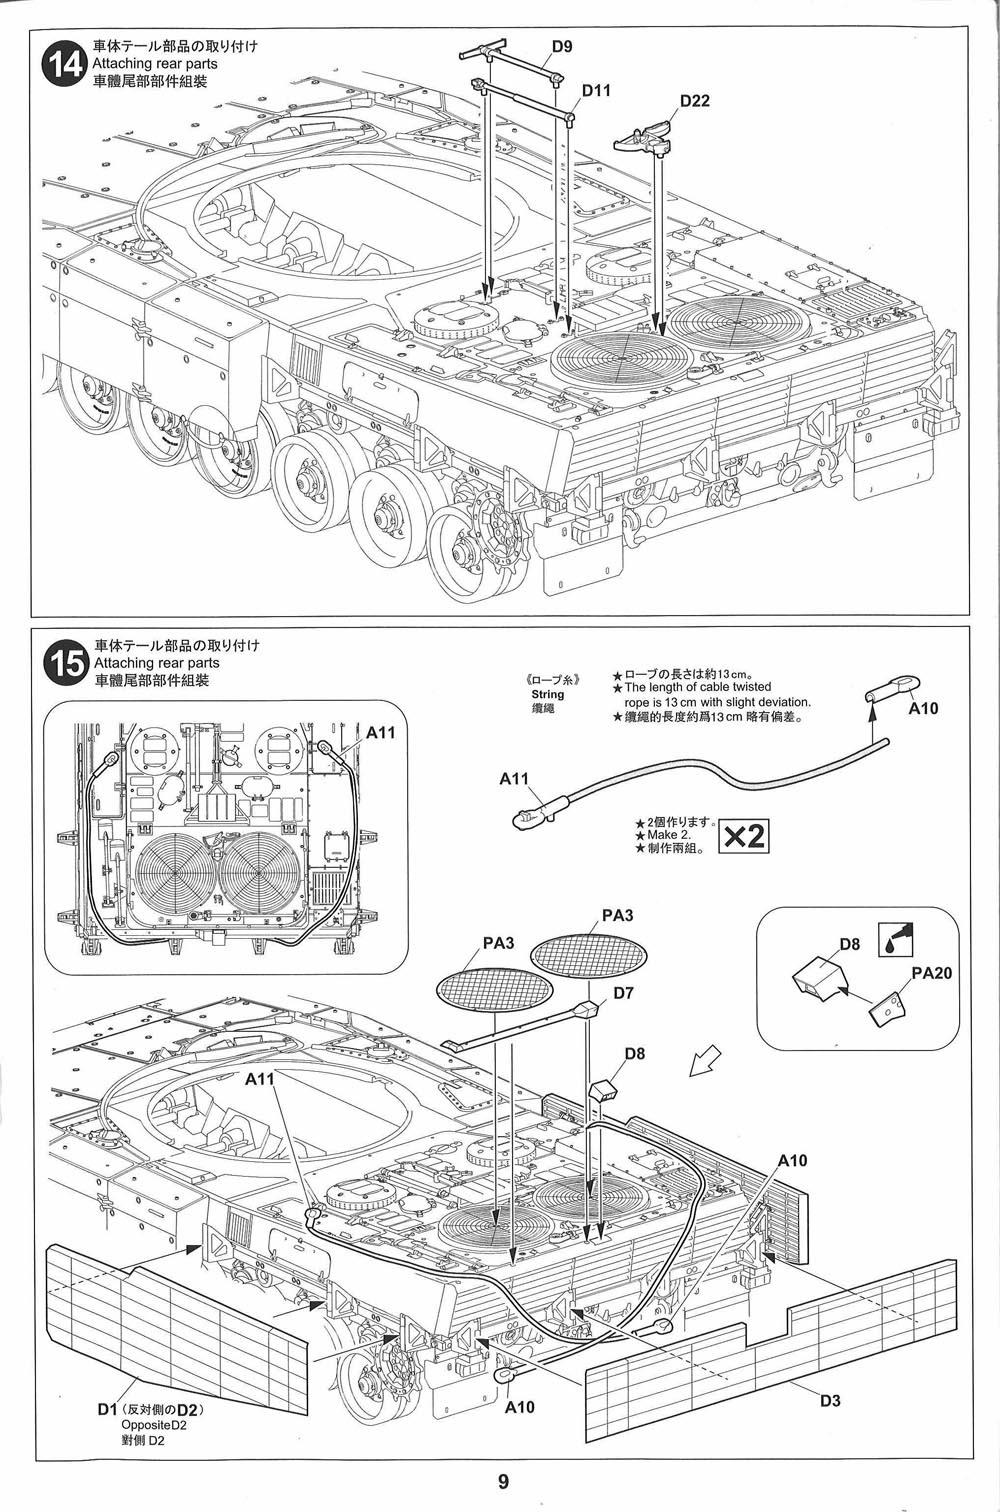
The rear hull panel is then detailed up with a slat mounting bar, mud flaps, hooks and clear reflectors. The convoy shield has a separate PE cross-piece to protect the light. Strangely, the rear lights are not mentioned (clear parts L6) but are shown fitted in stages 15 and 16. They should peek out BELOW the level of the rear slat armour.
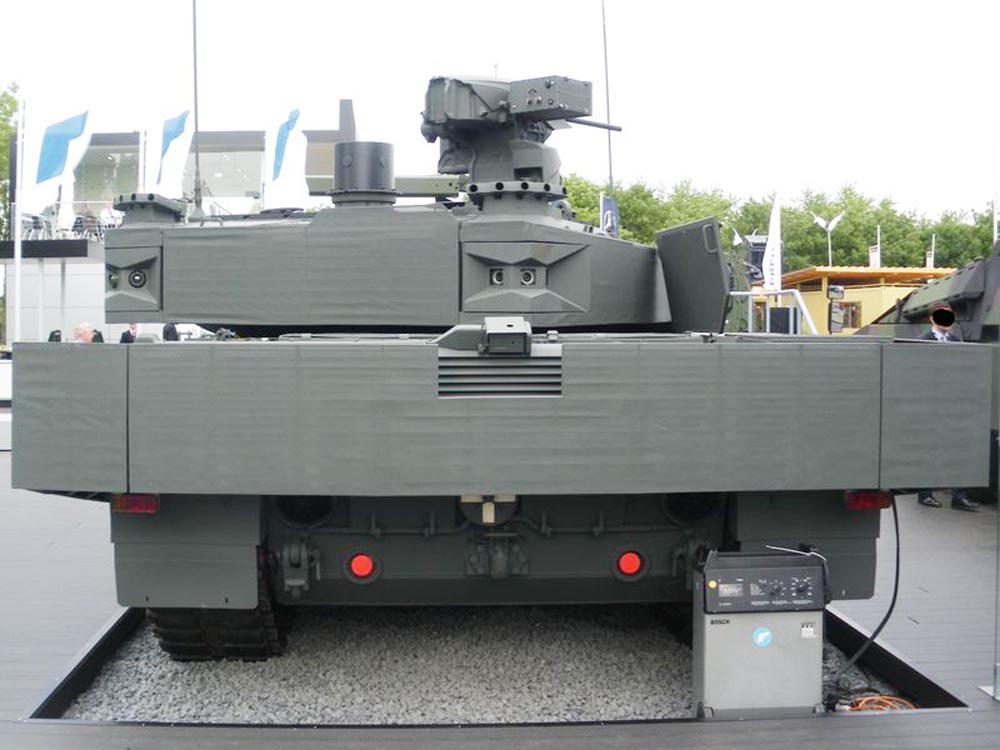
Not mentioned in the instructions are the rear lights, though they are included.
They are not that clear in the photo, but can be seen under the lower edge of the slat armour.
(Olivier Carneau photo)
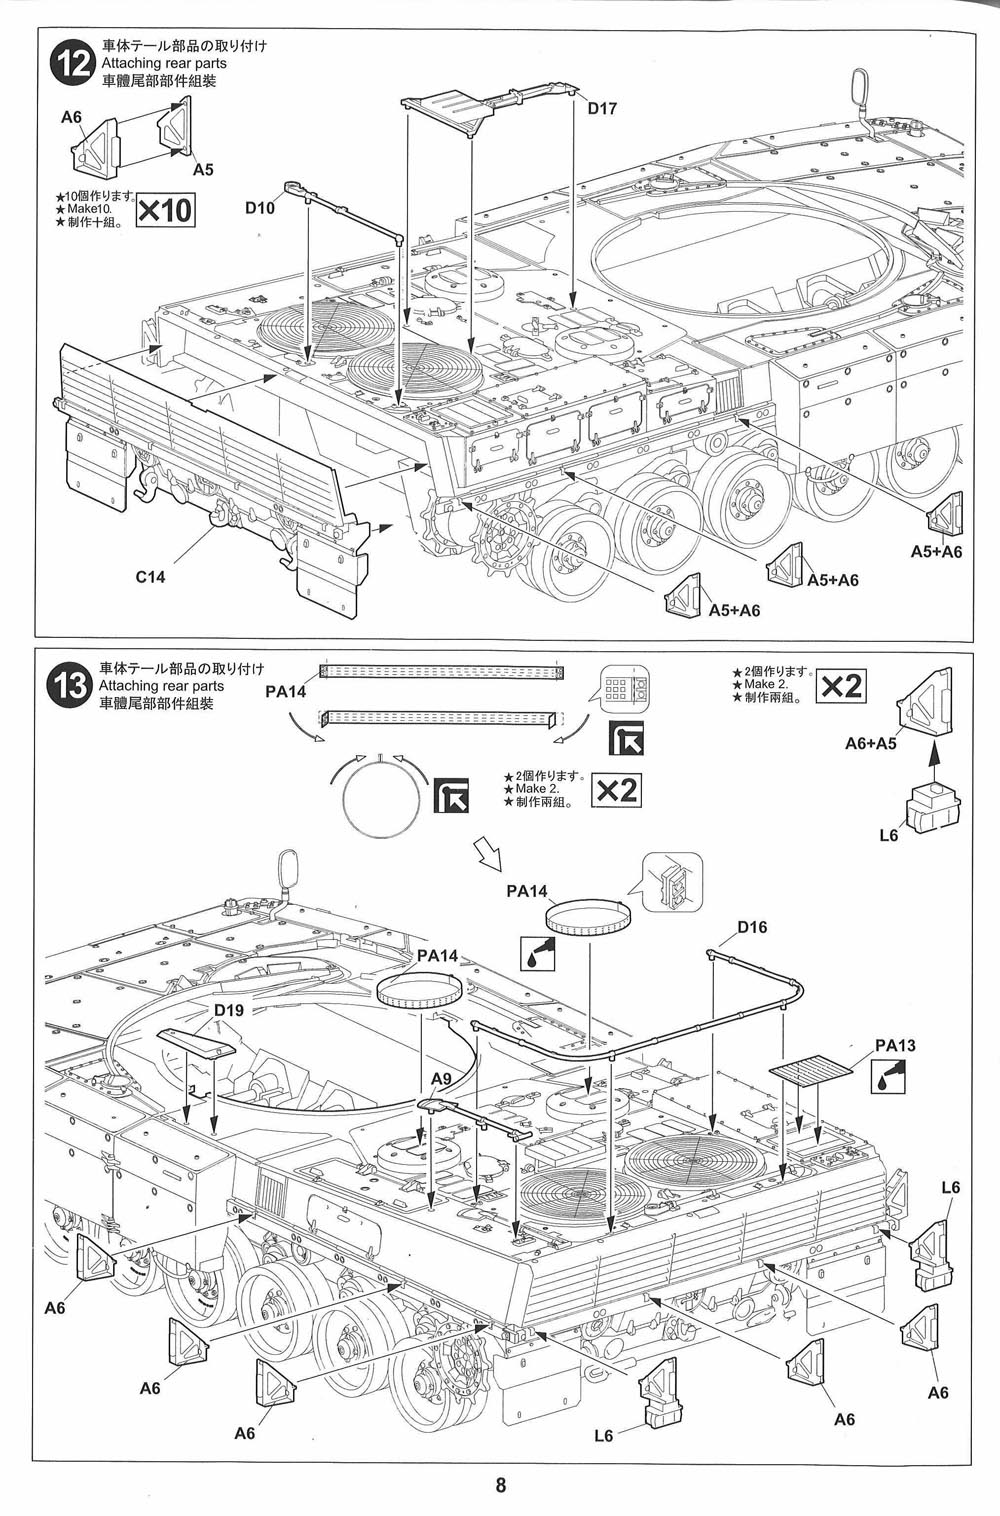
Four stages then concentrate on detailing the rear hull top and sides. This covers the addition of all of the slat mounts (don't worry, they are all plastic), tools (which all have clamp handles moulded on), the rear camera and PE grilles for the air filters, cooling grilles and APU. Tow cables are supplied. (RMG or Eureka would be better solutions).
The final part of the hull build is the addition of the three slat panels themselves. Here we have a problem with the shape of the left-side panel. In the kit, both sides are identical. In reality, the left side has a simple slope on the top edge, not a step like on the right. Strangely, the kit's colour profile shows the correct shape. This therefore has to be corrected with a new trim line, topping off the new cut line with a new slat from strip plastic.

Thanks to Diethelm Berlage for spotting this on the Track-Link website
where he is building this model.
This brings up a question. The kit has options for two, possibly three, different machines (not including the hypothetical colour schemes in the colour profiles). This is most clearly seen in the different commander's sights which we will come to later. Revolution has evolved since its first appearance in 2010 with some detail changes.
The question is: does the kit builder make what he wants from the box, for example by leaving the left-side slat panel alone, or does he choose to modify the kit to a specific machine at a specific time? The actual machine depicted in the kit appeared at the Indodefence show in Jakarta, Indonesia, in 2012. However, it did not mount the remote weapon system (RWS) at this show, though it is shown fitted in the instructions. It is no surprise that Tiger have depicted this machine as they are based in Hong Kong and must have photographed/researched it at this time.
At the Jakarta show in 2012 without the remote weapon system (with thanks to panzer-modell.de)
To help you make your mind up, Diethelm has given us links in his Track-Link blog to three different time periods:
I will mention the other differences as we go along.
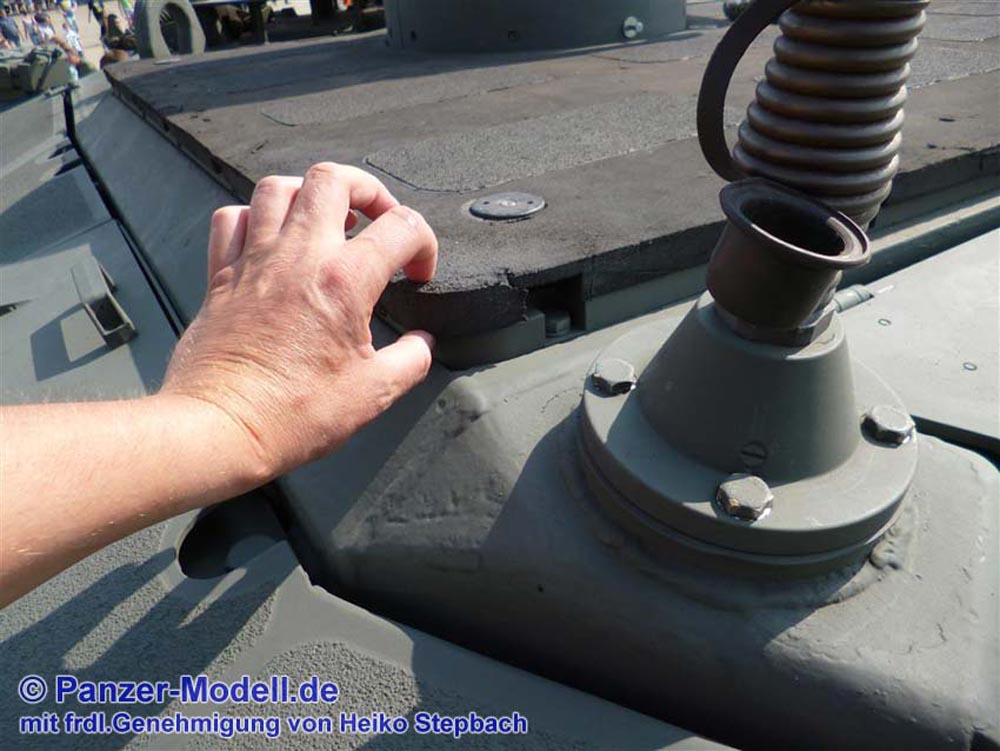
Another thing that changed was the APU. At Eurosatory in 2010, the APU housing was much simpler than depicted in the kit. At this show it did have the RWS mounted.
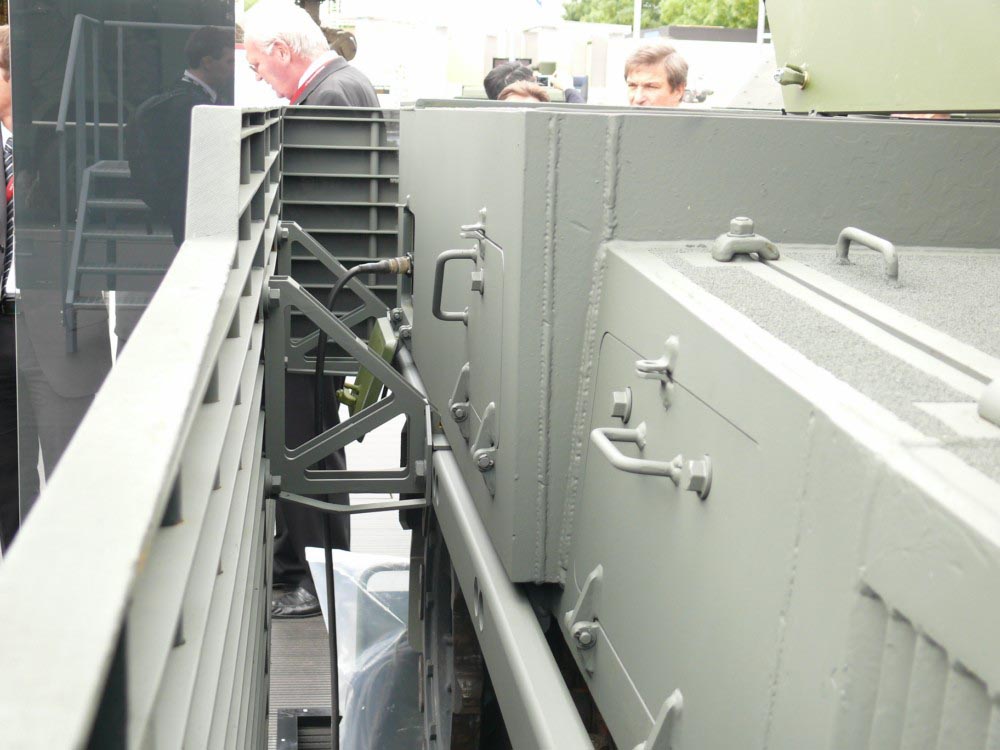
Eurosatory 2010 - The APU stuck out from the hull side with two different doors (Olivier Carneau photo)
Eurosatory 2010 - The lid was plain with a non-slip panel seen at the top of the photo (Olivier Carneau photo)
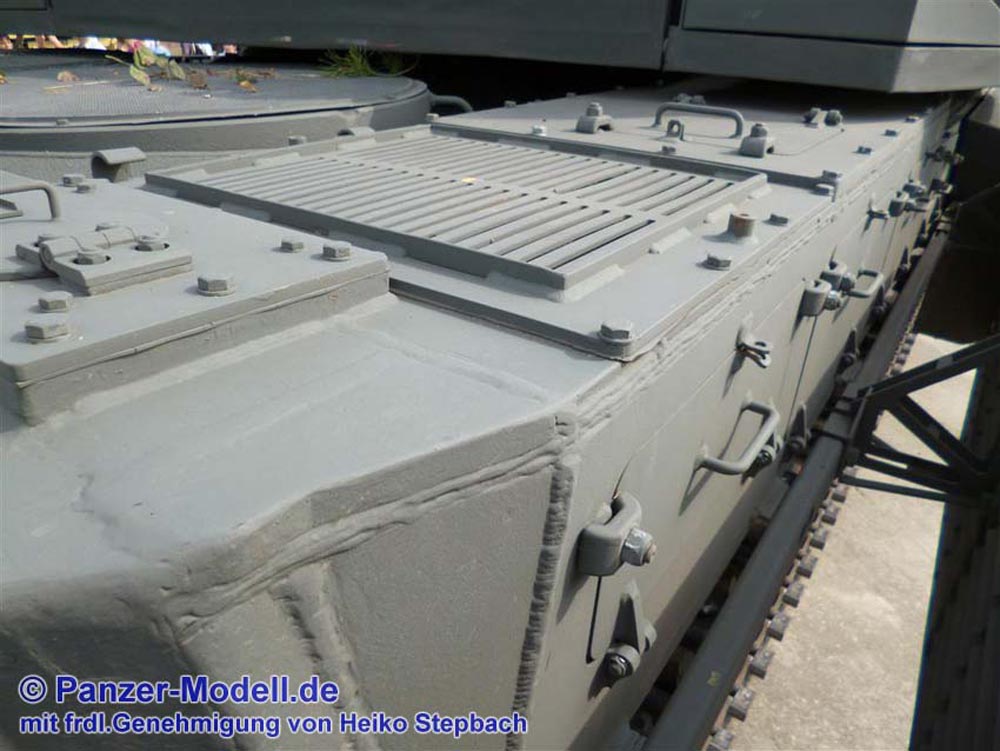
Jakarta 2012 - the APU as depicted in the kit (with thanks to panzer-modell.de)
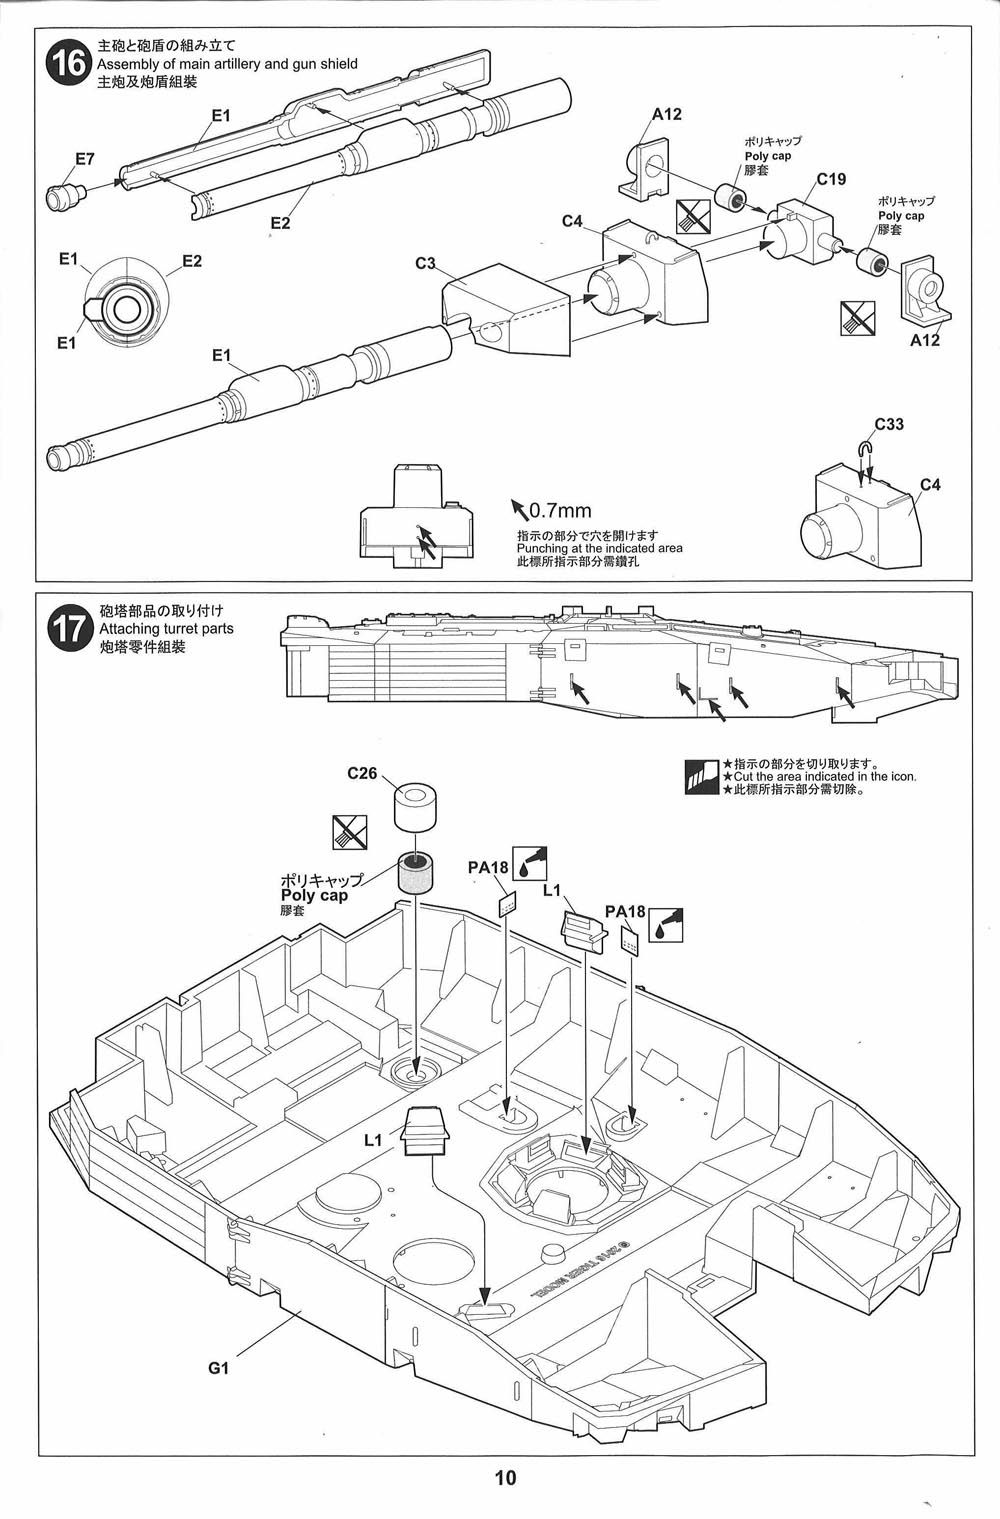
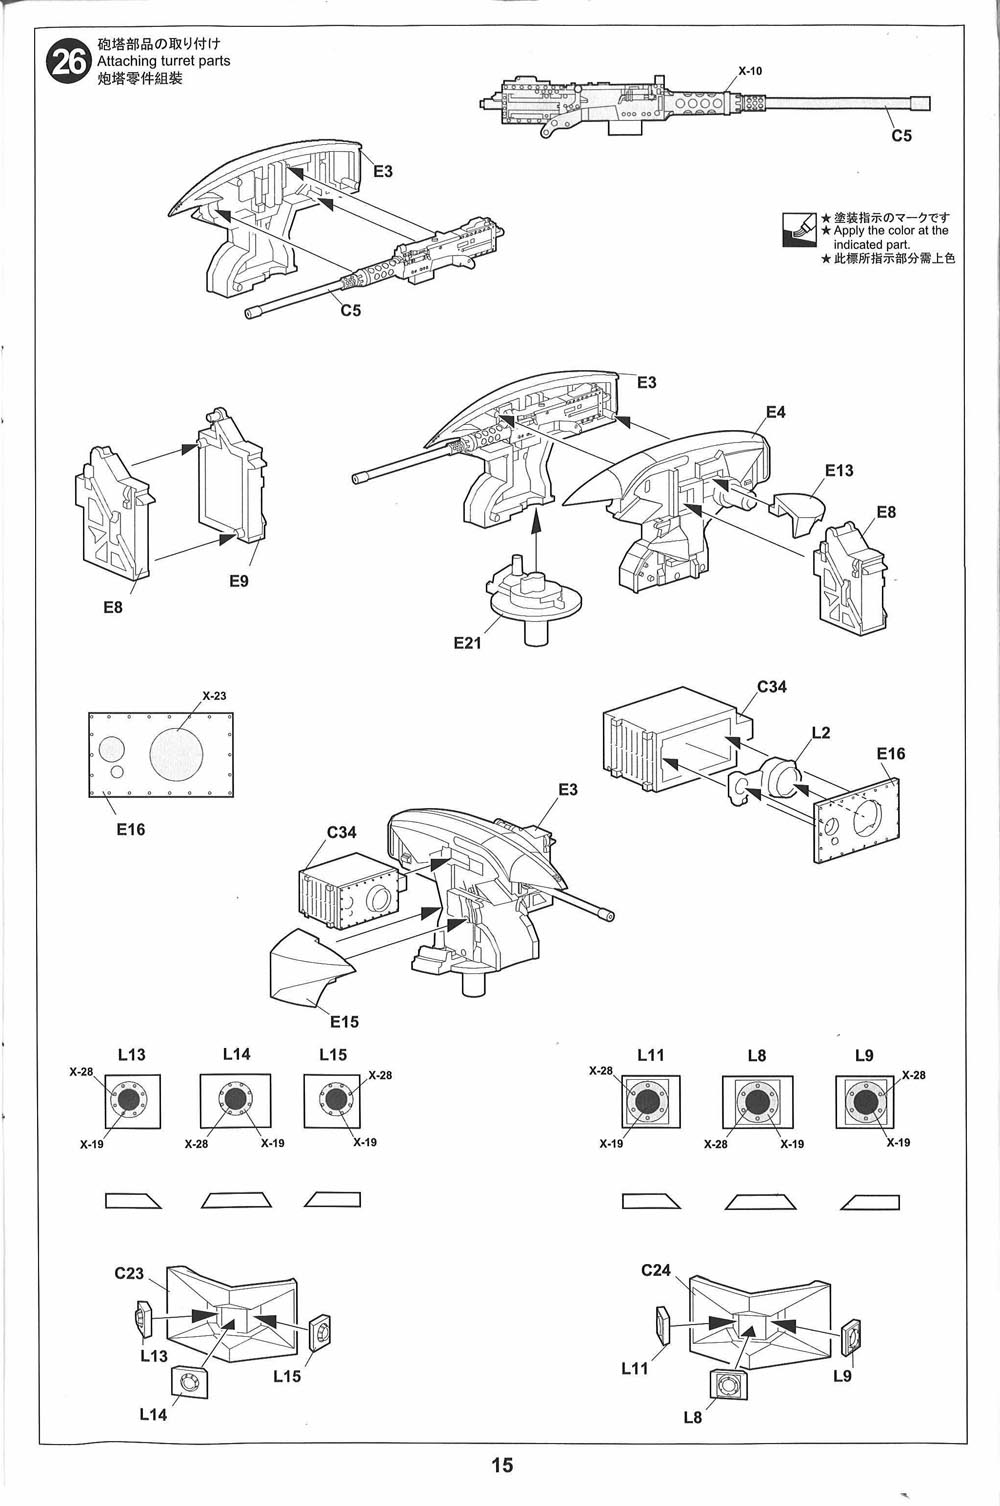
Here, we start with the gun which is conventionally split into two halves. It is quite nicely done but is not strictly accurate and has no texture on the extractor. Tiger have depicted an extra ring in front of the fume extractor. This is not correct for a 2A4 gun. Leopard Workshop has a corrected gun available (LW017REV).
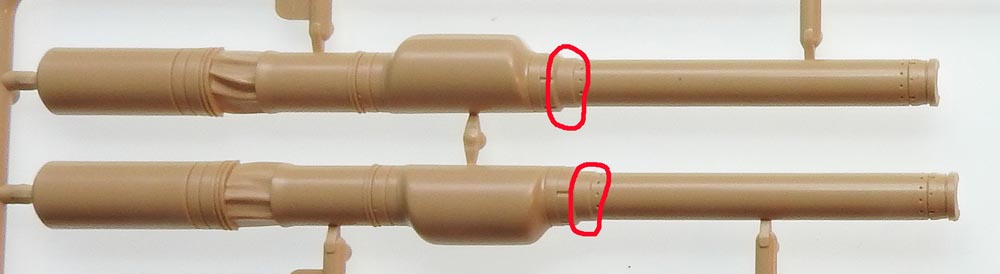
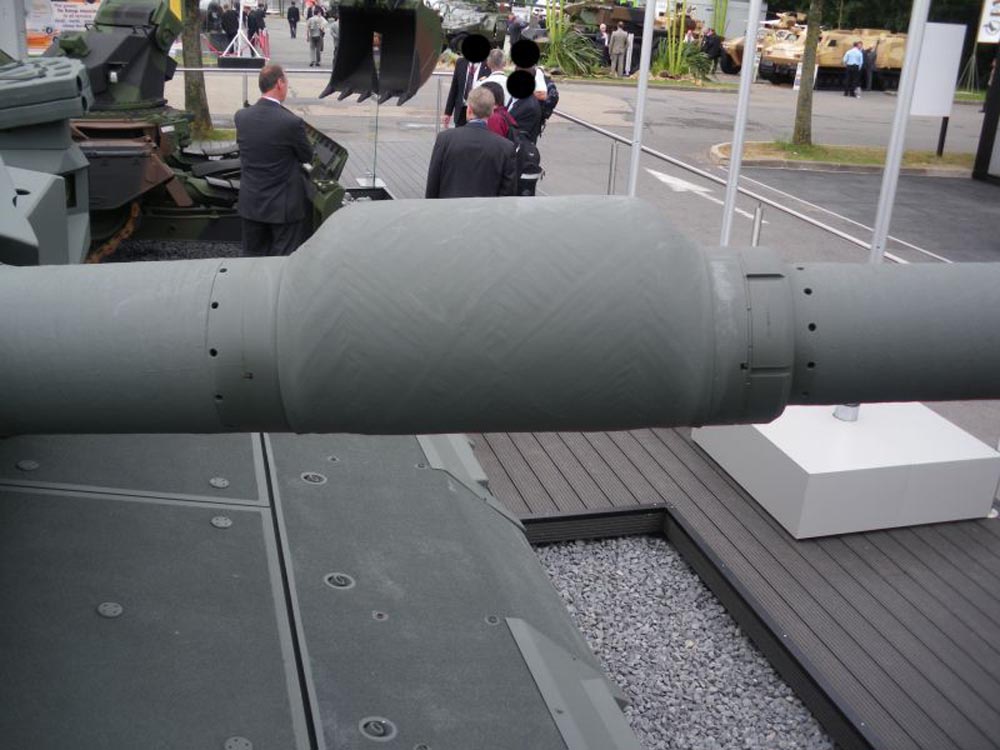
Eurosatory 2010 - The gun without the extra ring - note the texture on the fume extractor (Olivier Carneau photo)
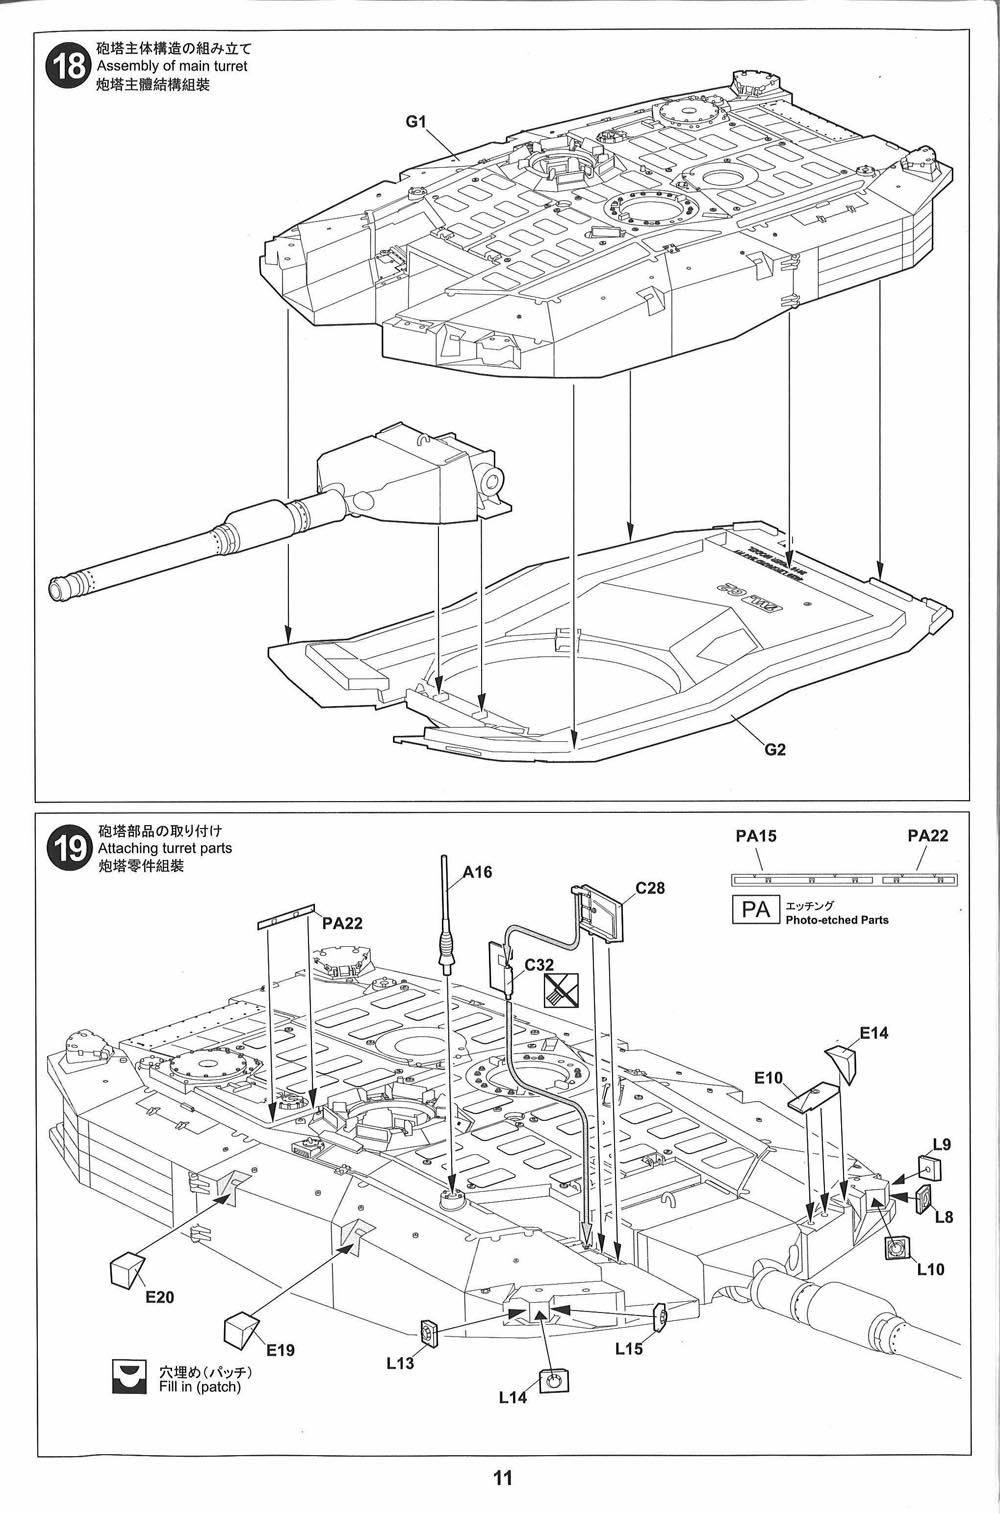
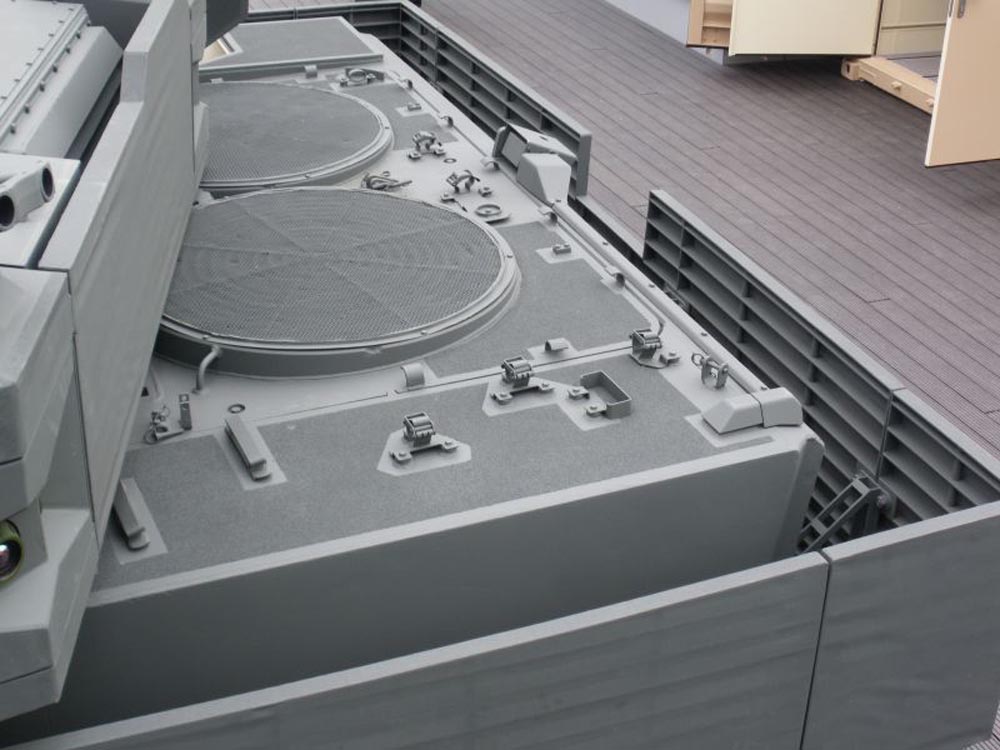
Next is the turret itself, and the same general comments from the hull also apply to this. It would not look out of place in a scene from Star Wars! It is an amazing piece of injection moulding. On the roof itself, Revolution has a kind of 'rubber' matt which itself has non-slip panels attached to it. I have no idea what its purpose is but it is depicted in the kit. The same comments apply to the non-slip panels which will look better after painting.
Jakarta 2012 - the rubber mat on the turret roof is quite thick (with thanks to panzer-modell.de)
One of the first things you have to do on the turret is to remove some location marks from the sides. There are also two slots in the roofline which have to be filled with patches, as the instructions call them. Why are these things here? All of these point towards a future model which had additional sensors in these locations - but not on the Eurosatory or Jakarta vehicle. Surely this means a future kit of a later sand-coloured machine (2015) which had a different RWS and commander's sight (the lens for which is already included in this kit on the clear sprue).

Extra sensors on the turret of the 2015 version, not included in this kit
Before joining the turret top and bottom, clamping in the gun/mantlet assembly, all of the clear turret periscopes have to be slotted in, plus a polycap if you want the RWS fitted (don't forget it wasn't fitted in Jakarta). There are also two neat intake grilles in PE which must be added from the inside.
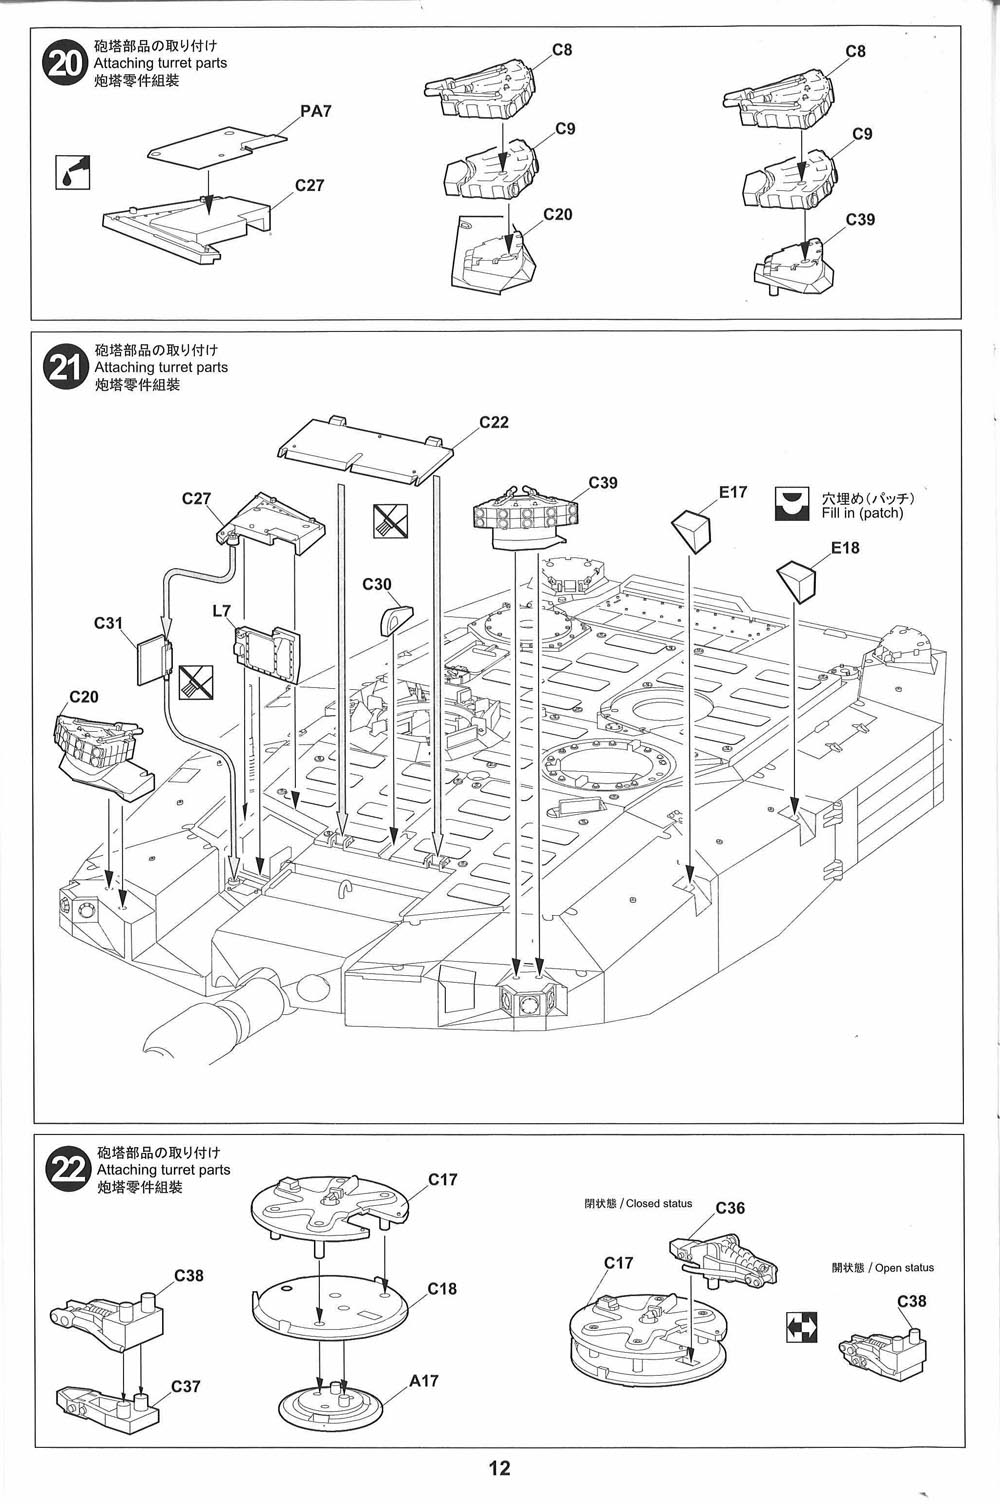
Sensors (three per corner) are added on all four corners from clear parts which will need careful painting.
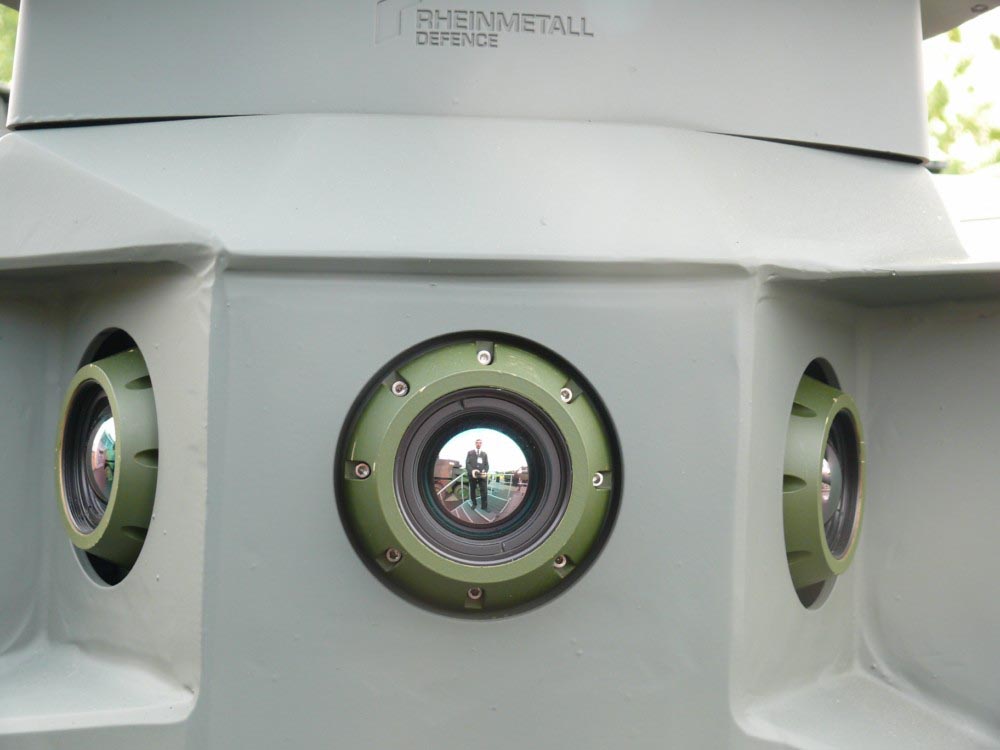
There are three sensors at each corner of the turret, requiring careful painting
The gunner's sight has a clear window, but there is nothing behind it. However, the right-side window is tinted black anyway. The sight doors can be modelled open or closed. The aerials could do with replacing with LW021B from Leopard Workshop.
The four ROSY launchers and hatches are added. The loader's hatch has different springs for open or closed positions - the nicest ones I've seen in plastic. The loader's periscope has a PE cover which can be bent to shape over a plastic former (part D21).
Now we come to the commander's sights. In Stage 25, we are shown two different sights, but the instructions don't say what they are. At the top of the instruction page is the 2012 version from the Jakarta show. At the bottom of the page is the version for Eurosatory 2010. The Eurosatory sight has quite a complex mount and details on the outside. For Jakarta 2012, the same basic sight was more covered in for protection and looks like quite a large and plain drum. The lenses for these sights are clear plastic. Unfortunately, there is nothing to put behind the windows so the insides of the drums should at least be painted black - or some lenses devised by the modeller. Once again, the left side window was tinted black anyway. As I mentioned, there is a third window which matches the later 2015 version.
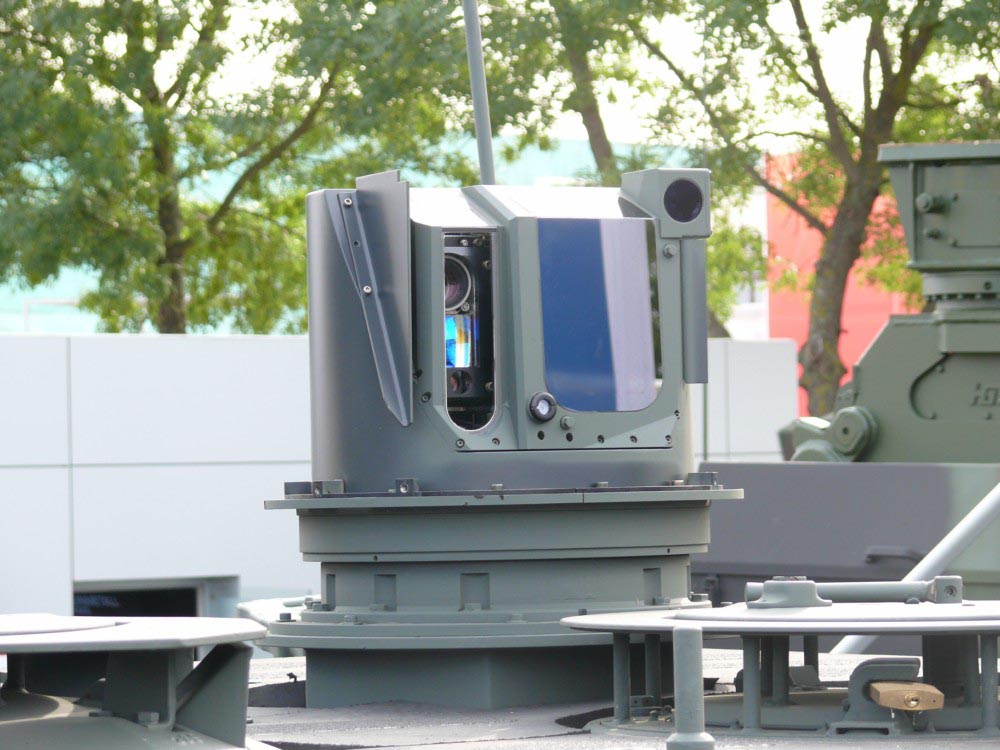
The Eurosatory 2010 commander's sight (Olivier Carneau photo)
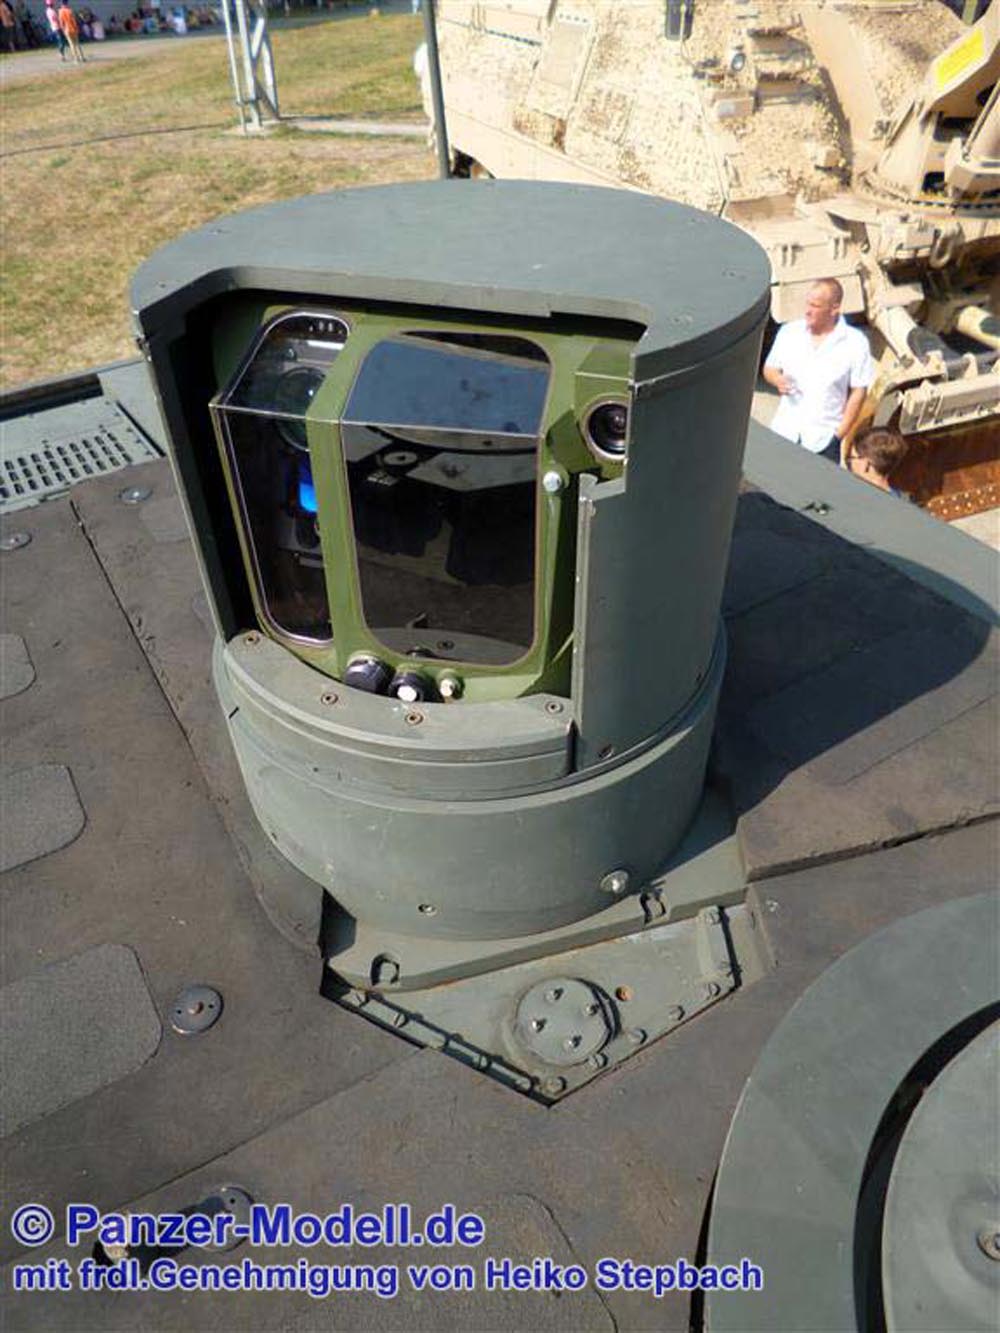
The Jakarta 2012 sight (with thanks to panzer-modell.de)
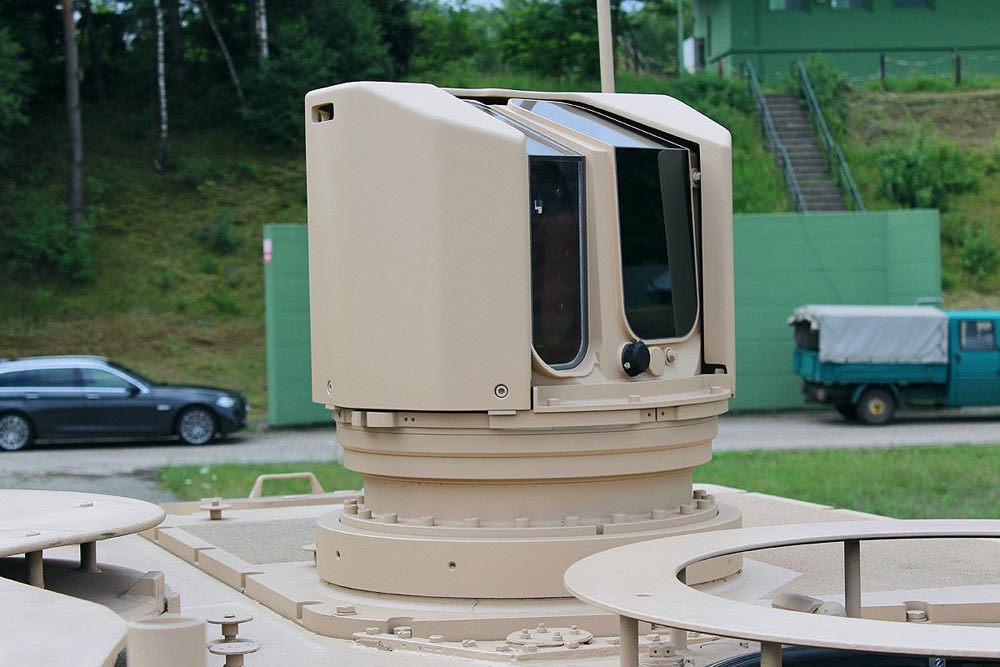
The later 2015 sight, the window for which is included on the clear sprue
The RWS is basically a .50 Calibre which is largely hidden away inside a fancy remotely-operated mount. On the side a camera is fitted. Again, this has clear lenses.
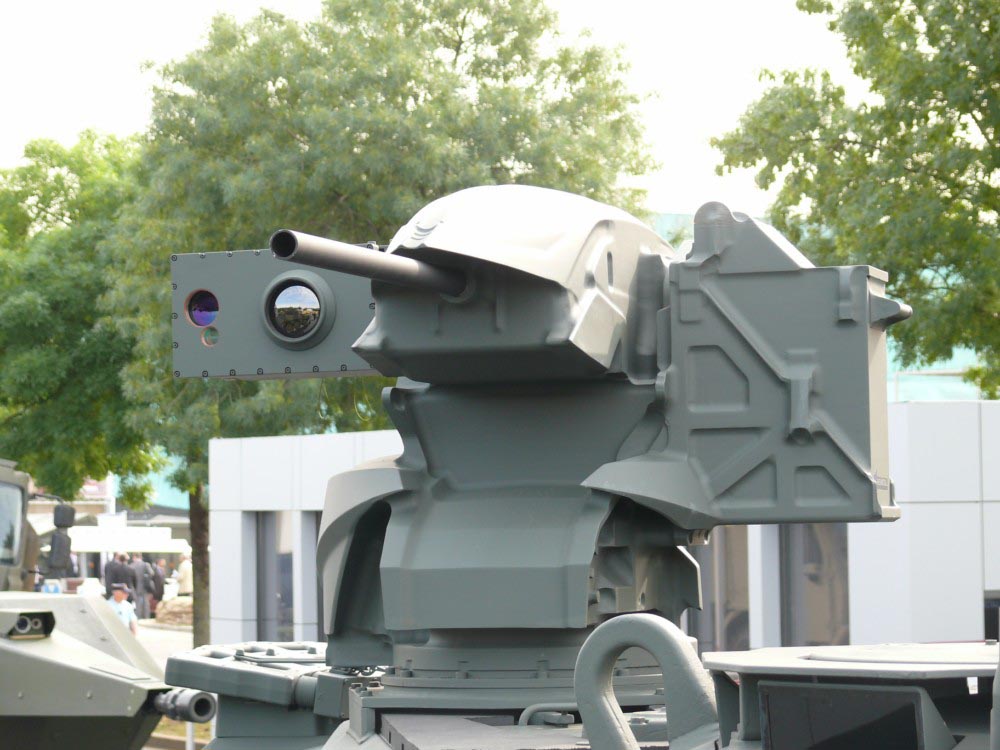
The remote weapon system as shown at Eurosatory 2010, but the gun has been substituted with a plain tube!
The final part of the turret construction is to attach the rear panel of covered slat and the PE grille over the air-conditioning unit.
What a superb kit. This has to one of the best Leopard kits on the market. The parts count is low (apart from the tracks), the quality is very high, and so is the attention to detail.
The only things against this kit is a lack of clarity in certain parts of the instructions, but only the rear lights, alternative commander's sights and wheel hubs. The size of the track end connectors is questionable. The gun is not really correct and the left slat panel has to be corrected.
If this is a sign of future, different Leopard models from Tiger Model, bring them on!! There is the definite possibility of another version to come. By the way, HobbyBoss Revolution seems to have failed as there has been no news whatsoever. The Tiger Model Revolution is definitely on,
Included in the text
© Leopard Club
![]() Contact us at leopardfibel@gmail.com
Contact us at leopardfibel@gmail.com